MulityLayered Flashcards
This web application allows users to study large amounts of information and to customize their study sessions. Users are able to add depth and context to their learning. MulityLayered Flashcards, as the name suggests is a flashcards learning application. MulityLayered Flashcards is set apart because rather than having just one item on the front and one item on the back, MulityLayered Flashcards allows the user to have more than two items of study and allows the user to choose which pieces of information they would like of the front and back of their flashcard. At the beginning of each study session they can select the options that they want on the front and on the back by using the Options Menu. There are multiple different data sets available for use. These study sets include Mandarin, Greek Alphabet, Hebrew Alphabet, Arabic Alphabet, Periodic Table, Animal Information, American Presidents, and Roman Emperor study sets. Experiments where run on a static version of this website and a version that loads the flashcards in using JavaScript. The static version of the website is much more efficient for user’s while the version that heavily relies on JavaScript is better for developers. Here is the link to the website: https://allegheny-college-comp-fall-2024.github.io/rebekahrudd-multilayered-flashcards-study-tool/index.html
Introduction
As humans, we encounter learning in many ways throughout life. Learning happens in classrooms, through lived experience and in other avenues. Learning begins with receiving knowledge. There are many different ways to remember, people have many study techniques. This article examines flashcards and adds to and improves this age old study technique. Using flashcards apply the concept of repetition. Repetition establishes and strengthens neural pathways that aid in learning [15]. Mammals learn through repetition, it is the wearing smooth of neural pathways in the brain [22]. When considering learning it is important to consider the extent of knowledge and the depth of knowledge as well [24]. Both the extent and depth of knowledge, changes as more time and effort is spent studying. Often what someone gets from a learning experience depends on how much effort and time they put into studying [14]. MulityLayered Flashcards is a web application tool meant to help extend memory longevity and increase the depth of knowledge when learning. This web application can be used inside the or outside the classroom as a tool for individual learning, or in a myriad of other ways. Beyond exploring what Multilayered flashcards does, it also consider the development history and the future uses of this web application tool.
Motivation
MulityLayered Flashcards expand people’s learning and increase it as well. Multilayered flashcards is an idea inspired by the desire to create a platform that increases the depth and breadth of learning. Rather than just learning a term and definition, Multilayered flashcards allows a user to add multiple levels and layers to what they are studying. This tool is applied to many areas of study. Though there are many topics of learning that MulityLayered Flashcards could be applied to. Another example for this web application is its relation to Chemistry with memorizing different aspects of the Periodic Table and attributes of the different elements. This tool is a major asset and it can be used for so much more than just chemistry or language learning. Without remembering vocab the language learner will never be able to speak or understand the information they are studying. In addition, there are many benefits that come from learning a second language [18], [30]. Mandarin Chinese was the original motivation for this tool before it expanded because there are many different aspects or layers of learning Mandarin for English speakers [19]. Besides Mandarin MulityLayered Flashcards is displayed on different language alphabets, science, history, and geography. Each of this different topics have a few sets in their area.The goal of these flashcards is to increase the learner’s depth of knowledge through memorization. Each study session is customizable.
The Final Product
This web application is largely focused around a study session. In order to start a study session a user first selects the set that they wish to study. Once they select the set they will then see all the cards in that set which will load onto the screen. The bottom and top of the screen will display an option for the user start. Once clicking the start button the website will bring the user to a page asking what they would like to study in their session, and gives the user the customizable options for what they would like on the front and back of their flashcards. Instead of having only one element on the front and the back the user will be able to select multiple elements for the front and the back, and change it for every study session however they would like. Next, they will again select the “start” button and the study session will start. This tool will have premade flashcards for a variety of different topics.
Memorization
We as humans have faulty memories. We are forgetful creatures. This is why in Arabic the word for human has the same root as the word for forget [46]. Memorization is an important part of learning and of even greater importance for language learning. Our native languages often feel easy but this is only because we have used the neural pathways for a long time. Those neural connections and pathways are formed by using them and they are strengthened through practice. “Practice makes perfect” or “practice makes better” as the sayings go and this is no different here. The goal is for learners to gain so many repetitions in their studies that the knowledge of different topics become “easy” or second nature to them [11]. Flashcards are a great way to do this. Learners can review topics over and over again. Flashcards also aid in a different way, they show the learner what areas they are still struggling in and thus need more attention and what areas they are more comfortable in. Flashcards thus help students spend their time more effectively, because it makes them aware of the areas that need more practice [14]. Flashcards will be considered more in depth in the Literature Review. The base of learning relates to memorization. Learning any topic has first to do with understanding an concept and then being able to remember it to recreate it and use that knowledge. There are many different tips and strategies in order to memorize different topics and information [24]. This web tool aides with the memorization of topics through repetition, specifically with flashcards. Next, the specifics of learning Chinese will be looked at because there are many aspects to be memorized to master the Mandarin language.
Goals of the Project
The goal of this project is to provide people with a self directed learning platform. This is not to take the place of classroom instruction but should be utilized in order to add and aid classroom learning. This is a web tool that teachers can recommend to their students in order to aid their memorization and to increase their learning. This web tool effectively works to add more context and depth to learning. In addition, the context and depth of any elements that is learned that has more than two categories. This tool can also be applied like a normal flashcard application, though this would just have the generic one element on the front and one element on the back and would not leverage the benefits this tool has to offer in designing a new study session with different combinations of information on the front and back of the flashcard. This platform is not designed to teach people the basics of each level of information of the flashcard. It is simply designed to display the information so that the learners can study it. It is not meant to educate the users on the card sections and how they related to each other. However, adding an education section on each card layer could be an idea to add in the future, in order to give the learners a page to learn about the different sections of each topic that they are memorizing. Though the expectation is that if the user is working to memorize the information they already have a general background in the topic, or will use other resources in order to study the topics further. This web tool also assumes that people will bring their own motivation for learning. Many learning web tools online work to make their web tools very stimulating in order to perform the functions of both attracting users to their web tools and keeping users. What people put into learning they will get out of it. This web application provides a platform for learning but the users must bring their own motivation. As a article about using the web application Skritter showed, when people used the web application to cram and not as a daily part of their learning it changed their learning and retention experience [49]. The same is true of this web tool. Many articles have another view on this, that the web application should provide the entertainment and the motivation [50]. Motivation can decrease or increase based on the web tools used. Sometimes this impact is suggested to be a fault of using online technologies for learning. Though using online technologies also bring many benefits [16].
State of the Art
There are many web tools present that aid people with learning through flashcards and specifically in language learning. And of course as more and more web tools become available online some have aided people in their efforts to learn and some that have actually negatively impacted people’s learning efforts [29]. Multilayered flashcards does not have adds and it does no work to gameify the tool so that users will be less distracted therefore minifying the negative effects. There are many web tools and techniques that can be used for teaching information in a classroom along with self-motivated study sessions and web applications [16]. The web tools being considered are largely web tools to study information generally and language and then language specifically [42]. These all fall under the category of self-motivated learning web tools, which MulityLayered Flashcards is too. For language learning generally, flashcards applications are considered [14]. The flashcards applications that will be discussed are Quizlet, Anki, and Anki App. The language learning platforms that will be considered are Duolingo, and three Mandarin specific tools: Skritter, Pleco, and HelloChinese. Multilayered flashcards is set apart from these other applications because of the way it adds depth to the flashcards.
Ethical Implications
With any work there are ethical implications to consider. Some ethical impacts to be considered with Multilayered flashcards are the location information is gathered from and possible data bias in language translation and culture loss, and different social imbalances with it pertains to access to learning and learning platforms.
Access to Technology
Whenever technology is part of the discussion there is the question of access and education about different web tools. In order to use a tool a person has to have access to electronics and then the internet. This will always be bias to consider with electronics. This exists with this project as well. In addition, the bias of access can be restricted based on where you live in the world. This issue was existent with other apps like Inkstone [39]. Inkstone is a app that is only accessible in certain areas of the world. It is not an app that is not accessible in the United States on the App Store or other software stores. In addition, when using technology, because the internet increases globalization and gives access for more of the world there is the topic of language and translation to consider. This website and web tool is written in English. Therefore, it will be accessible to English speakers and not accessible to people around the world who do not read and write English. These are two major biases that exist with this platform.
Information Gathering
There have been many datasets gathered for this project, most from different locations. For example, some data sets were gathered from different GitHub projects, others was on a website and then loaded into a different data format from the webpage. Other’s were copied and pasted without using the HTML from the website. Other data was scraped from PDFs and used in that way. The data has come from all different places. This means that it is important to consider the users privacy on both GitHub projects and people’s websites when taking data from these locations. Looking at Copyright standards and taking data only publicly available has been one ethical piece of consideration in this project.
Learner’s Age
One aspect that could be unfair about this project is the fact that there is often biased about a person’s age when learning language. There is an idea that it it is harder to learn languages as a person gets older. While different studies debate as to whether this may or may not be true, age should not stop someone from trying to learn a language [18]. There are also studies specifically done about online learning among adults [28]. The bias around age and language learning explains why there can be more of a barrier for older language learners to get started because as one ages language learning is said to get much more difficult. This fear of starting language learning because of one’s age can be a barrier for a lot of people and might hinder people’s interest in this website.
Technology Use in Language Learning
There are both benefits and drawbacks of using technology in language learning. Some studies have shown that when using technology to learn it can sometimes decrease motivation in studying [16], [38]. The article shows technology rich environments and uses surveys to gauge student’s motivation at the beginning and end of the study. However, there are also many benefits to using technology [49]. One major benefit for using technology in Mandarin learning is that there is less time and space needed when using online web tools to learn characters. As opposed with using paper to trace characters and write them over and over again which takes a much larger amount of space [27]. Learners also have access to their phones anywhere and so this increases the amount of time any given person can spend studying [27].
Language Learning Positives
Although there are different aspects of bias preventing people from using MulityLayered Flashcards there are benefits to this web tool that can help to correct bias as well. Language learning in general has many benefits [18], [19]. Some benefits are the access to other people and cultures without a translation barrier. It can increase communication. It can expand one’s perspective, cultural appreciation, and social awareness [30]. It can also help with memory retention and prevent memory loss [15]. There are many benefits to learning languages psychologically as well in other ways [15].
Mandarin Foundation Required
Because the idea for MulityLayered Flashcards is being displayed on Mandarin, if users would like to use these built in flashcards they must have a basic understanding of the requirements in learning Mandarin. As mentioned previously this tool is more worthwhile when paired with professional classroom teaching. As a result a learner will need to have access to basic Mandarin training in order to use this tool effectively. However, one area of future work is making a create mode. Once this is implemented MultiLayered Flashcards can be applied to any area of learning that a user desires.
Related work
This section goes into more depth about topics introduced previously. First it will consider general learning techniques and more self motivated learning techniques, like flashcards. Then this section will discuss each of the different flashcard sets for general language learning, language alphabets, science, and history more in depth and talk about the different layers in each of these sets. Finally, this chapter will take a look at the current state of the art and other web tools that exist.
Mandarin Language
The example of learning Mandarin Chinese was chosen to demonstrate this web tool because when learning how to write and speak Mandarin Chinese there are multiple layers that must be mastered in order to speak and write Mandarin. Many of these aspects are challenges specific to learning Mandarin that do not exist when learning other languages [50]. Mandarin is a hard language for English speakers to learn. Mandarin is a tonal language while English is not [23]. As a result of this difference it can be hard for English speakers to hear different tones that change the meaning of words with the same phonetics or pronunciation [19], [26]. Another aspect that can make Mandarin challenging is the writing system [28]. This is also another difference between Mandarin and English: the written version of Mandarin does not show the speaker how to pronounce different words [27]. So if a person is trying to learn the word for dog it requires more than just memorizing the word “perro” as is the translation to Spanish or “dog” as in English. The Mandarin pinyin letters for the Mandarin word dog are “g”, “o”, and “u” but it is written as: 狗. In language this symbol, 狗 is called an ideograph. Beyond just having ideograph symbols for writing, Mandarin is considered an ideo-phonographic-symbolic language [25]. “It has square-shaped characters, which are connected to syllables and tones” [27:5]. As clearly shown the character 狗 does not show the reader how to say it, whereas the word “perro” or “dog” shows the reader how to say the word. Beyond being able to read a character a person must also learn how to write it. Each character has a specific order that every line is written in and this is called stroke order.
As shown above, pinyin letters only tell a person one part of how to say the word. Mandarin is a tonal language, which means in order to correctly say the word, one must know which of the four/five tones to say –sometimes people count the non tonal words as a fifth tone [19], [50]. In for example, the word “gou” has a third tone. Then, after knowing both the letters, which help pronunciation for those with a native language that has an alphabet, and knowing the tone comes learning how to communicate through written language. Mandarin uses Chinese characters. There are many different ways of learning and studying Mandarin Chinese characters [48]. Writing characters are an essential part of maintaining Mandarin history and respecting the culture when learning how to write [27]. As people write characters faster and faster Having the correct stroke order becomes essential in recognizing a character. Both pinyin for Mandarin as a second language learner, tone and stroke order of the characters are all essential parts and pieces to learn Mandarin Chinese.
The Flashcard
Each flashcard for Mandarin is set up with four layers. There is the english meaning, the pinyin and tone, the simplified character and the traditional character. The English meaning contains one or two meanings that the word translates to. The pinyin and tone which contains the pronunciation and the tone of the word. The simplified character shows how the character is written and the traditional character shows how the traditional characters are written. When the simplified character and the traditional character are written the same the traditional character layer simply states “Same as simplified character”. What is displayed when the simplified and traditional characters are the same can easily be changed when prepping the data that is displayed. For example, it could simply have “None” or display the character even if it is the same as the simplified character.
The Data
The data for the flashcards has come from Hanyu Shuiping Kaoshi, otherwise known as HSK. HSK is a test for non-native Mandarin speakers in order to test their Mandarin Chinese knowledge. The cards created have been divided based on HSK levels 1-4. The cards sets are organized in English alphabetical order based on the Pinyin Pronunciation. Although there are six levels of HSK only four have been prepared as sets. The data from these sets comes from a GitHub project called Inkstone [39]. Inkstone is an app that works with a user practicing stroke order.
However, there are also other ways that this platform can be demonstrated. Each of the these sections and the required information to understand the different layers of each of these flashcard sets are explored and explained below.
Language Alphabets
Language Alphabets with different scripts is another phenomenal way to implement MultiLayered Flashcards. This is because once there is a different script beyond the Latin script for an alphabet this adds another layer of knowledge necessary to master the given alphabet. Rather than just the letter and pronunciation there is the letter, pronunciation, and how to write the letter. Elements like the letter name and order in the alphabet can also be added. The two alphabets considered in this project are Ancient Greek and Ancient Hebrew. These two data
Greek Alphabet
The Ancient Greek (and modern Greek) alphabets are written in a different script from the Latin Script. In this data set there are seven different layers. The layers considered are the number position in the alphabet, the uppercase letter, the lower case letter, the Greek name for the letter, the English name for the letter, the sound the letter makes in English and how the sound is pronounced. This also shows how even alphabets with the same script could have multiple inputs once adding the number position in the alphabet, the upper case letter, the lower case letter, and how the letter is called. Different scripts for the same letter could even be added so that the user has a better understanding of what the letter might look like in different fonts. For example, with English this might mean adding a cursive script or something similar.
The inspiration for the Ancient Greek came from a website called Carddia which has different physical flashcard sets that carry multiple levels of information [36]. This is very similar to my project except my project has its flashcards online. This website gives free PDFs after signing up for an account. Then a PDF to text converter was used in order to extract the text information from the PDF [35]. Then manual preparation of the data was done before using a converter file to change the .txt file into a JSON file with the text that was needed.
Hebrew Alphabet
The Hebrew Alphabet also contains seven layers though the layers have different categories. The categories are alphabet order, the Paleo Hebrew letter, modern Hebrew letter, the letter name, the transliteration, pronunciation, and numeric value. Paleo Hebrew is simply referring to Ancient Hebrew as opposed to modern Hebrew which is used conversationally around the world today. Most alphabets have the transliteration which is just the letter in Latin script that most closely matches the sound pronunciation of another script. This is hard because there are some letters that do not translate though they can still be transliterated using more than one Latin script character in order to differentiate the letter and the sound. The data for the Hebrew Alphabet also came from Cardia and was extracted using the same PDF text extraction website as above.
Arabic Alphabet
This Arabic flashcard set has 28 letters, though there are more flashcards once all the different vowels and consonant sounds have been considered. While the Arabic alphabet script differs from English, so do how letters are connected and how words are formed. For example, in Arabic script a letter appears differently based on whether that letter is written at the beginning, middle or end of a word. Another element of Arabic that makes it different than English is the fact that there is a one for one letter pronunciation. This means that the sound of a letter does not change based on what is around it, which is not often the case in English. The sound a letter makes in English often changes based on the letter around it. For example, the letter “e” in “read” and “red” make two different sounds. This would not happen in Arabic. There are three vowels in the Arabic language. Two of these vowels the Yee and the Waw can also take the shape of a consonant. Based on the vowel markings of the word a reader is able to determine when the “Yaa” and “Waw” are vowels or consonants. In Arabic there are short vowels and long vowels. All three vowels have a short and a long version. The long version of the vowels are part of the main structure of the word while the short vowels are indicated by markings above the word or below the word. These vowel markers resemble accent markers which are used in languages like Spanish and French, among many. The vowel sounds are the “oo” sound, the “aa” sound, and the “ee” sound. These were annotated with double vowels which are representative of the long vowels while the short vowels are normally just one letter. The resources for this project are a document with information about the Arabic Language from the Library of Congress [17]. There are six layers in the Arabic flashcards. These layers are the letter shape at the beginning, middle, end, and alone, in addition to the letter sound and the name of the letter.
Science
The two areas of science that MultiLayered Flashcards has been demonstrated on are Chemistry and Biology. The Chemistry set specifically focuses on all the elements in the Periodic Table. While, the Biology set looks at a group of animals and stores different information about them.
Chemistry
The Periodic Table has 118 elements which means that there are 118 flashcards in this set. The data from these sets are from two different places. The user has the options to study with only the data from Wikipedia page with the complete list of elements [31]. The other resource is data from a CSV file in a GitHub account called “GoodmanSciences” [21]. The list from Wikipedia has 15 different categories.
These are the 15 different layers of information from the Wikipedia data set [31].
- Element Number, Symbol, and Name
Each element in the Periodic Table has a number that is specific to that element, it also helps to organize the location of the element on the table though there are other factors that determine the elements position on the table. The symbol of each element is just a shortened version of the element’s name. For example, the first element in the Periodic Table is Hydrogen, which is the element name. The symbol is “H” and the number is 1.
- Group, Period and Block
Groups are also known as families. Groups or families are the columns in the Periodic Table. The group relates to each other because they have the same characteristics. There are 18 groups however the green rows are not counted.
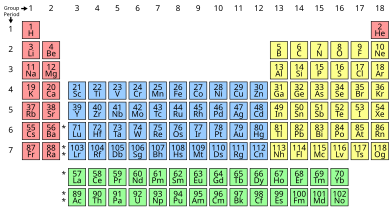 [47]
[47]
| Group Number | Group Name [40] |
|---|---|
| 1 | Alkali Metals/Lithium |
| 2 | Alkaline Earth Metals/Beryllium |
| 3 | Scandium |
| 4 | Titanium |
| 5 | Vanadium |
| 6 | Chromium |
| 7 | Manganese |
| 8 | Iron |
| 9 | Cobalt |
| 10 | Nickel |
| 11 | Copper |
| 12 | Zinc |
| 13 | Boron |
| 14 | Carbonyl |
| 15 | Pnictogens/Nitrogen |
| 16 | Chalcogens/Oxygen |
| 17 | Halogens/Fluorine |
| 18 | Helium/Neon |
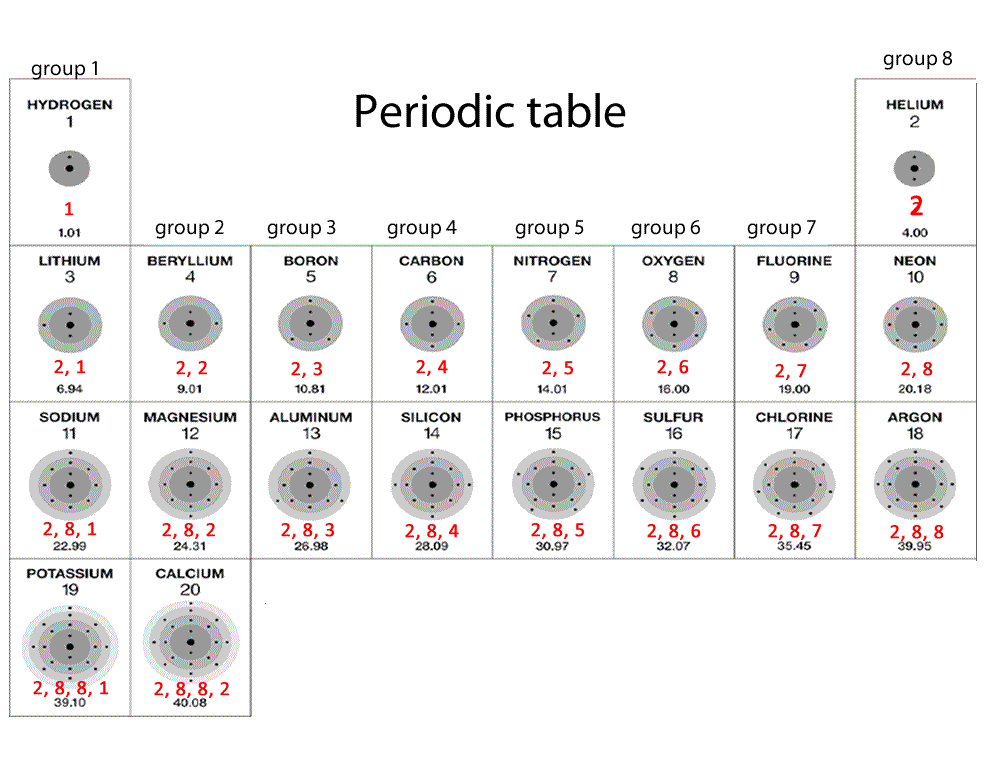
- Period
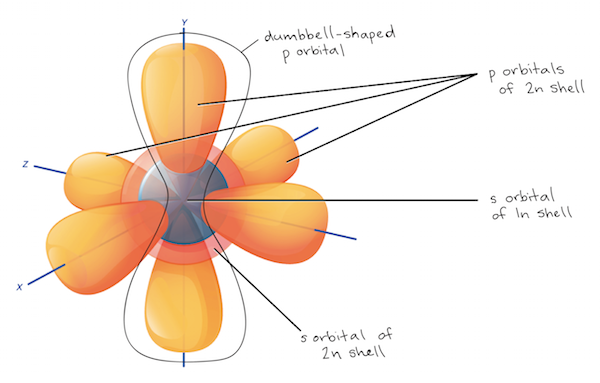
Periods are the horizontal rows in the Periodic Table. The Periodic Table has seven periods. The periods are organized based on their outer electron shell. For example, the first period only has two elements Hydrogen and Helium. These elements’ largest shell is the 1s subshell. Hydrogen has one electron while Helium has two electrons on the 1s shell. The 1s subshell one fits two electrons. The s subshell has only one orbital. The p subshell has 3 orbitals. The d subshell has 5 orbitals, and the f subshell has 7 orbitals.
- A. Period
- B. Number of Elements in the Period
- C. Sublevels in the Order they Fill
| A | B | C |
|---|---|---|
| 1 | 2 | 1s |
| 2 | 8 | 2s 2p |
| 3 | 8 | 3s 3p |
| 4 | 18 | 4s 3d 4p |
| 5 | 18 | 5s 4d 5p |
| 6 | 32 | 6s 4f 5d 6p |
| 7 | 32 | 7s 5f 6d 7s |
[10]
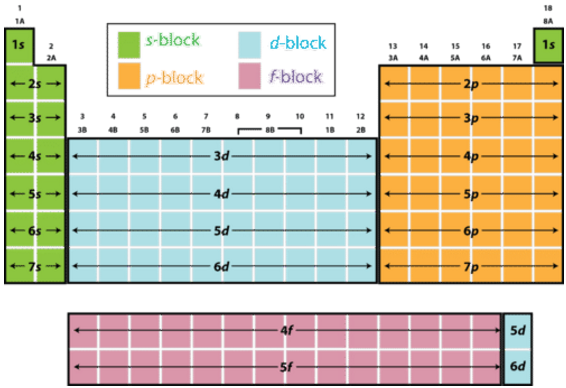
- Block
The blocks show which level each element fills the highest sublevel of. For example all the alkali metals and alkali earth metals are in the s-block. This can be seen in the figure below [33].
- Atomic Weight
Atomic weight is measure relatively to the amount the element is found on the earth. Different isotopes, meaning elements with the same number of protons but different numbers of neutrons in their nuclei, weight different amounts. The average is found by measuring all the isotopes that exist. For example the weight of Copper Isotope 63 is 62.929 and copper isotope 65 is 64.927 and isotope 63 makes up 69% of the Copper found on earth while isotope 65 makes up the other 31%. However atomic weight should not be confused with atomic mass. Atomic weight is the average weight of all the atom’s isotopes as explained above, while atomic mass is the mass of a single atom. The unit of measure is in Daltons.
- Density
Density has to do with mass per unit of volume. Density can be measured in relation to an atom’s nucleus or in consideration of the entire atom. This unit is measured in gram/cm^3.
- Melting Point, Boiling Point, Specific Heat Capacity
Melting point is the temperature when the atom changes from a solid to a liquid and this is measured in Kelvin. Boiling point is when an element changes from a liquid to a vapor and this is also measured in Kelvin. Specific heat capacity has to do with the amount of heat that that needs to be added to the mass in an atom in order for the heat of the entire element to move up one unit of temperature. Specific heat capacity is measured in Joules per kilogram per Kelvin. Joules are a unit of energy measurement.
- Electronegativity
When elements form bonds with each other what often is happening is that the electrons in the outer valence shells are moving from one element to another. Some elements have a stronger pull on these electrons than other elements. The measurement of the strength of an elements pull is called electronegativity. Electronegativity is measured on the Pauling scale. This scale ranges from 0.70 to 3.98. For the most part electronegativity increases across the Periodic Table in a direction from bottom left to top right.
- Abundance in the Earth’s Crust
Abundance in the earth’s crust is simply the estimated measure of the element as it appears in the earth’s crust. This layer of the flashcard is measured in mg/kg which stands for milligrams per kilogram.
- Origin
The origin has to do with how an element is found on the earth. For example, there are 24 elements in the Periodic Table that are not found on earth but are created. These are called the synthetic elements. Elements found naturally on earth are called primordial. There are also elements found only from decay, which means that these elements are only found when other isotopes of elements decay radioactively. An isotopes decay has to do with its radioactive lifespan. Which is one reason we have carbon dating.
- Phase
The final category has to do with phase. The phase refers to whether an element is found in its solid, liquid, or gas state. Some elements are found in different phases. Those most commonly an element phase is a solid or an unknown.
The second data set contains most of the same information except for five categories which Wikipedia has and the CSV file does not have, which are block, atomic weight, specific heat capacity, abundance in the earth’s crust and origin. This other data comes from a CSV file that is attached to a GitHub project [21].
- Atomic Mass
Atomic mass, which, as mentioned above, has to do with the weight of a single atom.
- Neutrons, Protons, and Electrons
Protons and neutrons are the pieces of an elements that make up the nucleus of an atom. The protons are positively charged while the electrons are negatively charged. The electrons orbit the nucleus. There are different methods of explaining the number of electrons. The most common way is that of the Bohr method was discovered in 1913 by a Danish scientist called Niels Bohr. However, though this method is simple and easy to understand it does a bad job of conveying the different orbital patterns of s, p, d and f. It also poorly conveys how electrons move. The Bohr models would lead one to assume that the electrons only move in a circle while the different orbital levels actually move in a certain shape. In addition, these electrons do not take about a fixed space rather because of their speed often only a percentage of them can be found in the orbital paths at one time.
- Radioactive, Natural, Metal, Nonmetal, and Metalloid
If an element falls into one of these categories then that layer of the flashcard says “yes” otherwise it just says “None”.
- Type
Type indicates whether the element is a metal, nonmetal, metalloids or a noble gas.
- Atomic Radius
The atomic radius has to do with the size of the atom from its radius to its outermost edge. This measures the greatest distance at which electrons are most likely to be found, because as mentioned previously they do not have fixed positions. The atomic radius is measured in picometers (pm).
- First Ionization
The first ionization has to do with measuring the amount of energy that is required to move an electron from a neutral atom into its gas phase. First ionization is measured in kilojoules per mole (kJ/mol).
- Isotopes
Isotopes where mentioned and explained above when talking about atomic mass. An atom often has different isotopes which have the same number of protons and is there for the same element and has the same atomic number but different isotopes have different numbers of neutrons.
- Discoverer, Year
The discoverer and year tell who discovered the element and when.
- Number of shells
The number of shells is the same as the energy levels of an atom. Each shell has a certain number of electrons that it can hold. For example, n=1 can only hold 2 electrons. n=2 can hold up to 8 electrons. The number of electrons that a shell can hold can be calculated using the formula 2n^2 where n is the shell number.
- Valence Electrons
Finally, the valence electrons has to do with the number of electrons that are found on the outer shell of an atom. All the elements in the first group, which are the columns, have only one valence electron. While group 2 has two valence electrons. Groups 3 through 12 are the metalloids so their valence electrons are not as stable. Group 13 through 18’s valence electrons can be counted by a single digit number. For example group 13 has 3 valence electrons, group 14 have four valence electrons and so on [20].
These two study sets have been distinguished with different buttons on the Chemistry study set page. The user has the options of using the Wikipedia set, the CSV set or a combination of both study sets.
Biology
The animal data set gives in depth information about different animals. While there are over 2.1 million different species of animals in the world This data set works to take a small but diverse sampling of different animals. This flashcard set has 16 layers for 196 different animals. The data for this file was gotten from an “Animal Information Dataset Exploring the Fauna: An In-Depth Animal Information Repository” by Sourav Banerjee [13]. Banerjee gathered his data using many different sources.
The 16 different layers are:
Animal Name
Height in cm
Weight in kg
Color: Color refers to common colors associated with the animal’s appearance
Lifespan in years
Diet: explains whether an animal is a carnivore or herbivore or an animal of another dietary type.
Habitat
Predators
Average Speed in km/h
Countries Found In
Conservation Status
Family: Family has to do with the other animals in a similar group as it. *
Gestation Period in days: Gestation period refers to the number of days between conception and the birth of the baby animal before being birthed.
Top Speed in km/h
Social Structure
Offspring per Birth
*= Family’s can range many different animal types. For example animals in the cat family could range from lions and tigers to house cats. Within each family there are multiple genre and within each genus there are different types of species. In total there are actually seven different levels of classification that zoologists consider. These seven levels of classification are domain, kingdom, phylum, class, order, family, genus, and species in that order. Family is one of the levels of classification.
History
In this section MultiLayered Flashcards is applied to studying different historical topics. The two topics of history considered are American Presidents and Roman Emperors.
American Presidents
For US Presidents there are four layers to the flashcard. These layers are the President’s name, the years that they were in office, the number President that they were, and the party that they were associated with. The data for this flashcard set is from a Github project called Dataset-List by Awhstin [12]. This GitHub project contains many other data sets beyond just information about the US Presidents. However, most of the other data is not well suited for this project because it just presents Census data and other information which is not necessarily helpful to spend time learning and memorizing all of those numbers.
The other data from a GitHub Repository by Namuol contains information about their home state, in addition to the specific date of when they took office and when they left office [32]. These categories have also been added to the dataset.
Roman Emperors
The flashcard set for Roman Emperors came originally as an idea from Carddia, however the data information came from a GitHub project called “emperors” by the user “zonination”. This flashcard set contains 15 different layers of information.
- Index: The order that this Emperor reigned.
- Name: This is the name that the Emperor was known by.
- Full Name
- Date of birth
- Date of death
- City of Birth
- Province of Birth
- Rise: This is their reason for their rise to power, like birthright or seized power, etc.
- Reign Start Date
- Reign End Date
- Cause of Death
- Killer
- Dynasty
- Era
- Notes
The data for this information was gathered from a Wikipedia page called “List of Roman Emperors”. There are some conflicts on different pieces of information such as birth dates, death dates, rise, reign start, reign end, causes of death, etc. The GitHub page shows links to different locations to look into some of the discrepancies and to read up more on different topics [51].
Competitors
There are many web tools that exist to help self-motivated learners conquer and overcome many of the challenges of learning in their respective areas of study. There are two main areas of focus, the latest in language learning tools and in self studying tools, namely flashcards. The current technologies this article considers fall under two categories: general learning platforms that use flashcards, and specific language learning platforms. Though MultiLayered Flashcards expands to many different areas of study beyond flashcard learning, both these platforms are being considered because MultiLayered Flashcards stands at the intersection of both self motivated flashcard studying and language learning, along with other subjects. The platforms discussed are Quizlet, Anki, and AnkiApp for well known and widely used flashcard platforms. In addition to Duolingo, Skritter, Pleco, and HelloChinese which are under discussion for the language learning side.
Online Flashcard Platforms
The general flashcard learning platforms have a few major differences between each other and MultiLayered Flashcards. Some differences that are noticeable are the entertainment piece of many tools and the reality that most tools save and track a user’s progress. In addition to being able to study many topics, which comes with the ability to create and store information. One aspect that sets my tool apart is the user’s ability to save multiple pieces of information as one card but separate piece of information. his makes the cards more accessible and gives a user more control over what they want to study. My tool also allows the user to move back and forth between cards. Many flashcard options do not allow the user to return to a previous flashcard once it has been passed. Some similarities in these flashcard programs are some of the more generic flashcard options like have a front and back in a study session and having flip buttons. In addition, there is often a count to see how many cards are left or to exit a study session.
- Entertainment / Gamification
- Tracking and saving progress
- Number of topics for study
- Creating your own study sets
- Multiple values in one card
- Going back to visit old card
- Control over a study session
- Moving forward to new cards
- Front and back of a card ?
- Flip buttons
- Exiting a study session
- Mobile phone access
- Online Internet Access
| MultiLayered Flashcards | Quizlet | Anki | AnkiApp | |
|---|---|---|---|---|
| 1. | X | \(\checkmark\) | X | X |
| 2. | X | \(\checkmark\) | \(\checkmark\) | \(\checkmark\) |
| 3. | X | \(\checkmark\) | \(\checkmark\) | \(\checkmark\) |
| 4. | X | \(\checkmark\) | \(\checkmark\) | \(\checkmark\) |
| 5. | \(\checkmark\) | X | X | X |
| 6. | \(\checkmark\) | X | X | X |
| 7. | \(\checkmark\) | \(\checkmark\) | \(\checkmark\) | \(\checkmark\) |
| 8. | \(\checkmark\) | \(\checkmark\) | \(\checkmark\) | \(\checkmark\) |
| 9. | \(\checkmark\) | \(\checkmark\) | \(\checkmark\) | \(\checkmark\) |
| 10. | \(\checkmark\) | \(\checkmark\) | \(\checkmark\) | \(\checkmark\) |
| 11. | \(\checkmark\) | \(\checkmark\) | \(\checkmark\) | \(\checkmark\) |
| 12. | \(\checkmark\) | \(\checkmark\) | \(\checkmark\) | \(\checkmark\) |
| 13. | \(\checkmark\) | \(\checkmark\) | \(\checkmark\) | \(\checkmark\) |
Quizlet
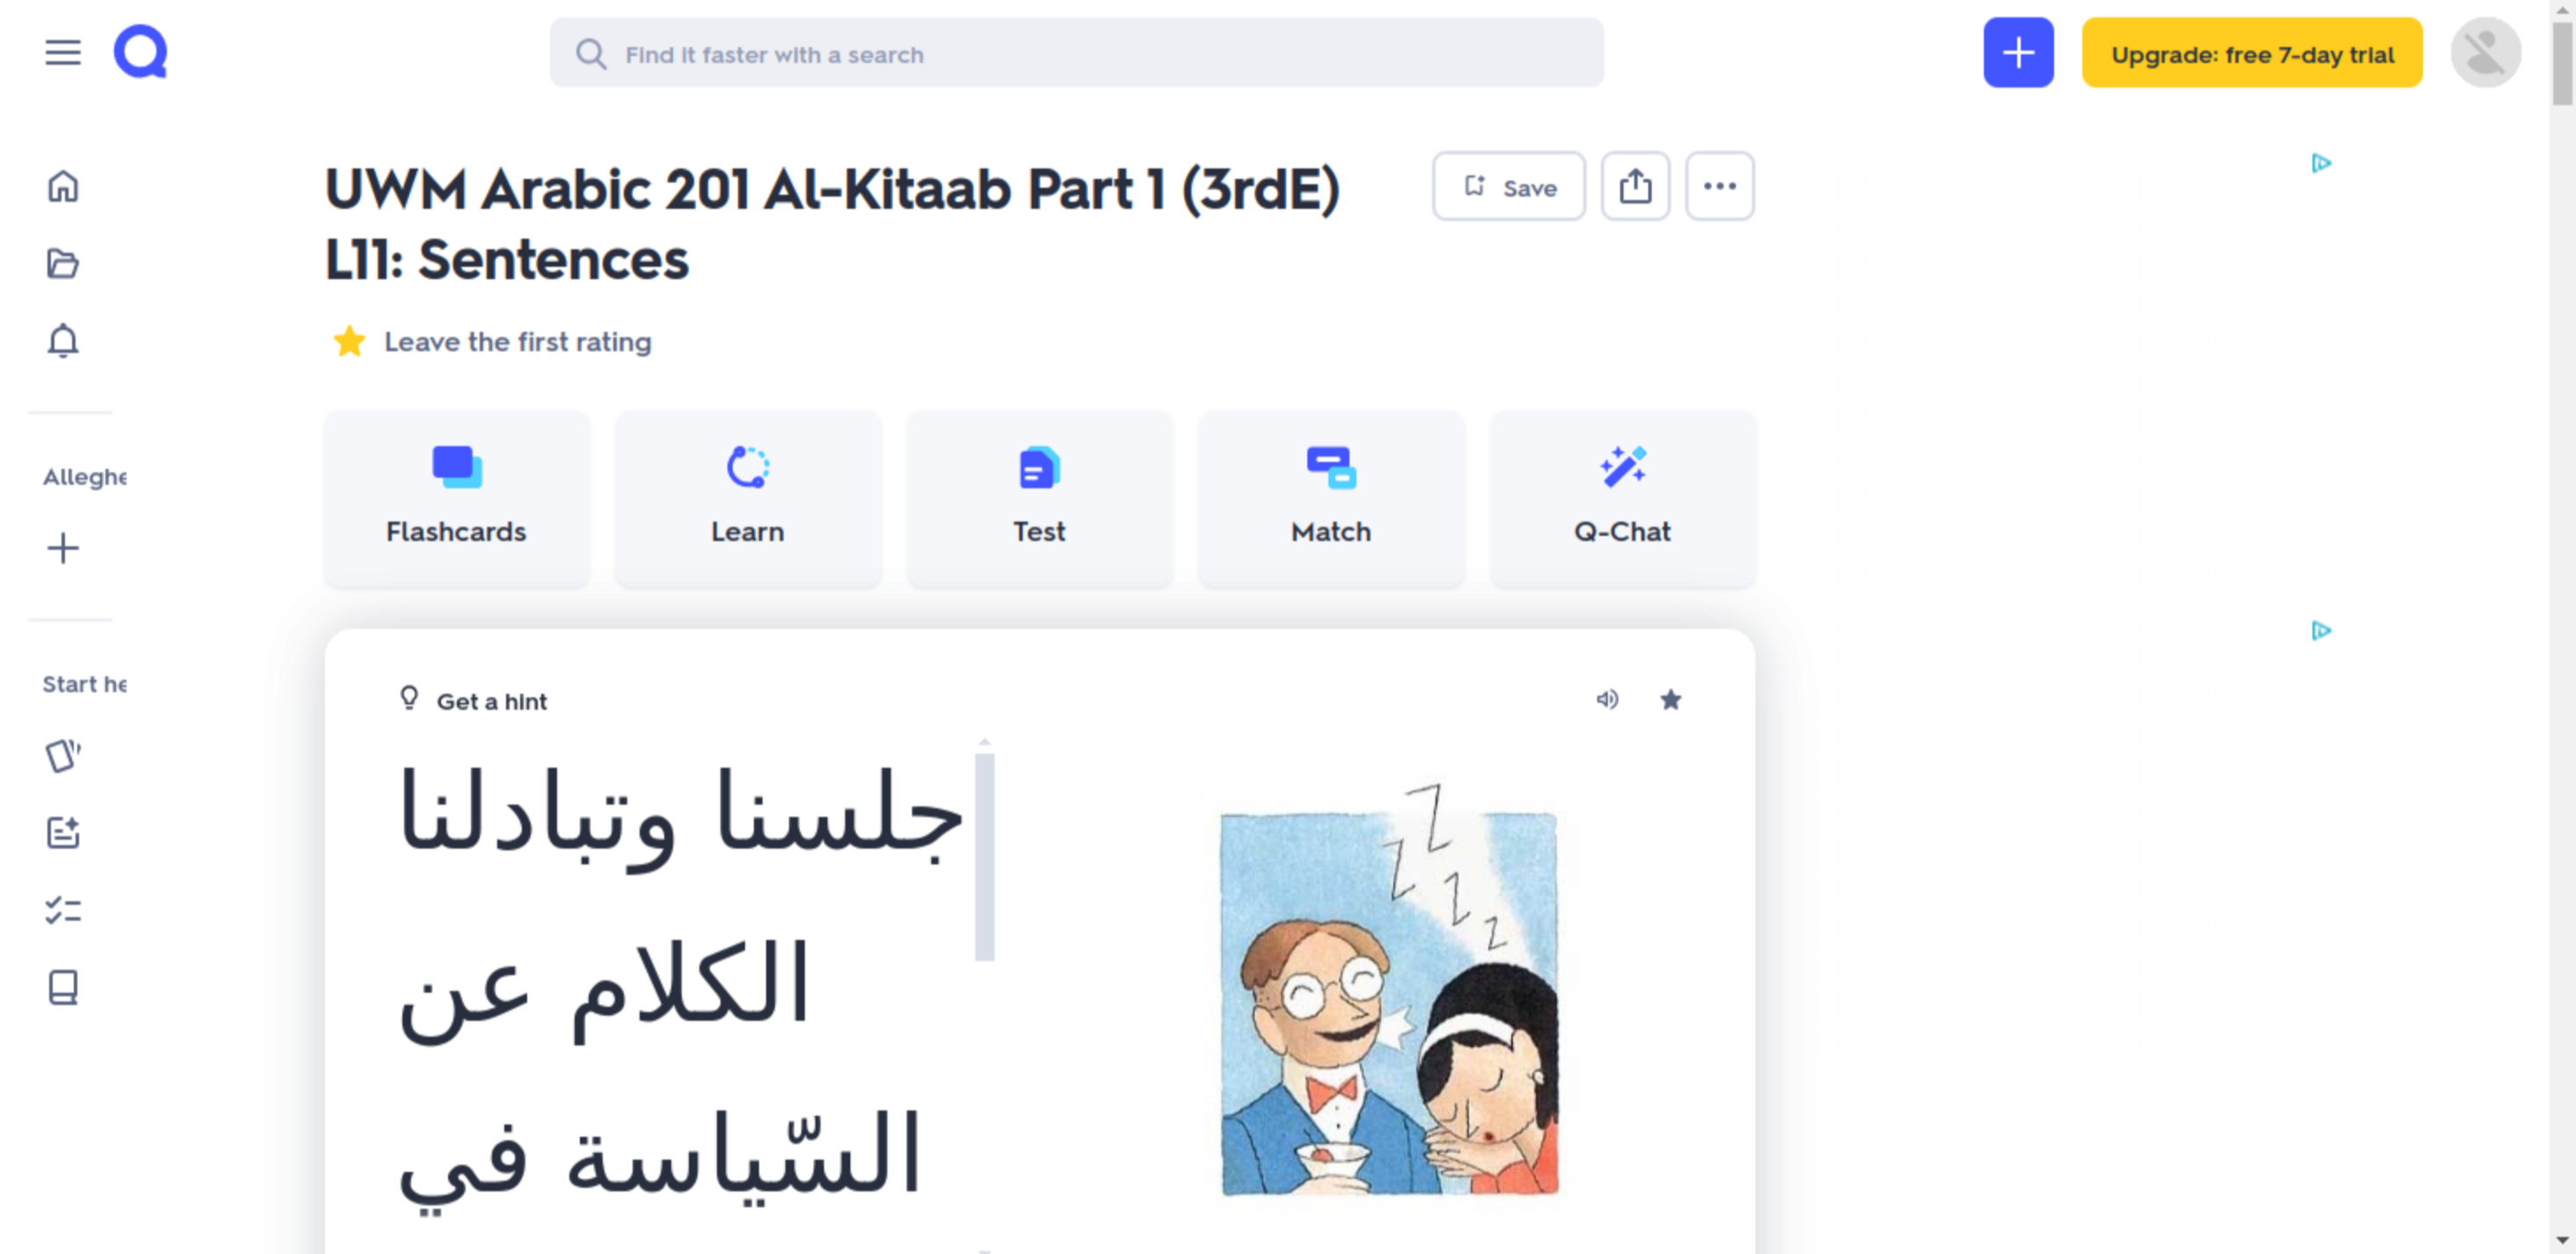
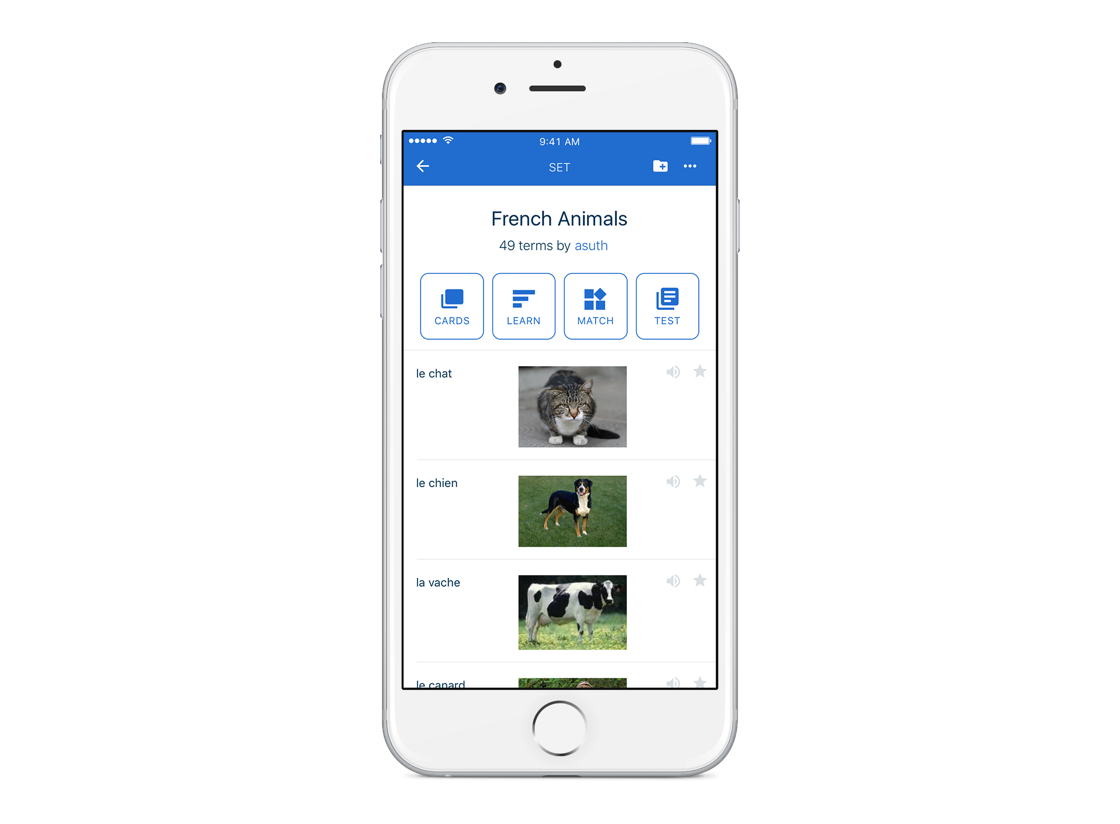
Quizlet is an online platform with both a smart phone app and an online web computer platform for flashcards. Though Quizlet offers other tools beyond just flashcards. Quizlet has flashcards, a learn method, a test method, a match method and its own AI to aid in learning options. In their flashcard study session there is a hint mode in addition to an option to shuffle the cards and an option to play the cards which automatically iterates through the cards. The different modes, beyond just flashcards, help the user grow their knowledge but in different ways.
Anki
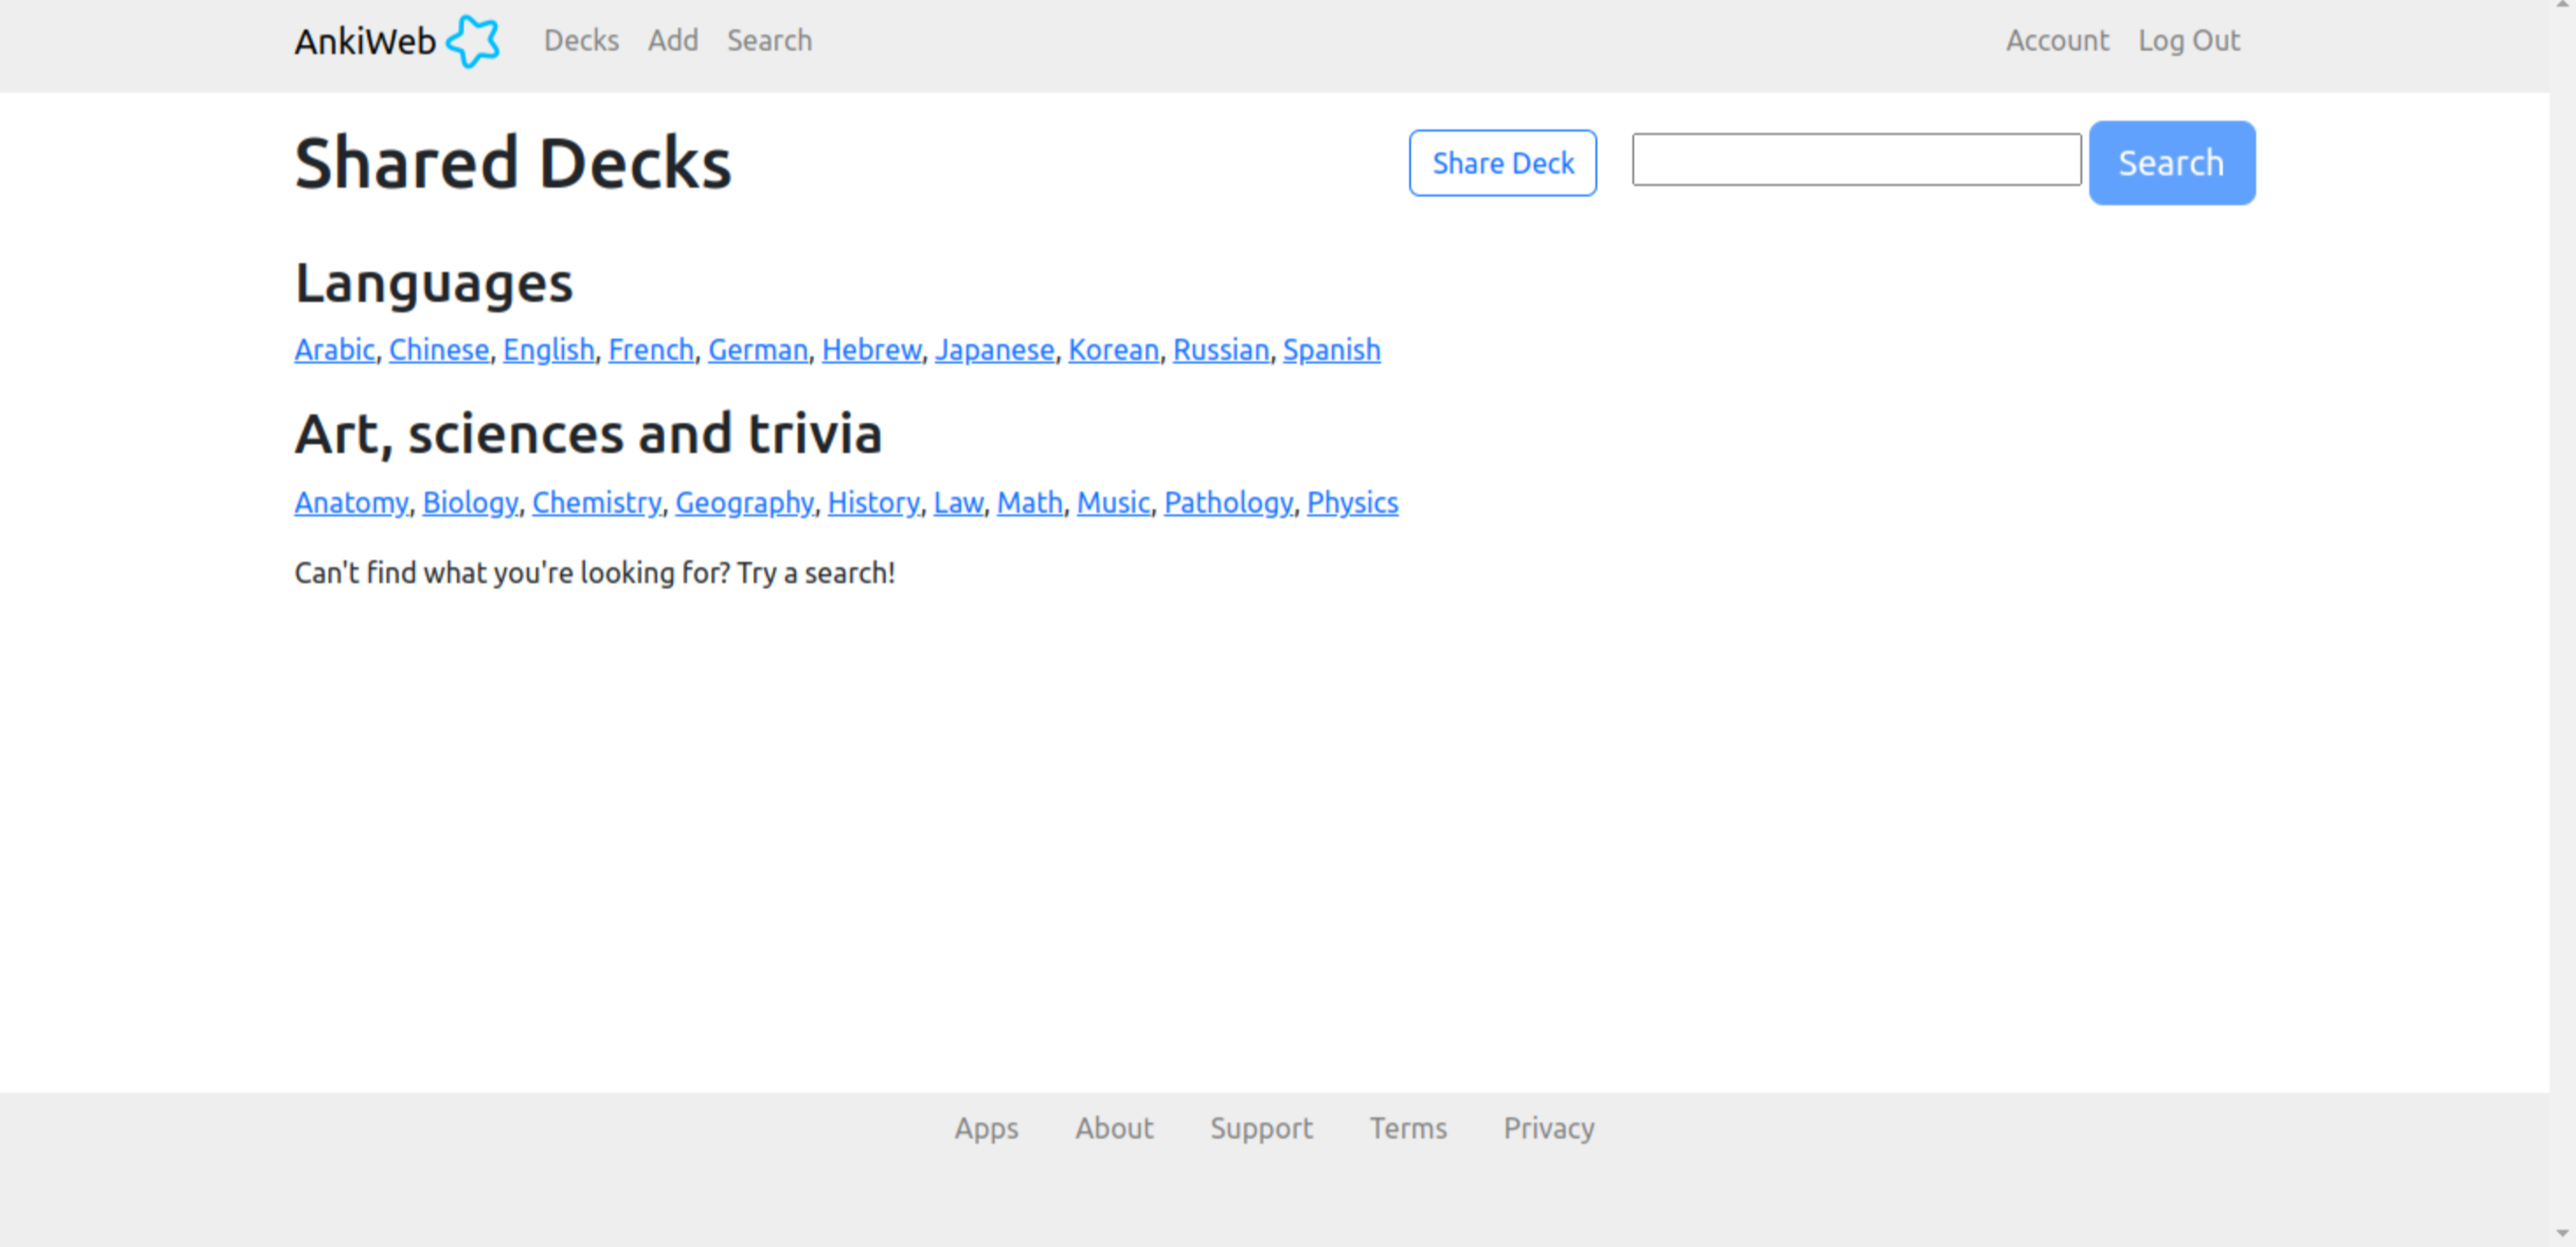
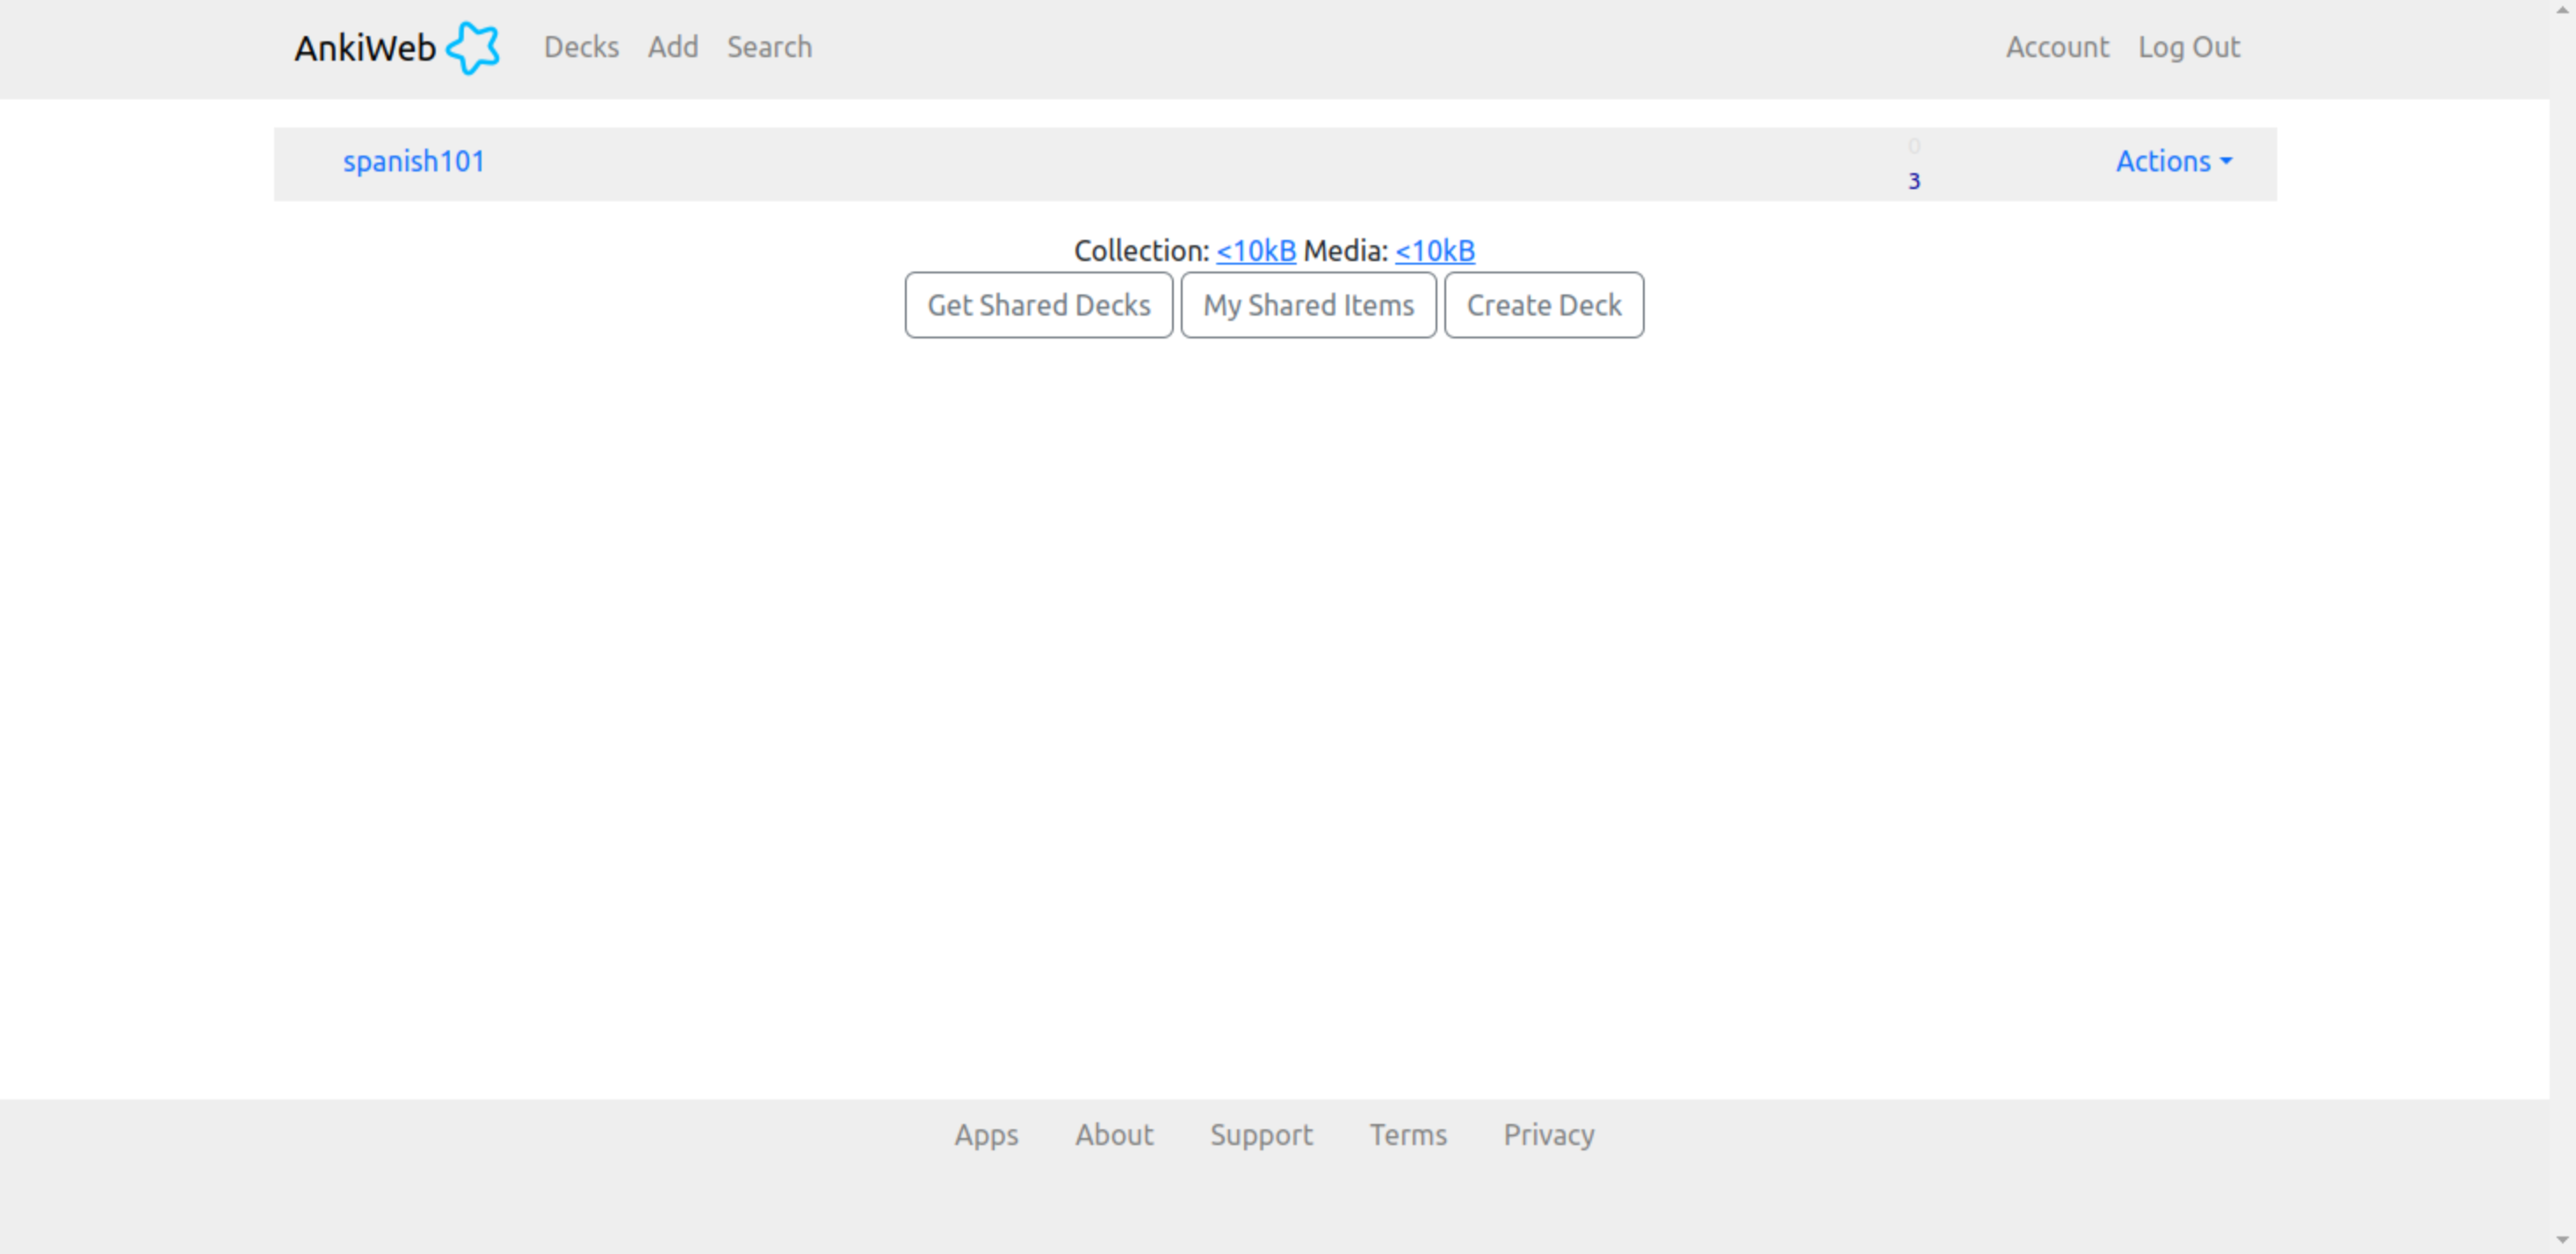
Anki is another flashcard app. Anki stands out because it utilizes a study concept called spaced repetition. Spaced repetition spreads out learning over time so that a person is able to remember concepts better in the long run. Space repetition attempts to convert learning into long term memory faster. This platform can be used on an app on a computer or on a phone. Many different topics can be studied on Anki from languages to sciences and from history to math. When a user clicks on a set it immediately starts the study session. During a study session, once the user flips over the card and then selects how hard or easy it was. After selecting the difficult Anki determines how many minutes later that same card reappears in the study session. If the card was hard it will appear again more quickly in attempt to strengthen the users knowledge in the area that they are struggling. If a card is easier it might be a while before it reappears again, or it might not reappear again at all. In addition, during a study session there is a number countdown to show how many cards there are.

AnkiApp
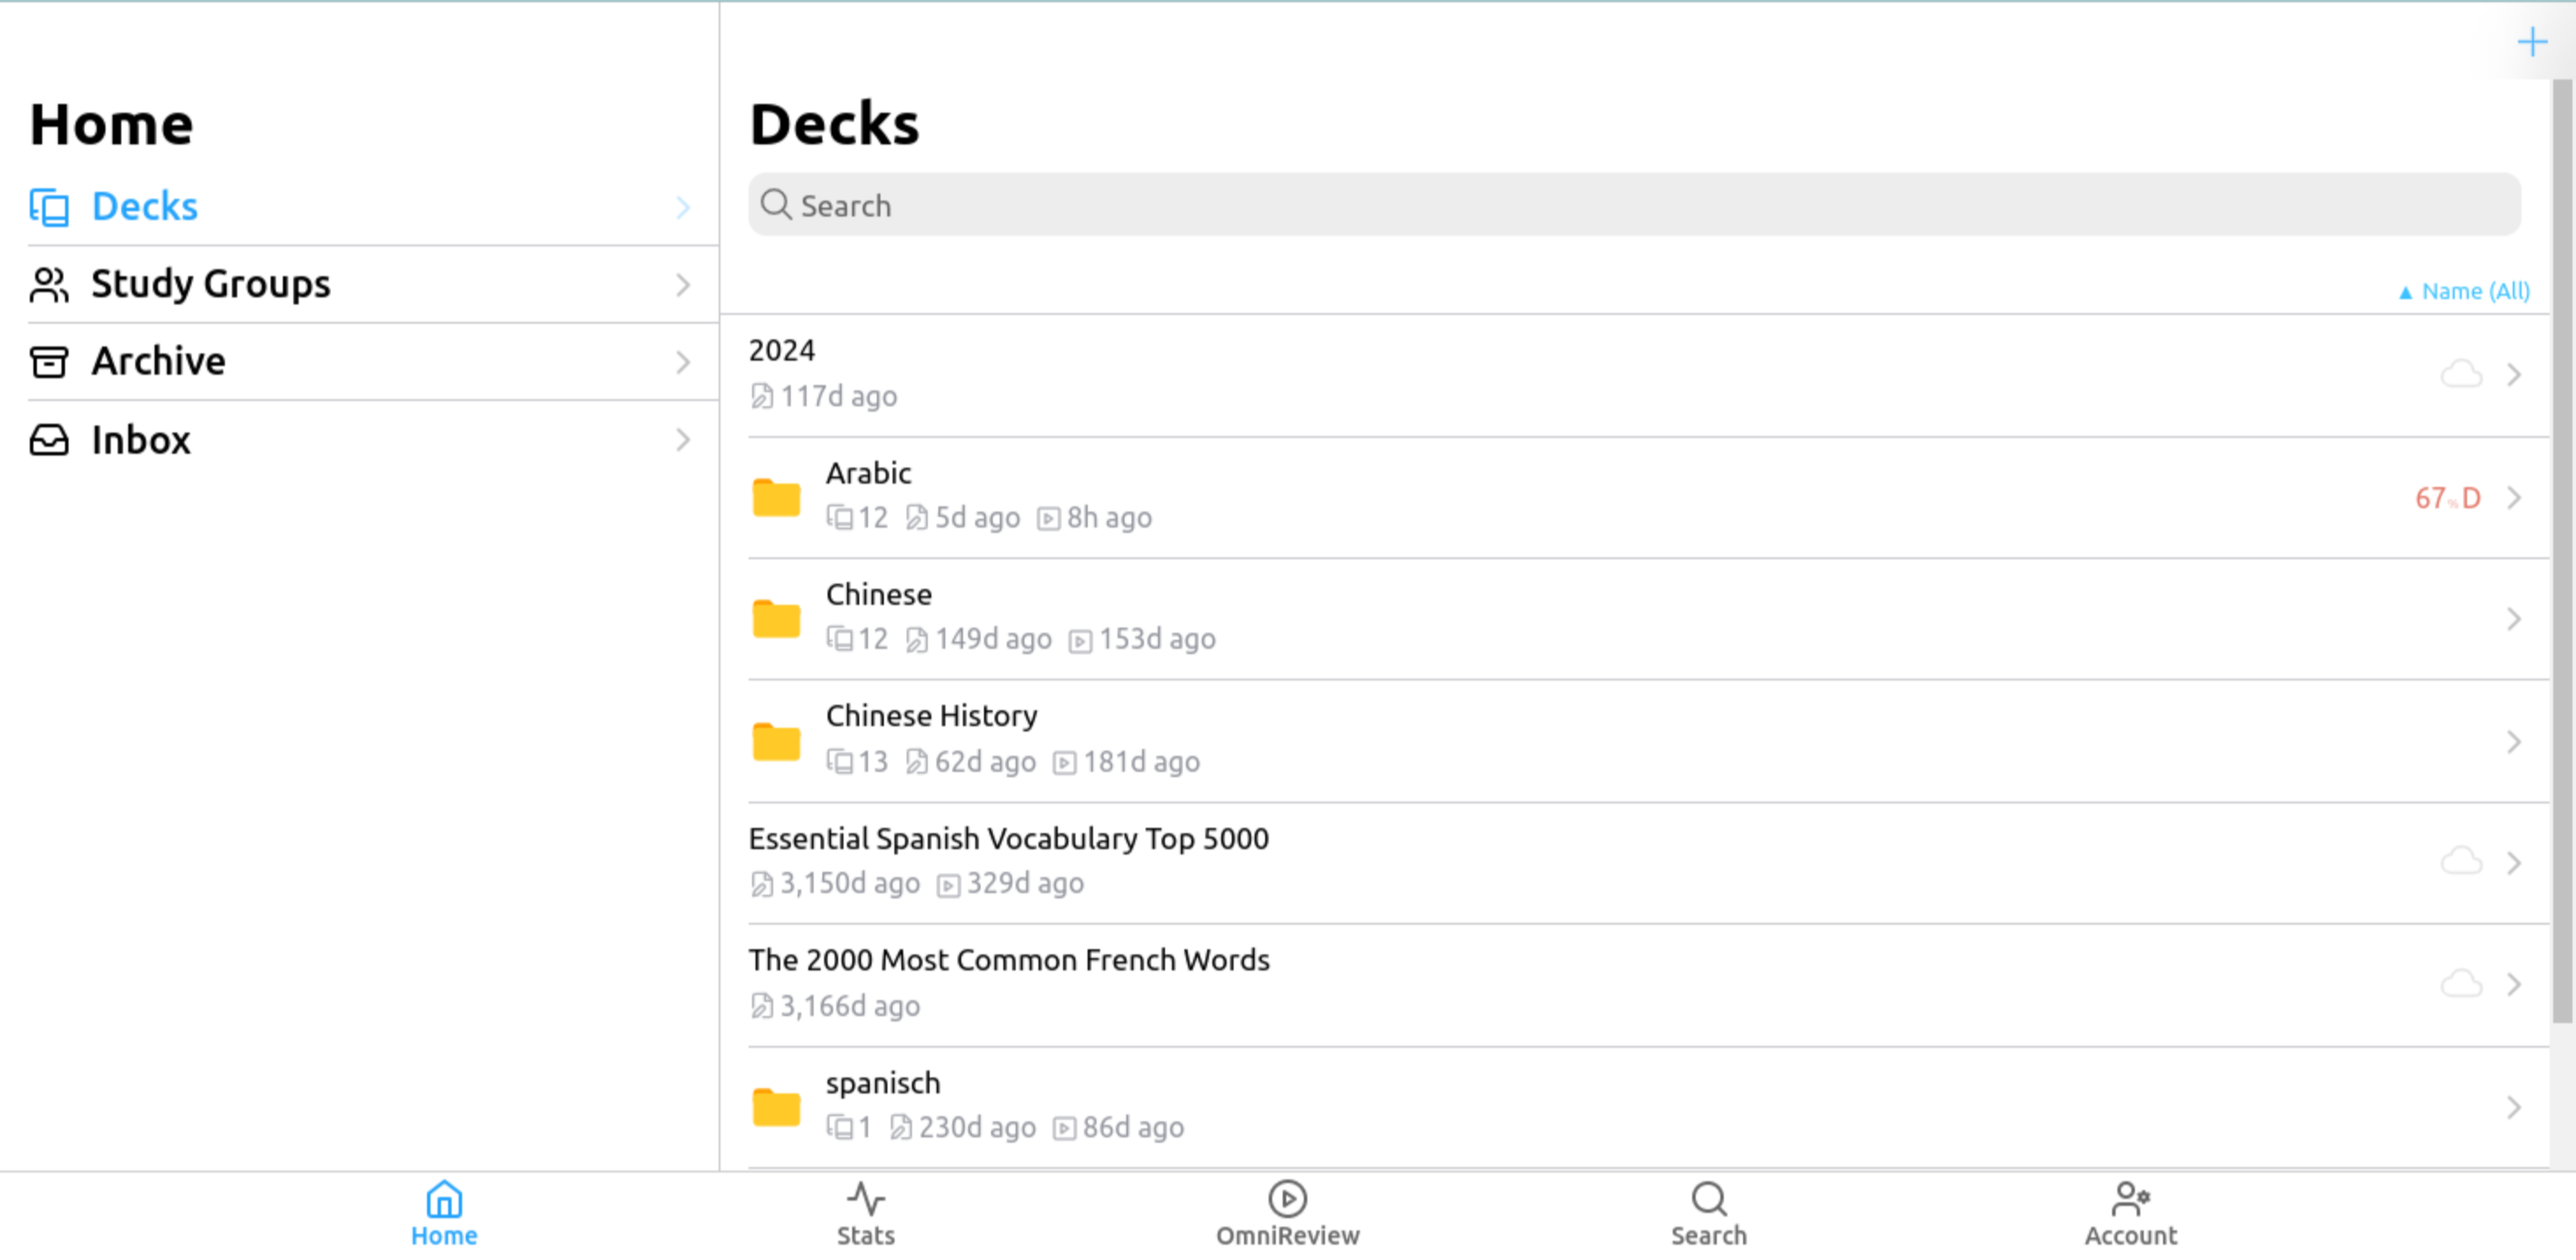
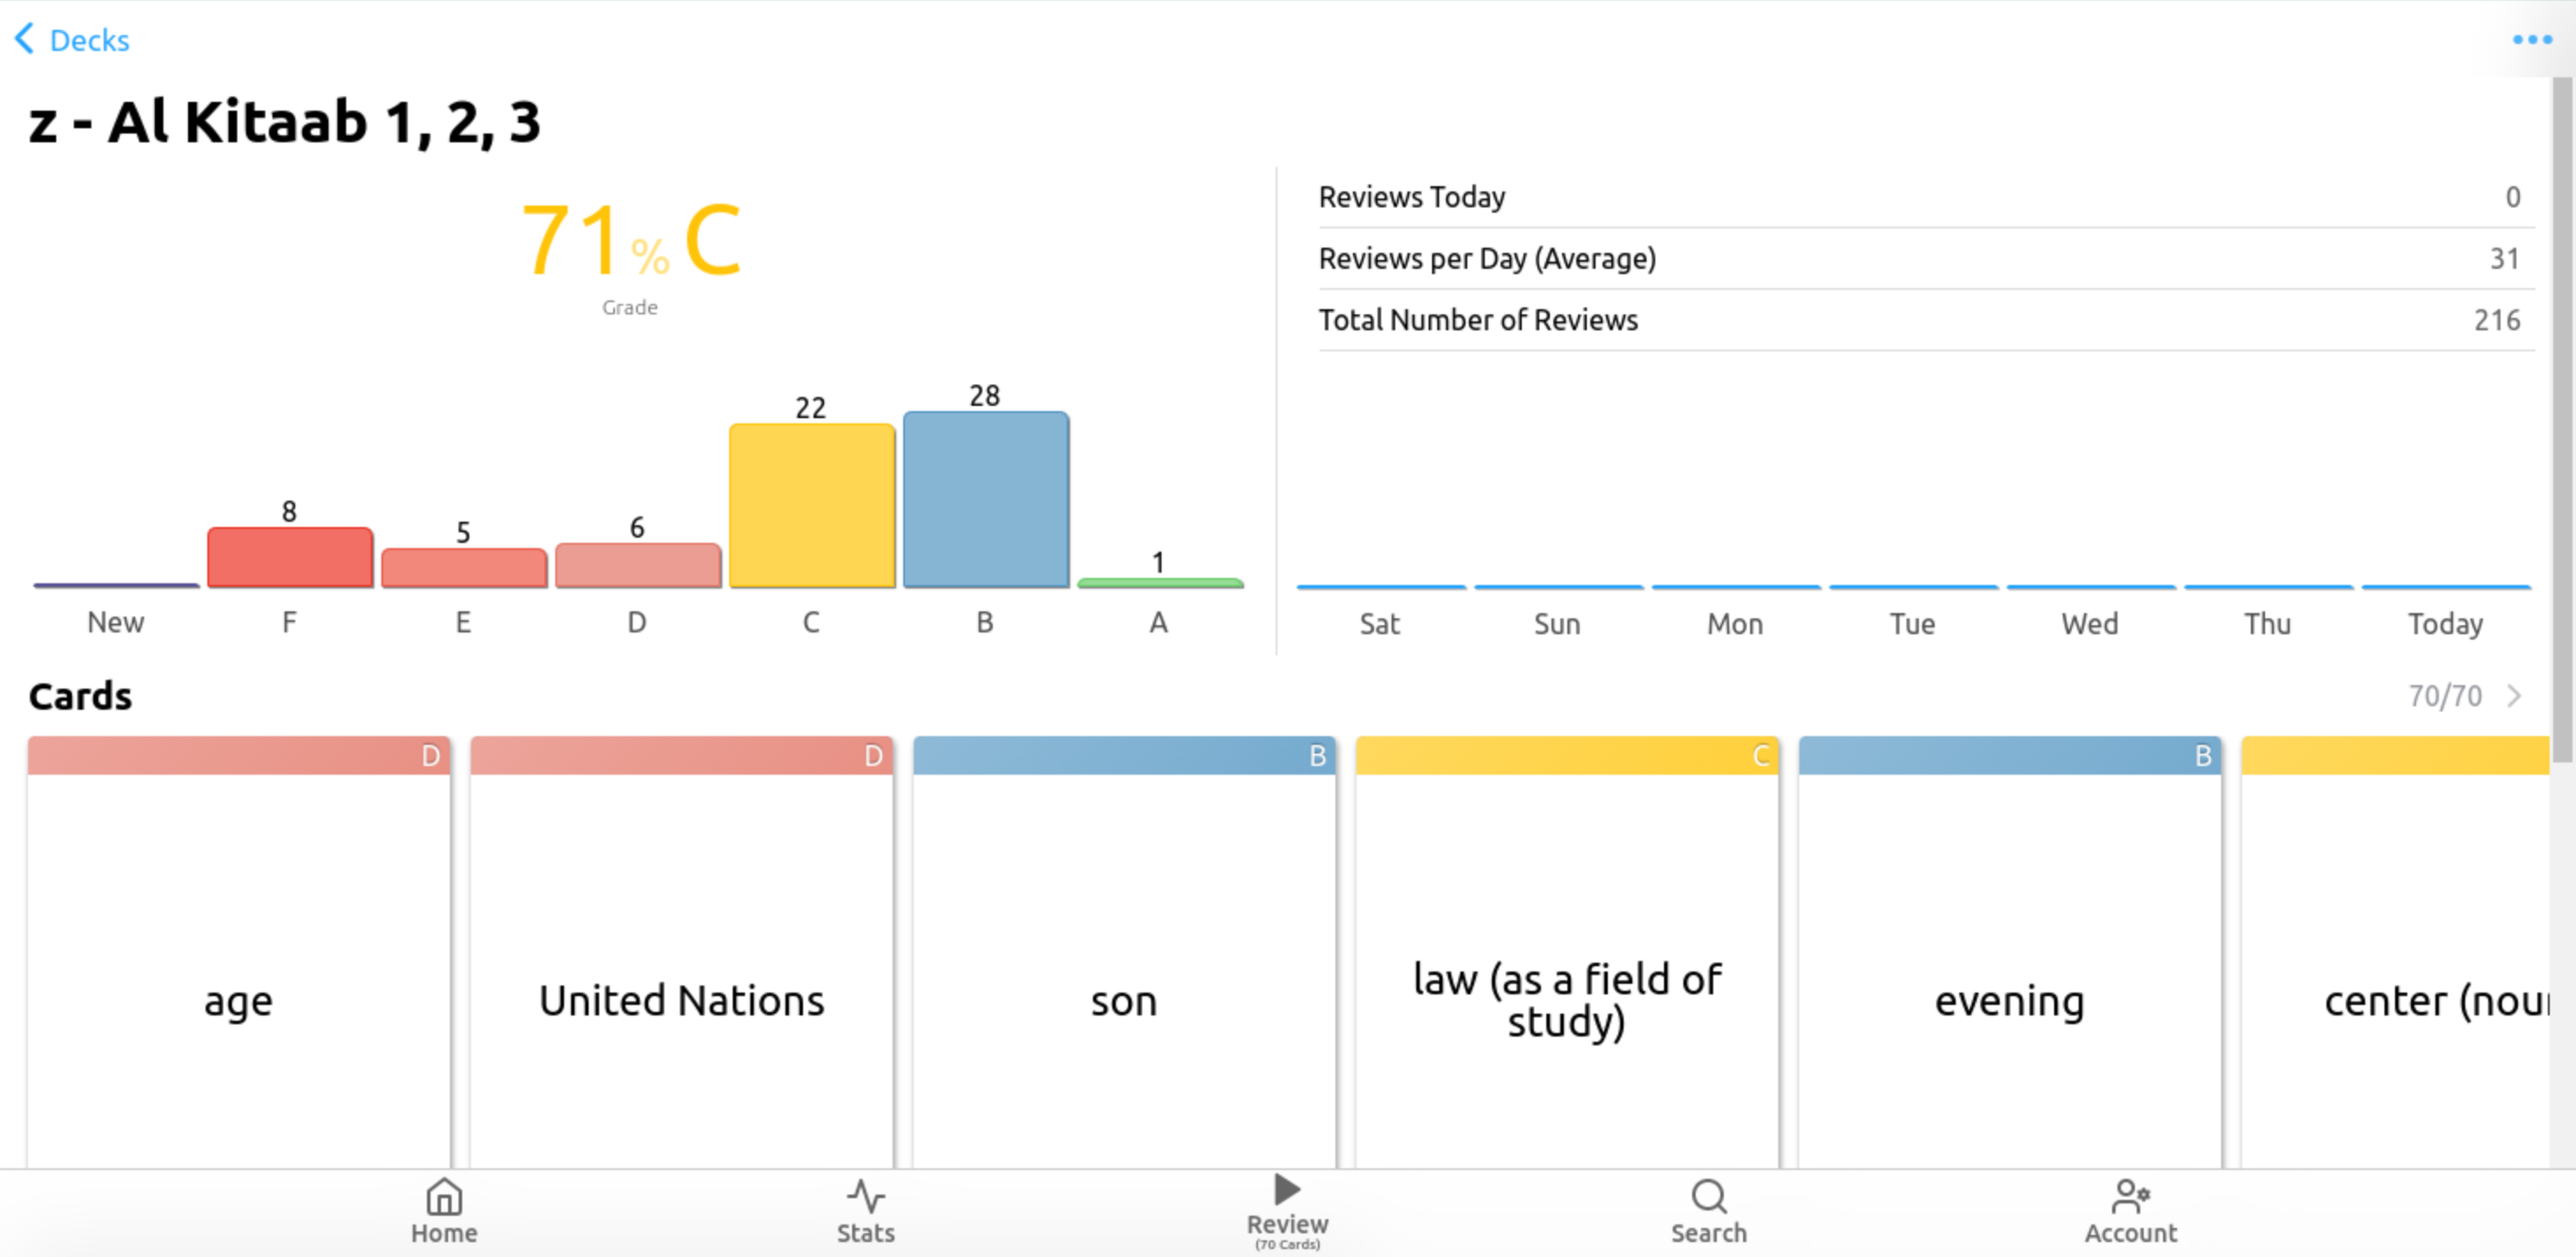
AnkiApp, not to be confused with just Anki as mentioned above, allows people to create and study flashcards similar to Quizlet and Anki. Though like Anki, AnkiApp implements spaced repetition to aid people in long term learning of required materials. In a study session on AnkiApp a user also select which grade They want to study in a given set or a user can study all the cards at once. The user can also choose to study a combination of cards in different categories like their F, E, D, C, B, or A cards. AnkiApp tells the user how often they have reviewed the cards, their overall grade, the times reviewed that day, the average reviews per day and the total number of reviews along with also giving them a grade on each individual card. There are many different study options to select in any given study session such as the number of cards a user wants to review, an auto-flip timer, and then the user can select the review mode which is where they would select the type of review that a user wants to do. The user has the option to used the spaced repetition or just randomly shuffle the cards. In addition, a user can reset their grades at any time. There are also many public sets in Anki App that are used by users can study many different topics, from languages to other subjects.
Online Language Learning Applications
Some differences between these online language learning programs and MultiLayered Flashcards are that MultiLayered Flashcards is not an mobile app accessible through the App Store or through Google Play. In addition, most of these tools are specifically for the Mandarin language. However, they are still helpful to consider because if one of the hardest languages for English speakers to learn, namely Mandarin, is using these tools, then surely they will work for other language learners as well. While many of these apps are available for beginners to a language, besides the alphabet sets MultiLayered Flashcards is best used to those who have some background in the given language. Some of these tools also have vocal pronunciation testing and listening activities along with other more interactive features. MultiLayered Flashcards is set apart because it can be used for free, where as, a few of these Other tools require a payment in order to use them. Some similarities between these programs and MultiLayered Flashcards are the web and phone application accessibility. The differences purposes between the following language learning tools shows their variety from the flashcard learning tools. There are many different aspects to language learning.
- A. Duolingo (General Language Learning)
- B. MulityLayered Flashcards (Flashcards)
- C. Skritter (Stroke Order)
- D. Pleco (Dictionary)
- E. HelloChinese (Mandarin Language Learning)
Categories
- Entertainment / Gamification
- Tracking and saving progress
- Memorization only focus
- Free to Use
- Single Character focused
- More than one language study
- Stroke order information
- Mobile phone access
- Online Internet Access
- Flashcards
- Learning sets/sessions
- Exiting a study session
- Access to HSK Levels
- Focus on Culture
| A | B | C | D | E | |
|---|---|---|---|---|---|
| 1. | \(\checkmark\) | X | X | X | \(\checkmark\) |
| 2. | \(\checkmark\) | X | \(\checkmark\) | \(\checkmark\) | \(\checkmark\) |
| 3. | X | \(\checkmark\) | \(\checkmark\) | X | X |
| 4. | \(\checkmark\) | \(\checkmark\) | X | \(\checkmark\) | X |
| 5. | X | \(\checkmark\) | \(\checkmark\) | \(\checkmark\) | X |
| 6. | \(\checkmark\) | X | X | X | X |
| 7. | X | X | \(\checkmark\) | ~~ | X |
| 8. | \(\checkmark\) | \(\checkmark\) | \(\checkmark\) | \(\checkmark\) | \(\checkmark\) |
| 9. | \(\checkmark\) | \(\checkmark\) | \(\checkmark\) | \(\checkmark\) | \(\checkmark\) |
| 10. | X | \(\checkmark\) | X | X | X |
| 11. | \(\checkmark\) | \(\checkmark\) | \(\checkmark\) | \(\checkmark\) | \(\checkmark\) |
| 12. | \(\checkmark\) | \(\checkmark\) | \(\checkmark\) | \(\checkmark\) | \(\checkmark\) |
| 13. | X | \(\checkmark\) | X | X | \(\checkmark\) |
| 14. | X | ~~ | X | \(\checkmark\) | X |
Skritter
Skritter is a platform mainly built in order to help users improve their Chinese, and or Japanese stroke order. In more generalized language learning a program that helps with writing practice could aid users in learning languages with other scripts. Skritter aids users whether they are complete beginners or have knowledge of Chinese or Japanese previously. Skritter is not well used for cramming and works best when used with daily language learning [49]. This is true when learning language in general, which is why space flashcard repetition works so well. Thus the purpose with which a web application is used greatly impacts the results that a user finds from using the web tool. Generally speaking too, motivation in language learning plays a large role. It is important to note that Skritter is an app that requires a fee in order to use [42]. Skritter is accessible in the United States and many other places around the world.
Pleco
Pleco is a free app available to anyone. While Skritter tests stroke order and writing skills, Pleco is a Chinese-English dictionary based app. Dictionaries are also common tools for language learners. They are often utilized when wanting to say new words or translate words into their own language so they can understand them. Pleco has many different search options and tools in addition to its dictionary, which is one reason that it is such a great learning tool. Pleco is a commonly used web tool among Chinese learners [27], [50]. One reason that it is so helpful is because of its ability for users to handwrite any character and then find that character from and selection menu and then search it to find its meaning and pinyin[42]. This handwritten to text feature is one aspect that makes Pleco stand out. Pleco gives the character, the pinyin, the tone, and then like any dictionary the word and its different parts of speeches along with the character being used in a sentence. Pleco also includes the stroke order, other characters that share the same radical, other characters the singular character can be combined with to make new words and their definitions, and sentences the character can be used in.
Duolingo
Duolingo is another very popular app for learning languages. Duolingo is used by many people because it is easily accessible to beginners. This is an app and an online platform that includes different activities and ways to learn and increase language learning. For example, there are ways to interact with other users and speakers, in addition to activities for individual self improvement. Duolingo stands apart from most other flashcard learning services because it is built and uses many gamification features to make this platform more engaging and exciting for users [41]. For example, there is the opportunity to earn “lingots” after every lesson studied. A user can then use lingots at the store to buy clothes and other accessories in addition to buying features like lives and streak continuations. However, there are adds after lessons are completed in Duolingo which is just like other games on mobile devices. Duolingo has used many different methods in order to make their platform more engaging and exciting for the user.
HelloChinese
HelloChinese is an app with a set up and screen very similar to Duolingo along with accomplishing similar goals. A user has a certain number of lives as they go through any given lesson. When a user answers a question wrong they lose a life. Once all the lives are lost a user must start over and begin that lesson again. HelloChinese also gives access to stories at different HSK reading levels. However, in order to access the stories in the library you must have the Premium or Premium+ plan. There is also an immersion tab which allows users to learn more about Chinese culture.
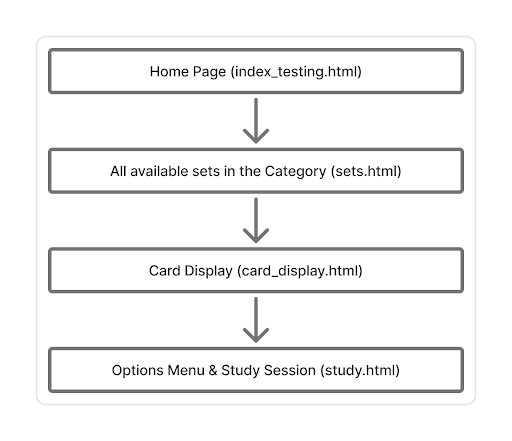
Methods of Approach
This section explains the development of MultiLayered flashcards. MultiLayered flashcards has been designed around a study session for the user which is explained throughout this section. All aspects of the tools required for testing are addressed in this section. There are four main pieces of this project. The first step is gathering the data and converting it into the JSON format that MultiLayered Flashcards can read in. Then there is the sets.html page which, if after data preparation there are multiple sets the sets.html displays all the available sets. Next there is the card_display.html and card_display.js page. These files work together in in order to display the flashcards in that study set. Next there is the study.html page and the study.js page. Both these pages work together to allow the user to select the options that they would like on the front of their flashcard and on the back of their flashcard. Then the study session begins once they click start.
The website layout shows the different study options available. Each of these study options have the same set up between their following pages. The only difference is the amount of study sets in each category. Mandarin has over 100 different study sets each with 50 cards and 4 layers, expect for the last card deck in each file which has less than 50 cards. There are three different Alphabets sets, one for Greek, Hebrew, and Arabic, all with 7 layers. Greek has 24 cards, Hebrew has 34 cards, and Arabic has 45 cards. Chemistry has three different options of data combinations. The CSV cards have 28 layers. The Wikipedia data set has 16 layers. Together they have 33 layers. Each deck has 118 cards because there are 118 Periodic Table elements. There are five different animal sets each with around 35 cards and a total number of 205 cards. These flashcards have 16 layers. There is only one American President study deck and it has 47 data entries with 7 layers. The Roman Emperor set has 2 sets each with 34 cards and a total number of 68 cards. Each flashcard has 15 layers.
Website Basics
In a website there are two parts called the frontend and the backend. The frontend has to do with the part of the website that the user can see online. There are multiple pieces that go into making and designing a frontend. These pieces are design, for which CSS is used, content, which utilizes HTML, and buttons and other pieces of interaction, which is programmed with JavaScript(JS). If a website that does not have data beyond content, link and buttons, for example if there is no login, that would be considered a static website. A dynamic website is one with a backend. A backend is the part of a website that a user does not see. It is where information like a user’s name and password and contact information is stored. A backend could also be a matter of loading in data, as it has been used in this project.
The frontend of this project was designed using HTML, CSS, and JS. HTML is used for the website text content, CSS is used for website styling and JS is used for button functionality. The data in the backend is stored in JSON files and then loaded into the site. The history of the changes made and version history has been stored on GitHub under the project is named Multilayered flashcards.
For each tool well will first considers the installation and different installation steps and snafus that people might run into. Followed by a consideration for how each of these tools is used more generally in the world of website design and then specifically in the web tool MulityLayered Flashcards.
Frontend
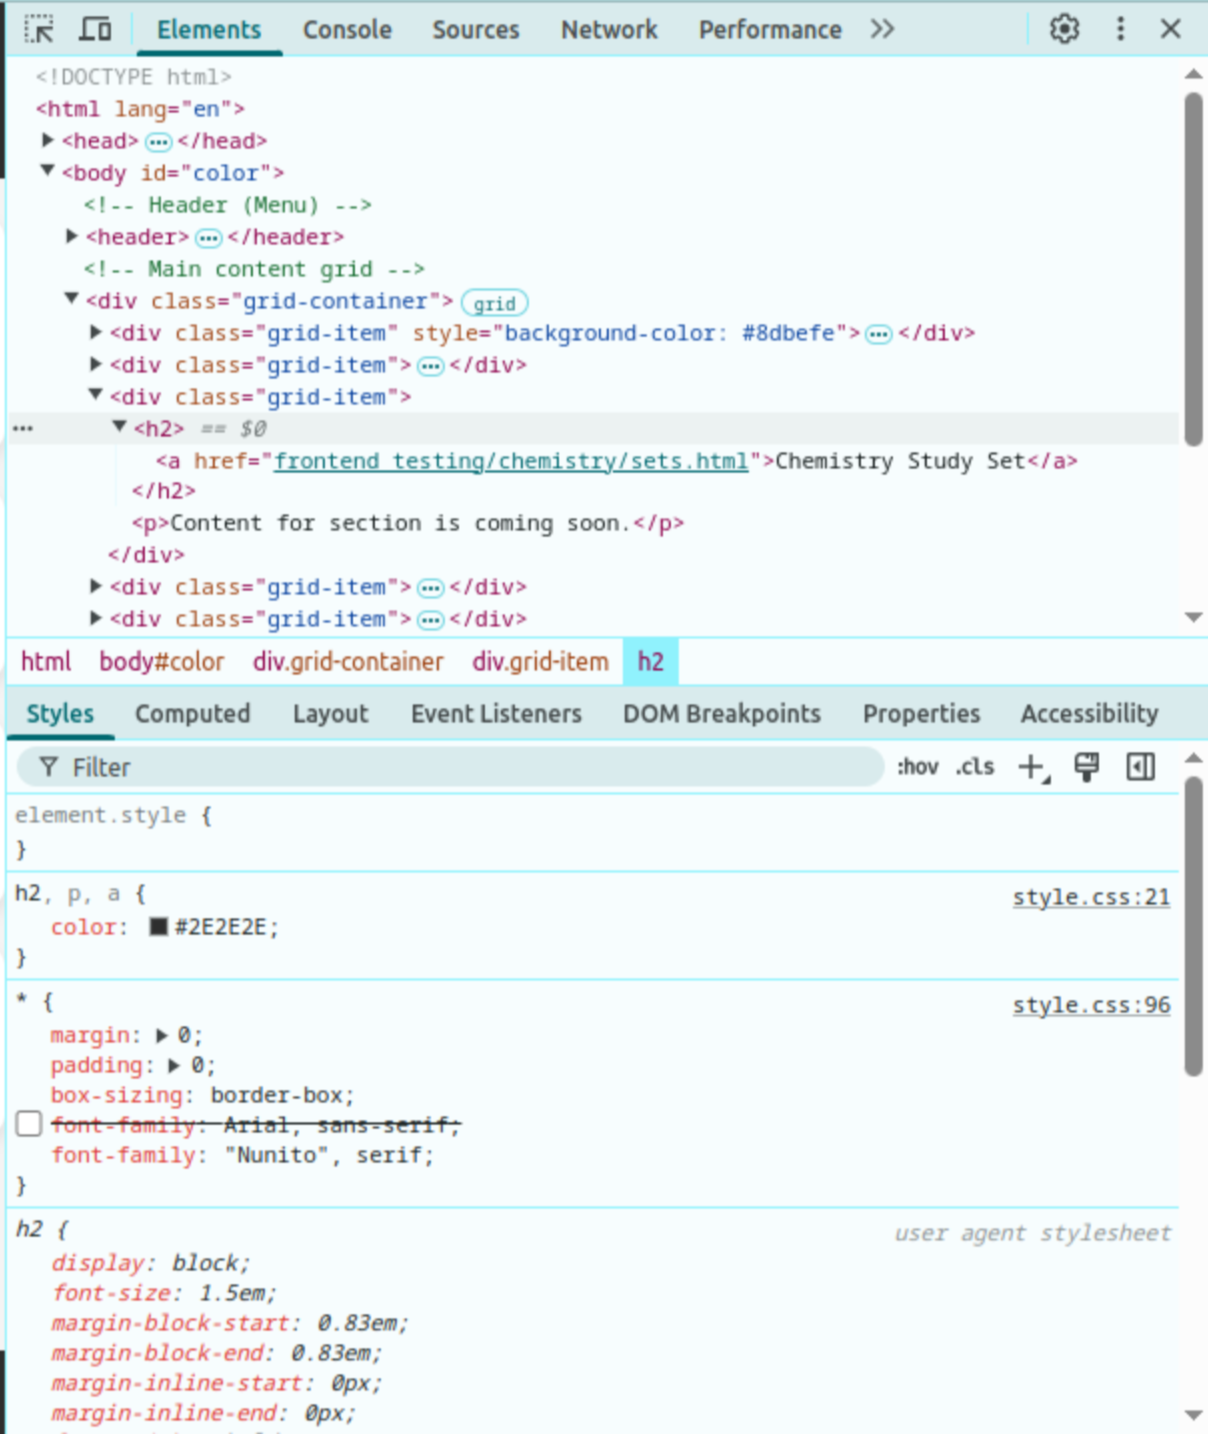
The frontend code of MulityLayered Flashcards was written on VS Code and was tested in a Google Chrome Web Browser. The command to test this code in your browser is a Python command python -m http.server. Another command that can be used is php -S localhost:8000. Both these commands are used for different reasons. The Python command was use most often for this project. Once a page has been opened in a Chrome browser the page code can be seen by using the F12 button or right clicking and then choosing the “Inspect” option. This loads a sidebar that shows the CSS design elements, the HTML code, and the console where a person can interact with JS files and actions. The side panel is displayed in figure below.
HTML
HTML is where the text written on the webpage is added. HTML allows a person to use tags like <body></body> which includes all website text content, <main></main> which does not include the nav menu or fotter, <div></div> which divide areas in main or header or the footer, <section></section> which works just like the div blocks, in order to organize text on a webpage. As mentioned previously, HTML has to do with the content on a webpage. Without any styling, the figure below shows the content on Multilayered Flashcard’s login page. In the past HTML was also where different design elements were added like bolding font and changing the sizes. However, in modern web development all the design is done in CSS which is discussed next. HTML is supported on all modern browsers. The latest version of HTML is HTML5. In this project HTML is used for the content in the different webpages. The hierarchy or organization of the website can be seen below.
CSS
CSS adds styling and makes the webpage look how one would expect. As opposed to a plain white page with text all on the left indent.
When HTML was first made as a programming language there were code segments added directly into the HTML that would change the style of the text. Today, all styling is done in CSS. See the following code for an example of what it looks like to change the background color, the padding, margin, and font of the body section in HTML.
body {
  background-color: #8dbefe;
  padding: 0;
  margin: 0;
  font-family: sans-serif;
}
CSS code can also be added into HTML. It can be defined in different sections and given different labels beyond the HTML tag name. These other attributes are called ids and classes. It may look like the following in HTML and subsequent/corresponding CSS code can be seen below.
<div id="main"> </div>
<div class="bar"> </div>
#main {
background-color: white;
}
.bar {
text-align: center;
}To be an id tag there must only be one. This means that there can not be an id tag in a class that is used more than once. If a user wants to label a section more than once they must use the class tag. Whereas, the id bar is only only in one place. These classes and ids are then called in the CSS file using a “#” sign or a “.”.
JavaScript(JS)
JS has been used for many different elements in this project. Everything from having a file called general.js that implements the hamburger button of all the pages to more complicated actions like loading in JSON data and creating HTML sections to house the data and then populating those sections with the data, all of those actions are done in JS.
JSON
JSON is used to store the data for the flashcards in Multilayered flashcards. JSON was chosen because it is a data form that is commonly used in websites. This is a good reason to choose JSON because it make this project and the code makes this project more reusable. In addition, because JSON is common, users are able to more easily understand the format of the JSON file.
Python
In MultiLayered flashcards Python was used in order to prepare the data that is loaded into each study session. It’s main job was to change various different formats of information into a file with the JSON that can then be used in the website. The basic task of the converter.py file is to open and file read through the information in the file assign those values to flashcards which are then added to a list that is then added to a dictionary. Then this dictionary is written to the JSON file.
Tools in Use
Now, how each of these tools has been used within MultiLayered Flashcards is considered in depth. As mentioned previously there are four major sections of this project. These sections are: data conversion to JSON, displaying the set options in sets.html, displaying the flashcards from the selected set in card_display.html, and finally choosing the card back and front selection options and iterating through the card in study.html. For each of these sections the code displayed is from the Mandarin portion of the MultiLayered Flashcards. There are four phases to consider.
Mandarin Data Conversion
The data conversion process for Mandarin involved pulling data from an HTML file and transferring it into a JSON file. As seen previously, the data for the JSON file all has the same code. The data in the HTML files can be seen below.
啊,"ā","ah" 啊,"a","ah" "矮","ǎi","short; low" "爱","ài","love"
"爱人","àirén","husband; wife; sweetheart" "安静","ānjìng","quiet;
peaceful"
"安排","ānpái","plan; arrange" "八","bā","eight" "把","bǎ","bunch"
The Python file converter.py changes the data from the HTML files with Chinese characters, pronunciation, and translation information in a JSON. The JSON files are organized into folders based on their HSK number. In each HSK folder there are files with the data. Each file has 50 entries of data except for the last HSK set which has the remaining number of cards from the HSK sets. The sets are labeled with the HSK number, then the word “hsk”, then the number that file was created from the code. If it was the third file to be created, then the number would be three. For example: 2hsk31.json. This means that this file is in the second HSK level and it is the 31st file to be created.
{
  "hsk1": [
    {
        "simplified_character": ["啊", [0], ["2024-12-21"], ["20:02:27"]],
        "traditional_character": ["None", [0], ["2024-12-21"],
        ["20:02:27"]],
        "pinyin_tone": ["ā", [0], ["2024-12-21"], ["20:02:27"]],
        "english_meaning": ["ah", [0], ["2024-12-21"], ["20:02:27"]],
    },
    {
        "simplified_character": ["矮", [0], ["2024-12-21"], ["20:02:27"]],
        "traditional_character": ["None", [0], ["2024-12-21"],
        ["20:02:27"]],
        "pinyin_tone": ["ǎi", [0], ["2024-12-21"], ["20:02:27"]],
        "english_meaning": ["short; low", [0], ["2024-12-21"],
        ["20:02:27"]],
    }
  ]
}
converter.py opens the HSK files, iterates through the data, changes the format and then writes the data to the JSON file. The function that performs this operation is called process_html_to_json_traditional and takes in four parameters. The parameters are the hsk_number which is an int referring to which HSK level the data is. The second parameter is folder_path which is a string to the folder path that the JSON files are written to. The third parameter is called html_file_path_simplified and html_file_path_traditional. These parameters are the names of the files that are being read into this function. Each HSK level has two HTML files, one file with the simplified Mandarin characters and one file with traditional Mandarin characters. This function is then called four different times for each of the different HSK levels.
First an empty dictionary data is created. This dictionary is where all the data is added and then data is written to the JSON file. Next the integer level is set which is used as a counter when adding entries to the list called entries which is then added to the data dictionary.
Next, the HSK simplified file is open, and each line is separated and added to a list using the .readlines() method. Next this list is iterated through and any blank spaces are removed using the .strip() method, and any blank lines are skipped using conditional logic to first check if the line is not there using the method if not line_simplified then the program will continue. Next is this command parts_simplified = [part.strip().strip('"') for part in line_simplified.split(",")] This command strips the file of any quotation marks in the line that is under consideration. Then, that line is split on the commas. This .split() method has the output of a list. For example consider the data above. If this is the line that the program is considering in the loop it is running 啊,"ā","ah" 啊,"a","ah" "矮","ǎi","short; low" "爱","ài","love" then the list looks like this: [啊,ā,ah]. The first index of the list is set to the simplified_character the second index in the list is set to the pinyin_tone and the third index is set to the english_meaning this can be seen in the code below.
simplified_character = parts_simplified[0]
pinyin_tone = parts_simplified[1]
english_meaning = parts_simplified[2]
The next part of the code adds these values defined above to a dictionary called entry This dictionary sets the values that are then added to the JSON file. The traditional character category is blank for now, though it is added to later.
entry = {
  "simplified_character": [simplified_character, [0],
  [datetime.now().strftime("%Y-%m-%d")],
  [datetime.now().strftime("%H:%M:%S")]],
  "traditional_character": ["None", [0],
  [datetime.now().strftime("%Y-%m-%d")],
  [datetime.now().strftime("%H:%M:%S")]],
  "pinyin_tone": [pinyin_tone, [0],
  [datetime.now().strftime("%Y-%m-%d")],
  [datetime.now().strftime("%H:%M:%S")]],
  "english_meaning": [english_meaning, [0],
  [datetime.now().strftime("%Y-%m-%d")],
  [datetime.now().strftime("%H:%M:%S")]],
}
Next, the entry is added to the entries list that was specified in the beginning. When the entries list reaches 50 the list entries is added to the data dictionary with the name of the HSK set numbere. Later a file fill be create base on the HSK level name and the counter iteration number it is within the level. Then the entries list is emptied and the process is restarted till all the character information in the character HTML file has been assigned to a dictionary. Stopping each list at 50 entries means that each flashcard set only has 50 cards. If the user wants more more than 50 cards the file html_to_json_converter.py has to be rerun in the terminal with the value in the if statement set to 100. This is hard coded, though an idea for the future is to change this and make the number of card in each set flexible and changeable at the user’s desire.
entries.append(entry)
if len(entries) == 50:
    data[f"hsk{counter}"] = entries
    counter += 1  # Move to the next level
    entries = []  # Reset for the next batch
Next the HTML file with the traditional character data is opened, and is changed into a list using the same .readlines() command as above.
# TRADITIONAL ITERATION
with open(html_file_path_traditional, 'r', encoding='utf-8') as file:
    traditional_lines = file.readlines()
Next the length of the traditional file is found and the length of the simplified file is found. This is a precaution in order to check that the same characters are on the same lines in both files. If there is a different number of lines this would indicate to the user that there was an extraneous line with extra data, or maybe simply a blank line was not removed or something similar to that. This would then have to be investigated before continuing.
length_simplified_file = len(simplified_lines)
length_traditional_file = len(traditional_lines)
The following code is checking and confirming how many flashcards there are in each set. There should be 50 flashcards in every set except for the last set. The following code uses a flooring operation and the % operation in order to find the remainder number of flashcards in the last file. The flooring operation // is used to determine the number of times that file length has successfully been divided in 50 cards. // calculates the number of times a whole number fits into the divided number. For example, 14 // 3 would equal 4. The % operator gives the remainder number of flashcards in the files once they have been divided by 50. So using the same example 14 % 3 would equal 2. This operation only runs if the file lengths are equal otherwise an error is thrown telling the user to check their files. These operators are used to determine what the number counter of the final file should be and how many flashcards should be in it. This is a way of testing that the code is actually doing what it is supposed to be doing.
    hsk_number_of_sets = 0
if length_simplified_file == length_traditional_file:
    full_hsk_sets = length_simplified_file // 50
    remainder_hsk_set = length_simplified_file % 50
If the remainder_hsk_set does not equal 0 meaning that 50 evenly goes into the total number of flashcards. This means that the total number of flashcards sets equals the full_hsk_sets variable. Otherwise the else sets the total number of flashcards sets to the number of full_hsk_sets + 1. The developer can then simply check the number of flashcards sets there should be and the number of flashcards in the final set file. The print statement tells the developer both these pieces of information.
    if remainder_hsk_set != 0:
        hsk_number_of_sets = full_hsk_sets
    else:
            hsk_number_of_sets = full_hsk_sets + 1
    print(f"There should be {hsk_number_of_sets} hsk sets with
    {remainder_hsk_set} cards in the last one")
Next the traditional character file values are added to a list so that it can be confirmed as to whether they are the same as the simplified character values or not. First the traditional file is opened up and cleaned in the same way as the simplified file was above. However, these codes need to be cleaned up in another way. It can sometimes be confusing to see how the traditional character is different from the simplified character. In order to make this distinction easier, the traditional character only prints if it is different from the traditional character. If the traditional character is the same as the simplified character then that is stated in the traditional card category. However, if the two characters are different, that can be changed as well. In order to check what characters are the same a list called traditional_character_list is created and all the traditional character values are added to the list. Next a counter called counter_for_traditional_list_position is created in order to track the position of the for loop in the traditional_character_list. All the flashcard data is iterated through using the list for hsk_number_of_sets and each list in data is called based on its set_name.
for i in range(hsk_number_of_sets):
    index = i+1
    set_name = "hsk" + str(index)
Next another for loop runs within the top one. That for loop can be seen below. For every single entry in the for loop an if statement is used to see if the entry for the simplified_character is equal to the entry for the traditional_character. If the entries are equal to the particular position in the traditional_character_list then the traditional character value of the flashcard reads “Same as simplified character”. Otherwise the traditional character is added to the flashcard, as seen in the else statement. This iteration of the traditional_character_list is only possible because the same characters are on the same lines in both incoming HTML files.
for entry in data[set_name]:
    if entry["simplified_character"][0] ==
    traditional_character_list[counter_for_traditional_list_position]:
        entry["traditional_character"][0] = "Same as simplified character"
    else:
        entry["traditional_character"][0] =
        traditional_character_list[counter_for_traditional_list_position]
    counter_for_traditional_list_position += 1
Finally, once values have been added for all the traditional characters a file path and folder are created for the data sets to be written. The file path has the name of the hsk plus the name of that HSK level, either 1, 2, 3, or 4. Each entries list in data is called and then written to its specific file. The file name contains the counter number that the entries list was which is the set_name. The set_name calls the data from the data dictionary with all the flashcards. The file name starts with the number HSK level that the file is and the folder name and file name are saved in the created_folder path variable.
for i in range(hsk_number_of_sets):
    index = i+1
    set_name = "hsk" + str(index)
    created_file_name = str(hsk_number) + str(set_name)
    created_path = folder_path + created_file_name
Then in the last file, which is shown in the conditional logic statement if i == hsk_number_of_sets-1, the string_to_save value is added to the data set using the command data[set_name].append(string_to_save). The string_to_save contains the information about how many cards should be in the final file and what the file number should be. This is one way for the developer to confirm that the code is working correctly. Then the file is opened with the created_path name and the data from the dictionary is written to that file, that happens in the for loop that is the length of hsk_number_of_sets. So all the data should be available in all the different files.
    if i == hsk_number_of_sets-1:
        string_to_save = str(f"There should be {hsk_number_of_sets}
        hsk sets with {remainder_hsk_set} cards in the last one")
        data[set_name].append(string_to_save)

    with open(f'{created_path}.json', 'w', encoding='utf-8') as json_file:
        json.dump(data[set_name], json_file, ensure_ascii=False, indent=4)
        print(f"JSON file {created_file_name}
        has been created successfully.")
Mandarin sets.html
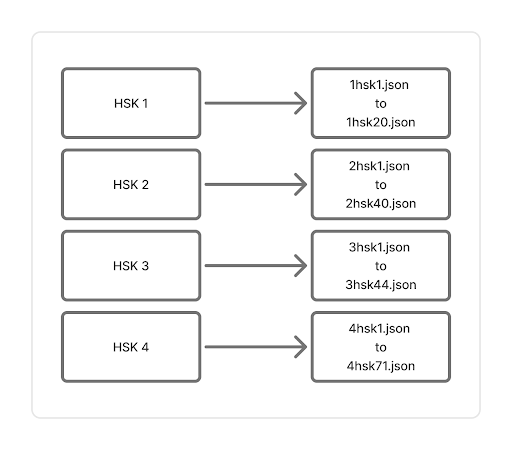
HSK level 1 has 19 sets of 50 cards and the 20th set should have 34 cards. HSK level 2 has 39 sets of 50 cards and the 40th set should have 21 cards in it. HSK level 3 has 43 card sets and the 44th set should 2 cards in it (though it has more). HSK level 4 has 70 sets with 50 cards and the 71st should have 21 cards in it.
The sets.html page display options for all these different sets. It uses a grid to format and display them. Each option is written with the HTML code displayed below.
<li><a href="card_display.html?option=1hsk1">Set 1</a></li>
<li><a href="card_display.html?option=1hsk2">Set 2</a></li>
What is special about this code is that rather then just linking to the card_display.html page the href is passing more information along through the link. This information can then be accessed by the card_display.html page and card_display.js page. The information passed along through the URL is used to call the corresponding data set and change the h2 in card_display.html so that the correct HSK level and set number are displayed. There is also information about the HSK Levels and links to other HSK resources on sets.html
Mandarin card_display.html
card_display.html contains very little code itself. The flashcards sections visible to the user are created and populated using card_display.js. card_display.js makes sections based on the number of flashcards in the set and then populates the created HTML sections with the code from the JSOn file. The code in card_display.html can be seen below:
<main>
  <h2 class="set_name"></h2>
  <a href="study.html"><button class="study_start">Start</button></a>
  <section id="card"></section>
  <a href="study.html"><button class="study_start">Start</button></a>
</main>
There is an empty h2 with the class set_name which gets populated based on which set information gets sent in the URL. In order for card_display.js to populate the set_name it first uses set_information to find the HSK level number and the corresponding set number. set_information is the variable to holds the data set name that was passed along through the URL. This data set for example might be 3hsk5. This variable is first divided on the h which then returns a list containing [3,sk5]. The set_information variable is also split on the letter k which returns the list [3hs, 5]. Both the list split on k and the list split on h are created in order to find the HSK level number and the corresponding set number.
const hskSet = set_information.split("h");
const newSetNumber = set_information.split("k");
Next, both these pieces of information are then used to create the variable filePath which is passed into the fetchJSONData function inorder to load in the correct JSON data. With this example set_information the file path would look like this data_prep/hsk3/3hsk5.json. Following is the code that creates the filePath, const filePath = "data_prep/hsk" + hskSet[0] + "/" + set_information + ".json";.
Next the two split lists are used to populate the HTML field set_name. The set_name for this file would look like this: HSK 3: Set 5. This string is then added to the HTML field set_name by calling the class set_name and then iterating through all the present cases of the class. Then the variable set_display_name is added to the HTML page. The HTML function .inneHTML would be used to update the field.
export let set_display_name = "HSK " + hskSet[0] + ": Set " +
newSetNumber[1];
const items = document.getElementsByClassName("set_name");

Array.from(items).forEach((item) => {
  item.textContent = set_display_name;
});
Next in the HTML, there is a button with the class study_start this button links to the study.html page using the href=. Then there is an empty section with the id card that is then populated with all the card information using the rest of the code in the card_display.js file. So we will now turn our attention to the card_display.js file.
There are three main pieces of the card_display.js page focuses on. First, the information from the URL is accessed and set the set_information variable that is used throughout the rest of the file. Second, the fetchJSONData function runs which calls the main function which calls the populateSections function which calls the data in cardFields and uses the data from the JSON file passed in the fetchJSONData. These functions are the second major process to be considered. Third, the necessary code and variables are exported so that they can be accessed by the study.html and study.js files.
- The Information from the URL
The information passed from the URL is accessed using the URLSearchParams function The name this data is stored under is option which is seen in the HTML code from sets.html: <li><a href="card_display.html?option=1hsk1">Set 1</a></li>. The variable from option is stored in the constant variable selectedOption.
function getQueryParameter(name) {
  const urlParams = new URLSearchParams(window.location.search);
  return urlParams.get(name);
}
const selectedOption = getQueryParameter("option");
The switch function sets the hsk_set_variable to the information in option parameter from the URL. The hsk_set_variable is then set equal to set_information. The important piece to note is that set_information is not just defined by let but is defined by export let this export means that this piece of information can be accessed in another .js file. For this to work both files must be defined as module type in their respective HTML files. For example the code in HTML that is calling card_display.js has the following code <script src="card_display.js" type="module"></script>. Now if the type="module" description was not there values could not be exported between files. Exporting different pieces of information is also the third and final set of this file, so that the study.js module is able to access the required information in order to run its code.
let hsk_set_variable = "";
switch (selectedOption) {
  case "1hsk1":
    hsk_set_variable = "1hsk1";
    break;
  case "1hsk2":
    hsk_set_variable = "1hsk2";
    break;
    // this function continues and has a case for
    // every HSK set available
}
export let set_information = hsk_set_variable;- Loading in the Flashcards
Second, the functions fetchJSONData main and populateSections are called. Each function is considered individually.
function fetchJSONData() {
  fetch(filePath)
    .then((res) => {
      if (!res.ok) {
        throw new Error(`HTTP error! Status: ${res.status}`);
      }
      return res.json();
    })
    .then((data) => main(data))
    .catch((error) => console.error("Unable to fetch data:", error));
}
fetchJSONData();
This function use fetch() to get the required data. fetch() is given the parameter filePath which was defined above and the explanation of how the information from the URL was set to set_information which is then added to the a string to create the filePath. This means that the JSON data for all the HSK sets can change and nothing in this code needs to change because it already routes straight to where the HSK data is stored. The code sends an HTTP request and if this request fails the first error message is returned. This error message runs if the res.ok line returns false, meaning that a 404 or 500 status code was returned from the HTTP request. However, if the code works successfully then the JSON data is read in using res.json(). If the JSON is parsed successfully the next .then runs and the data is passed to the main() function as a parameter. If the code fails at any of these other points the failure is caught using the .catch method and an console.error message is written to the console. After the function is defined it is immediately called fetchJSONData();.
let arrayLength = 0;
function main(data) {
  arrayLength = data.length;
  localStorage.setItem("array_length", arrayLength);
  populateSections(data, arrayLength);
}
The main function takes data in as a parameter and has no returns but calls different function with in. First, the length of the data is found by calling the .length method. arrayLength was defined before the function using a let statement. A let statement was chosen because this allows the value of the variable to change the other option for variable definition is a const statement which means that the value of the variable can not be changed. It remains a constant as the name const suggests. Next this variable is set to localStorage. This is so that the variable can be accessed in the next file. The reasons that it set to localStorage rather than exported is because the value of the arrayLength returns to 0 outside the function main. Next the function populateSections is called and the parameters arrayLength and data are passed to the function.
Next,cardFields sets the array that is then called in the populateSections functions in order to populate the data. The cardFields data makes this function more reusable.
const cardFields = {
  a: ["english_meaning", "English Meaning"],
  b: ["pinyin_tone", "Pinyin & Tone"],
  c: ["simplified_character", "Simplified Character"],
  d: ["traditional_character", "Traditional Character"]
}
Before using cardFields the information to create sections and populate them was divided into two sections and the code was much more rigid. The following code considers the old method, in order to be able to better understand what the new method is doing and the improvements that it has made.
These two functions were called populateSections and createSections. createSections made the sections and then populateSections was called in order to add the JSON data into the sections. These functions were implemented separately because for development purposes it was easier to make sure each function was working separately before trying to run them together. arrayLength was a parameter to both functions since both functions iterated through the code. These functions where hard coded with the sections to create and how to populate it, rather than using the dictionary approach.
The code for both these functions can be seen below. Only the english layer of the code is display, though this code was added for each individual layer in both functions. createSections uses the function .innerHTML in order to add the following code to the card id section created in the HTML file. The variable i was populated from the for loop for (let i = 0; i < arrayLength.length; i++). So, for the length of data from the JSON this for loop would run. So for most HSK sets, except for the last one, the for loop would iterate 50 times to create these sections.
function createSections(arrayLength) {
  for (let i = 0; i < arrayLength; i++) {
    document.getElementById("card").innerHTML +=
      `<section id="section${i}">
        <!-- from json english -->
        <section id="item${i}a" class="odd">english place
        holder</section>
        <!-- items in this section were also created for
         pinyin, and both characters categories -->
        </section>`;
  }
}
The code above creates the following section in HTML. For this example we will assume the for loop is on its first iteration, so the index will be 0.
`<section id="section0">
    <section id="item0a" class="odd">
    english place holder</section>
  <!-- items in this section were also created for
         pinyin, and both characters categories -->
</section>`;
There was another for loop in populateSections which also iterated through all the data to populate the code in HTML that was created by createSections. Only the english layer is displayed, though all the sections had data added to them. The for loop uses the same process as the for loop above, except instead of the for loop being used to define the index in HTML, the for loop here is used to call the created index and add to it.
function populateSections(data, arrayLength) {
  for (let j = 0; j < arrayLength; j++) {
    const terma = "item" + j + "a";
    document.getElementById(terma).innerHTML =
      "English: " + data[j]["english_meaning"][0];
      // items in this section were also created for
      //  pinyin, and both characters categories
  };
};
While coding, avoiding many for loops is preferred because for loops increase the run time exponentially based on the size of the data. This means that while the input is small and the time is little, but as the input size increase the time it takes to run this code increases linearly, though with nested for loop, ie one for loop inside another, the time will increase exponentially. Big O(n) notation is used in Computer Science to talk about this relationship between the input size and time taken to run. Two nested for loops has a Big O(n) notation of Big O(n^2) showing that the time increases exponentially with the data size. The goal for all code is to have a Big O(n) notation of O(1). This suggests that as the size of the input grows there is no change on the runtime. There are a few different operations that do this, the most notable being an Object. Objects are also known as dictionaries in Python, though they are called Objects in most other programming languages.
Each individual section is identifiable because every card and every section on every card has its own unique name. This works because when each section is created as the index number changes in the loop so the section name changes. Referring again to the code above you can see that in each id there are these symbols ${i}. The dollar sign means that this item is changeable and not part of the string like an f-string in Python. This means that it changes as the loop does, so changing every card/section and element in the section to have their own unique id. As seen above each element in the card has been assigned a letter “a” through “e” after the string “item” and the index number. This unique name is also present in the code above as well.
The new implementation of populateSections is much better than the previous implementation. Though, the code taken at face value can be a bit more confusing. First, the new implementation is improved because both createSections and populateSections have been combined into the same function and the same for loop, though there are still two for loops present in the new populateSections function. In this new function the for loop both creates and populates the sections. In addition, the new implementation is better because it is not hard coded like this previous method. In order to make a new study set in this previous method both the createSections and populateSections functions would have had to be manually changed in order to reflect the different layers of the new code. However with the cardFields array, the developer only has to change the information in the array and populateSections automatically runs and creates the new code.
The following for loop is within populateSections. This implementation takes in the dictionary cardFields. For for (const [key, value] of Object.entries(cardFields)) the major action taken can be seen below.
const elementInSection = `<!-- ${value[1]} -->
<section id="item${j}${key}" class="even">${value[1]}:
${data[j][value_item_0][0]}</section>`;

document.getElementById(sectionID).innerHTML += elementInSection;
This code sets the variable elementInSection to the data that is added to the HTML file with the populated code within it. value[1] calls the first index of the value of the given iteration in the for loop. This is the commented out code in the HTML section to define the layer. The next line creates the section and sets the id name as the index of the for loop value which is j and the letter in the alphabet that is the key value of the cardFields array. The class alternates between even and odd, based also on the value of j. If j is even then the class is even if j is odd an else statement is called with the same code as above except that the class is false. Next, the formal name of the layer, which was also added to the HTML comment is also added to define the flashcard. Next, the data at index value j with the value_item_0 simply equals value[0] and it calls the [0] index value of that list. The output of this code is being called from the data dictionary from the JSON file using the key which is the name at value[0]. Finally, this string is added to the HTML file using the command .innerHTML.
Updating study.js and study.html was done in a similar method. In order to code them at the beginning the functions were all hard coded to ids within the sections. However, now improvements have been made and the code is more flexible. However there are still elements in the study.js that need to have more flexible coding implemented. This will be one project for future work.
- Exporting different variables to
study.js
Third, there were a few different elements that study.js needed to access in order to run. These elements are passed, using local storage. arrayLength was added to local storage in the main function, however, the rest of the variables are passed to local storage at the bottom of the card_display.js file. These elements were all stored using local storage rather than export because the values in the card_display.js were reset every time the study.js module was loaded. As a result, the exported values kept appearing as empty, and then the code in study.js would not load. These values are the first elements accessed from study.js.
localStorage.setItem("set_name_for_html", set_display_name);
localStorage.setItem("card_field", JSON.stringify(cardFields));
localStorage.setItem("file_path", filePath);
Mandarin study.html
In study.js the first action taken is that all the necessary elements are accessed from local storage using localStorage.getItem("item_name"). The item_name if the first value passed in to the localStorage.getItem() function seen above.
Next, the Options Menu based on the values in the cardFields array. The Options Menu contains a “Card Front” option and “Card Back” option. In each of these options are all the different values that could be on the card front and the card back, which are the different layers of the flashcard. The user can then select the different options that they want in order to choosing which options are on the front and the back. The options are all the values in the cardFields dictionary. Before study.js used the cardFields dictionary, the card front and back options were hard coded into the HTML file. below can be seen the hard coded HTML section for the English layer of the Mandarin flashcards. Only the options for the card front is seen, though the same code expect for the back section also exists. The back section has a class="selectableB" rather than class="selectableA" as the front sections. In addition, the ids for each individual checkbox is back_a rather than front_a. The id tags remain the same even though the flashcard’s data is changing.
<section id="selection_format">
  <section>
    <h3>Card Front Options</h3>

    <ul id="itemListA">
      <li class="selectableA">
        <input type="checkbox" id="front_a" /><label for="front_a"
          >English Meaning</label
        >
      </li>
      <!-- items in this section are also created in <li> tags -->
      <!-- for pinyin, and both characters categories -->
    </ul>
  </section>
The following code shows the Shuffle versus non shuffle options. The code that makes these buttons work is be explained further in the description of the study.js file.
  <section>
    <h3>Study Options</h3>
    <ul id="itemListC">
      <li class="selectableC">
        <input type="checkbox" id="shuffled" /><label for="shuffled"
          >Shuffle</label
        >
      </li>
      <li class="selectableC">
        <input type="checkbox" id="created_order" /><label
          for="created_order"
          >Created order</label
        >
      </li>
    </ul>
  </section>
The shell of the “Study Options” sections stays the same however all the <li> tags are populated through the study.js file. The outline in the study.html file can be seen below:
<section id="selection_format">
  <section>
    <h3>Card Front Options</h3>
    <ul id="card_front">
    </ul>
  </section>
  <section>
    <h3>Card Back Options</h3>
    <ul id="card_back">
    </ul>
  </section>
  <!-- shuffle options -->
</section>
These sections are now populated using a function called createOptions which can be seen below. This code calls the card_front and card_back HTML section and then adds code to them for every key and value pair in the cardFields dictionary. It sets the id name as the front_ concatenated with the given key, and does the same for the back except with the word “back”. The createOptions function is called immediately after its creation.
function createOptions() {
    for (const [key, value] of Object.entries(cardFields)){
      document.getElementById("card_front").innerHTML +=
      `<li class="selectableA">
      <input type="checkbox" id="front_${key}" /><label for="front_${key}"
        >${value[1]}</label>
      </li>`
      document.getElementById("card_back").innerHTML +=
      `<li class="selectableB">
      <input type="checkbox" id="back_${key}" /><label for="back_${key}"
        >${value[1]}</label>
      </li>`
    };
};
createOptions();
The rest of the code in the HTML file also contains various buttons and warning messages. In addition, the code shell <section id="card"></section> is in the HTML so that all the flashcards can be created again. This may seem repetitive and it is. card_display and study files could have been combined into one file. However these two files are split up so that when the user hits the back arrow from study.hml they would not go all the way back to the sets.html page. Rather from a study session they would simply return to the card_display.html.
One warning message lets the user know that when no shuffle mode is selected the default mode is to shuffle the cards, rather than have them iterate in their original pattern. The other error message displays when not all the flashcard front and back options have been selected. study.html also contains code that shows the user what flashcard number they are on and give them a exit_session option while studying. These options can be seen in the div called containerIntro. The containerIntro div is only displayed during the study session
<div id="containerIntro">
<h2 class="set_name"></h2>
<p id="card_number"></p>
<p id="exit_session">< Back</p>
</div>There are also four buttons that are defined. These buttons are: start, next, back, and flip. study.html also contains a message that has a congratulatory message once the user has finished their study session. Most of these buttons and messages start with the CSS display value of “none”. These values are not displayed at the beginning of a study session. Various warning messages are displayed at different points in time.
Most of the code in study.html has to do with changing the visibility of buttons, messages, and flashcards based on the buttons that are clicked during a study session. There are five important steps to be considered when looking at the study.js file. First, the Options Menu and all the flashcard sections must be created and then populated. After the flashcards are made the display must be set to “none”. Second the user’s selections from the Options Menu must be saved and impact how the cards are displayed. Third, the general study set up is implemented and the first flashcard is shown once the start button is clicked. Fourth, the next button functionality is implemented and the end of the flashcard program set up is also in this button functionality. Finally, the fifth section implements the back button functionality.
- Loading in the JSON data and Changing the Flashcard Visibility
The process to load in the JSON data in study.js is the same as in card_dislay.js. It uses fetchJSONData and populateSections. Then the visibility of all the cards is set to display = "none" for each individual section. First the display for all the cards is set to inline, before using a for loop to iterate through all the cards. This code calls each card by its sectionName and sets the visibility of the card to none.
function optionsMenu(arrayLength, listToUse) {
  // iterate and set all section displays to none
  document.getElementById("card").style.display = "inline";
  for (var i = 0; i < arrayLength; i++) {
    const sectionName = "section" + listToUse[i];
    console.log("section name: ",sectionName);
    document.getElementById(sectionName).style.display = "none";
  }
}
The display must be set to none for each individual flashcard. The display can not be set to none for the whole entire group because then it does not work to change the visibility of each individual card when the entire section is display “none”. Where as, when each section is set to display individually, when the display is changed again to view, it does not affect the other cards. However, the downfall of this is that study.js file is using a for loop to iterate through each card to set the display to none. This again has a Big O notation of O(n^2) and so time will increase linearly as the input does. This does not have a big impact with small study sets, but that impact increases as the size of the set does.
- User’s Selections Storage and Impact
First a list called listNumbers is defined. This list contains and list of numbers that are based on the arrayLength. This list is used to create the shuffle and create order modes.
const listNumbers = [];
for (let i = 0; i < arrayLength; i++) {
    listNumbers.push(i);
  }
When the user wants the created order the index for the card is called from the original unshuffled list. However, when the user wants shuffled cards, the index value for the card is called from the shuffled list. The [...listNumbers] method is called so that the original listNumbers does not change, only this copy of the list will be affected. Then the shuffle() function is called on the copy of listNumbers. The shuffle() function uses the following code inorder to get a random number in the required range. There are no repeats in the shuffled list. let randomIndex = Math.floor(Math.random() * currentIndex);
Next the user’s selection of which layers they want on the front and the back of their flashcard are stored using selectedCountCard count and a selectedCountShuffle count. If either of these counts do not have the required number then an error message shows, telling the user to select all the available checkboxes. The functions increaseCheckboxCount and decreaseCheckboxCount both increase and decrease the count respectively when different values are clicked and unclicked by the user. The function for increaseCheckboxCount can be seen below. The code for decreaseCheckboxCount is implemented in the same manner except it decreases the selectedCountCard rather than increasing it.
  let selectedCountCard = 0;
  function increaseCheckboxCount(section) {
    if (section == "card") {
      selectedCountCard++;
    } else if (section == "shuffle") {
      selectedCountShuffle++;
    }
  }
The following code changes the values of the listToUse based on what the user selects for if they want the shuffled option or the created order option. The default option is shuffled unless the user wants the created order. When the toggleLogin function is called the list to be used in the study session is changed based on the user’s selection.
  let selectedCountShuffle = 0;
  let listToUse = shuffledList;
  function toggleLogin() {
    listToUse = listNumbers;
  }
A change in the checkbox selection can be made using the addEventListener that has a first parameter of change and then defines the function or calls a function in the second box. The code here defines a function name function. This function increases the checkbox count when the shuffle button is checked: shuffleBtn.checked. Otherwise the function decreases the shuffle count. There is the same function for the created order button, that is not displayed, but has the same functionality.
  const shuffleBtn = document.getElementById("shuffled");
  const nonShuffle = document.getElementById("created_order");

  shuffleBtn.addEventListener("change", function () {
    if (shuffleBtn.checked) {
      increaseCheckboxCount("shuffle");
      nonShuffle.style.display = "none";
    } else {
      nonShuffle.style.display = "inline";
      decreaseCheckboxCount('shuffle');
    }
  });
Next the user’s selections for their study session are saved and applied to the code. This section of the code is more hard coded and could be updated by the developer in the future. For the Mandarin flashcard set there are four different selection options, which are specified in the cardFields dictionary. Variable “a” is connected with selection option “English”. Variable “b” is connected with the selection option “Pinyin & Tone”. Variable “c” is connected with the selection option “Simplified Character”. And variable “d” is connected with the selection option “Traditional Character”. There is a toggle function that is called every time the user changes the checkbox selection.
var a = true; function togglea() {a = false;} // english meaning
var b = true; function toggleb() {b = false;} // pinyin tone
var c = true; function togglec() {c = false;} // simplified
var d = true; function toggled() {d = false;} // traditional
There is a generic function called handleCheckboxToggle that handles the toggle of the front and back checkbox options. Then for each category from the Options Menu calls the handleCheckboxToggle. handleCheckboxToggle has two scenarios that run. First, if the front checkbox is checked, the first part of the if statement runs. The part of the function increases the card check count and if the front checkbox is not checked the checkbox count is decreased and the toggleCheckbox function is called. This then sets the value of the variable to false. Later in the program the boolean values of the variables a, b, c, and d are checked. This will then determine which layers in a flashcard should be flipped over and which ones should keep the display as a value of none. The function for backCheckbox does the same steps but toggles the checkbox in the first if statement. In addition, both functions change the visibility of the checkbox based on the checkbox that is selected. For example, if the checkbox is selected for the front side of the flash card the user should not be allowed to still check that checkbox on the back side of the card. So the checkbox on the back of the card gets set to display = "none".
  function handleCheckboxToggle(frontCheckbox, backCheckbox,
  toggleCheckbox) {
    frontCheckbox.addEventListener("change", function () {
      if (frontCheckbox.checked) {
        increaseCheckboxCount("card");
        backCheckbox.style.display = "none";
      } else {
        backCheckbox.style.display = "inline";
        toggleCheckbox();
        decreaseCheckboxCount('card');
      }
    });
    backCheckbox.addEventListener("change", function () {
      if (backCheckbox.checked) {
        frontCheckbox.style.display = "none";
        toggleCheckbox();
        increaseCheckboxCount("card");
      } else {
        frontCheckbox.style.display = "inline";
        decreaseCheckboxCount('card');
      }
    });
  }
Next, for each category in the Options menus needs the call the function handleCheckboxToggle. The parameters that are passed in are the frontCheckbox and backCheckbox id value from the HTML and the toggleCheckbox function. The function for the english flashcard value is displayed through the inputs and set up of each function looks the same for all the options of the Options Menu.
  handleCheckboxToggle(
    document.getElementById("front_a"),
    document.getElementById("back_a"),
    togglea,
);- General Study Session Design & Start Button (First Flashcard)
The code above and all the button responses below are all within the main function. All throughout the study session the user will have the option to exit the study session. When a user chooses to go back and clicks on the exitLink an alert pops up on the screen and asks the user if they want to go back to the beginning of the study session. There the user can exit or cancel the request. If the user chose to exit the window.location.reload reloads the page and bring the user back to the Options Menu.
  const exitLink = document.getElementById("exit_session");
  exitLink.addEventListener("click", function () {
    let userChoice = confirm(
      `Are you sure you want to leave this study session?
      You will have to restart from the beginning.`
  );
  if (userChoice) {window.location.reload();}
  });
Before the actions defined by when the user clicks the start button there are a few different variables defined. The first variable index is the value of the given card in the listToUse. This index does not reflect the item number of the current card because in the shuffled list the index number does not match the i value of the item${i} number. However, the in the created order list these numbers are both the same. The next variable defined is the cardNumber the cardNumber is the number that is displayed to the user for which card they are on. This number is one larger from the index because the index of list starts at 0 but to the user the first flashcard they are on is displayed as 1 rather than 0. Though the index number and the displayed card number changes in all the same locations.
Next, the start button is called from the HTML and defined in a variable. There are few different ways to add function actions to button when the button is clicked. The different ways to implement buttons are all be seen below. The first way is be defining the function within the button, this is different from defining the function outside the button click and then simply putting the function name in the location.
let index = 0;
let cardNumber = 1;
const start = document.getElementById("start");
start.addEventListener("click", function () {
When there the start button is clicked there are a few things that have to happen. First the code checks the selectedCardCount to confirm that enough check boxes have been selected in order for the cards to be displayed. If there are enough boxes selected the rest of the functionality for the start button runs. This first item changed is the HTML content inside the card_number id in the study.html page.
// If no checkboxes are selected, show an error
if (selectedCountCard < 4) {
  document.getElementById("errorMessageFrontBack").style.display = "block";
  console.log(selectedCountCard);
} else {
  // gives the user the card count
  cardNumber = listNumbers[index] + 1;
  document.getElementById("card_number").textContent =
    `Card ${cardNumber} of ${arrayLength}`;
Then all values that display the navigation and menu and page name, and footer are hidden. There are hidden by calling the .tablet-desktop, .intro, .mobile-nav, and footer class. Only the .tablet-desktop option is shown below because the code set up for .intro, .mobile-nav, and footer have the same setup. Then each element within these classes is iterated through and the display is set to “none”. In addition, all the values from the Options Menu are also hidden. They are called using their id names. The different values that are called and set to none are errorMessageFrontBack, start, card_front, card_back, shuffle_options and all elements with a h3 heading. While all these values are set to a display of none, card_number and exit_session are both set to have a display of inline. Both these ids are part of the div called containerIntro.
const tabletDesktop = document.querySelectorAll(".tablet-desktop");
tabletDesktop.forEach((element) => {
  element.style.display = "none";
});
Next, the buttons next and flip are shown. The back button is only displayed once the listToUse value is past the first index. On the first index of the listToUse there is no card to go back to to the back button is not displayed until the user is on the second card.
The toggleCardVisibility function is shown below. It takes in the condition which will either be true or false, because a, b, c, and d were defined earlier. Then it calls the flashcard using the index and the alphabet letter that it is. Then based on the condition the layer is either set to display “block” or display “none”.
// defined earlier in main, outside the start button function
function toggleCardVisibility(condition, index, itemAlphabet) {
  const card = document.getElementById(
    "item" + listToUse[index] + itemAlphabet,
  );
  card.style.display = condition ? "block" : "none";
}
In each card, the name of the section is created and then set to display “block”.
However, if the user does not want a certain option displayed on the front then the variable a, b, c, or d will be false and so that layer of the flashcard is not displayed. Based on whether the values of a, b, c, and d are true or not they are displayed or not. If the value is true then the card layer is displayed.
const sectionName = "section" + listToUse[index];
document.getElementById(sectionName).style.display = "block";

toggleCardVisibility(a, index, "a");
toggleCardVisibility(b, index, "b");
toggleCardVisibility(c, index, "c");
toggleCardVisibility(d, index, "d");
Next, once the start button is clicked, all the layers of the flashcard should be revealed. This means that the toggleCarVisibility can be called and the condition parameter can be marked as true for every single value. The flip button is also set so that it has a display of none.
document.getElementById("flip").addEventListener("click", () => {
document.getElementById("flip").style.display = "none";
  for (const [key, value] of Object.entries(cardFields)){
    toggleCardVisibility(true, index, `${key}`);
  };
});- Next Button (Flashcards from 2nd to the End)
Another way that a button function can be initiated is that rather than calling a function or defining the function name is that within the button click the function initiation can simply involve and () => {} to initialize the function. The first action that the next button does is to change the location of the flip button. On the first flashcard the flip button was only 90px above the bottom of the screen so that it was right above the next button. Here however, it must be moved above the back and next buttons. The next action the next button takes is to hide the current flashcard that was just displayed. The index is then increased and a new card number is displayed to the user. So they would know that they are on “Card 2 of 50”. This is visible in the top right hand corner.
  document.getElementById("next").addEventListener("click", () => {
    document.getElementById("flip").style.display = "inline";
    document.getElementById("flip").style.bottom = "120px";

    // Hide the current flashcard
    console.log(listToUse[index]);
    const sectionName = "section" + listToUse[index];
    document.getElementById(sectionName).style.display = "none";

    index++; // Increment the index to show the next card

    // gives the user the card count
    cardNumber = listNumbers[index] + 1;
    document.getElementById("card_number").textContent =
      `Card ${cardNumber} of ${arrayLength}`;
  })
The next section of code takes the index and calls and displays the different layers of the card based on the user selections that were made. This is the same process that was done in the start button functionality. The only difference here is that the back button is also displayed. The reason the back button is not displayed on the above card is because there is no flashcard to go back to. This code runs when the code hits index < arrayLength - 1. The index must less than the arrayLength - 1. When the index == arrayLength - 1 this excludes the final card of the flashcard set. Then the else if statement runs for the last flashcard. The difference in the else if statement is that the text content of the next button is changed to the word “Finish” using the following command document.getElementById("next").textContent = "finish"; If the if and the else if statement do not run it means that the index is equal to the arrayLength which means that there are no more flashcards. In this scenario the else statement will run.
if (index < arrayLength - 1) {
  // sets display for only the specified layers
  // runs all flashcards between the first and the last
  document.getElementById("flip").addEventListener("click", () => {
    // displays all card layers
  });
  // display the back button
  document.getElementById("back").style.display = "inline";
} else if (index == arrayLength - 1) {
  // sets display for only the specified layers
  // runs only the last flashcard
  document.getElementById("flip").addEventListener("click", () => {
    // displays all card layers
  });
  // change the next button to say finish
  document.getElementById("next").textContent = "finish";
}
When the else statement runs the message that tells the user they have finished their study session is displayed. In addition, all the buttons are set to display none. Then all the elements of .tablet-desktop, .intro, .moblie-nav, and footer class are displayed again.
else {
document.getElementById("message").style.display = "block";
document.getElementById("next").style.display = "none";
document.getElementById("back").style.display = "none";
document.getElementById("flip").style.display = "none";
}- Back Button Functionality
Rather than increasing the index like the next button, the back button decreases the index count and the card number that is displayed. Otherwise it has the same functionality as the next button. if the index == 0 that is the first card the back button is not displayed. and the location of the flip button is moved to sit directly on top of the next button. The previous flashcard is display and all the different layers are evident when going backwards, though this can be changed. The else if section changes the text content of the back button from “Finish” to “Next” when going back from the final card. And finally is there are no more cards the else hides the back button.
document.getElementById("back").addEventListener("click", () => {
    // hide the current flashcard
    index--; // Increment the index to show the next card
    // set up the top corner card count for user display
    if (index == 0) {
      // display set up for the very first flashcard
      // no back button
    } else if (index < arrayLength) {
      // changes the value of the Next button to Next
      // just in case it said finish
    } else {
      // If no more cards, hide the Next button
    }
  });
The original implementation of the next, flip, and back buttons work in a way that the first flashcard and the last flashcard had their own button, section, and code written for them, while every flashcard in between the first and the last use the same code and just iterate through the indexes. The first flashcard is different because it has to hide all the HTML from the Options Menu. In addition, the first flashcard does not display the back button, while the last flashcard does not display the next button but has a finish button. On all the in between flashcards there are both a next button and a back button. Within all three of these card display and study sections the displays are changed based on which buttons are pushed.
Above has been an explanation of the four main pieces of this project. First, the data preparation and conversion to a JSON file. Second, the sets.html page. Third, the card_display.html and card_display.js page and fourth, the study.html page and the study.js page. The code shown above has been the set up for the Mandarin set. There are some slight differences among the other sets. The majority of the difference are in the data conversion and the set up of the sets.html because the other code has been updated and made reusable the functionality should be the same, besides a new dictionary of terms and information.
Ethical Considerations
This tool uses a lot of outside sources for data that is then loaded into make flashcards. This data comes from many different sources and projects. It is important to consider the locations that the data came from. The data is publically accessible and available. It has not been taken incorrectly from private projects and sources. With that being said, much of the data is from Wikipedia for projects that took data from Wikipedia. This means that the data has not taken from the latest research. In addition, it means that the data has not been corroborated with anything outside of itself. The data has not been checked against any other sources. This is an ethical concern because it means that not all the data might be accurate, some topics might be more widely debated like who killed which Roman Emperor where as some data can be more trustworthy like the atomic weights of Periodic Table elements, which are supported by science and have been corroborated by many different scientists.
Design Accessibility
There are standards online that dictate web accessibility. These help ensure ethics and that computer websites and applications are available to all users. These standards measure aspects of website design like color contrast and confirm they adhere to the accessibility standards [1]. WCAG give standards on aspects of design like color contrast and ratios. This section is looked at more in depth in the Experiments because the web tool is run through different algorithms that ensures color contrast reach the AAA accessibility standards. In addition, other aspects of the website are checked in that section as well.
The style and design for the homepage was chosen in order to give a sleek and professional view of the website. It does not use much color, just simple black and white. One element that helps this page appear more professional is the shadow added to the different flashcards on the page adding this shadow makes then pop off the page and make the page feel less 2D. Having a little amount of text and other information on this homepage also makes it feel professional. There is not an overcrowding, it is simple, to the point and put together. The font also contributes to this modern simple theme. It is easy to read and understand, there is space between the letters which adds to the comprehensibility of the Homepage.
The homepage hosts the links to page where all the differenet flashcard topics are displayed. Each flashcard topic has a different color, these colors carry over to be the background color of each individual study set. Mandarin has a different color scheme than the homepage in order to make Mandarin Flashcards its own study set separate from the others. One reason for In addition, having these separate web pages allows for more context and information to be added to each flashcard topics. For example on the Mandarin Flashcard page, there is a Culture tab. This Culture tab would not be applicable to the other learning sets, only to Mandarin. Likewise, there is the space in other more cultural pieces for context and history where there might not have been otherwise.
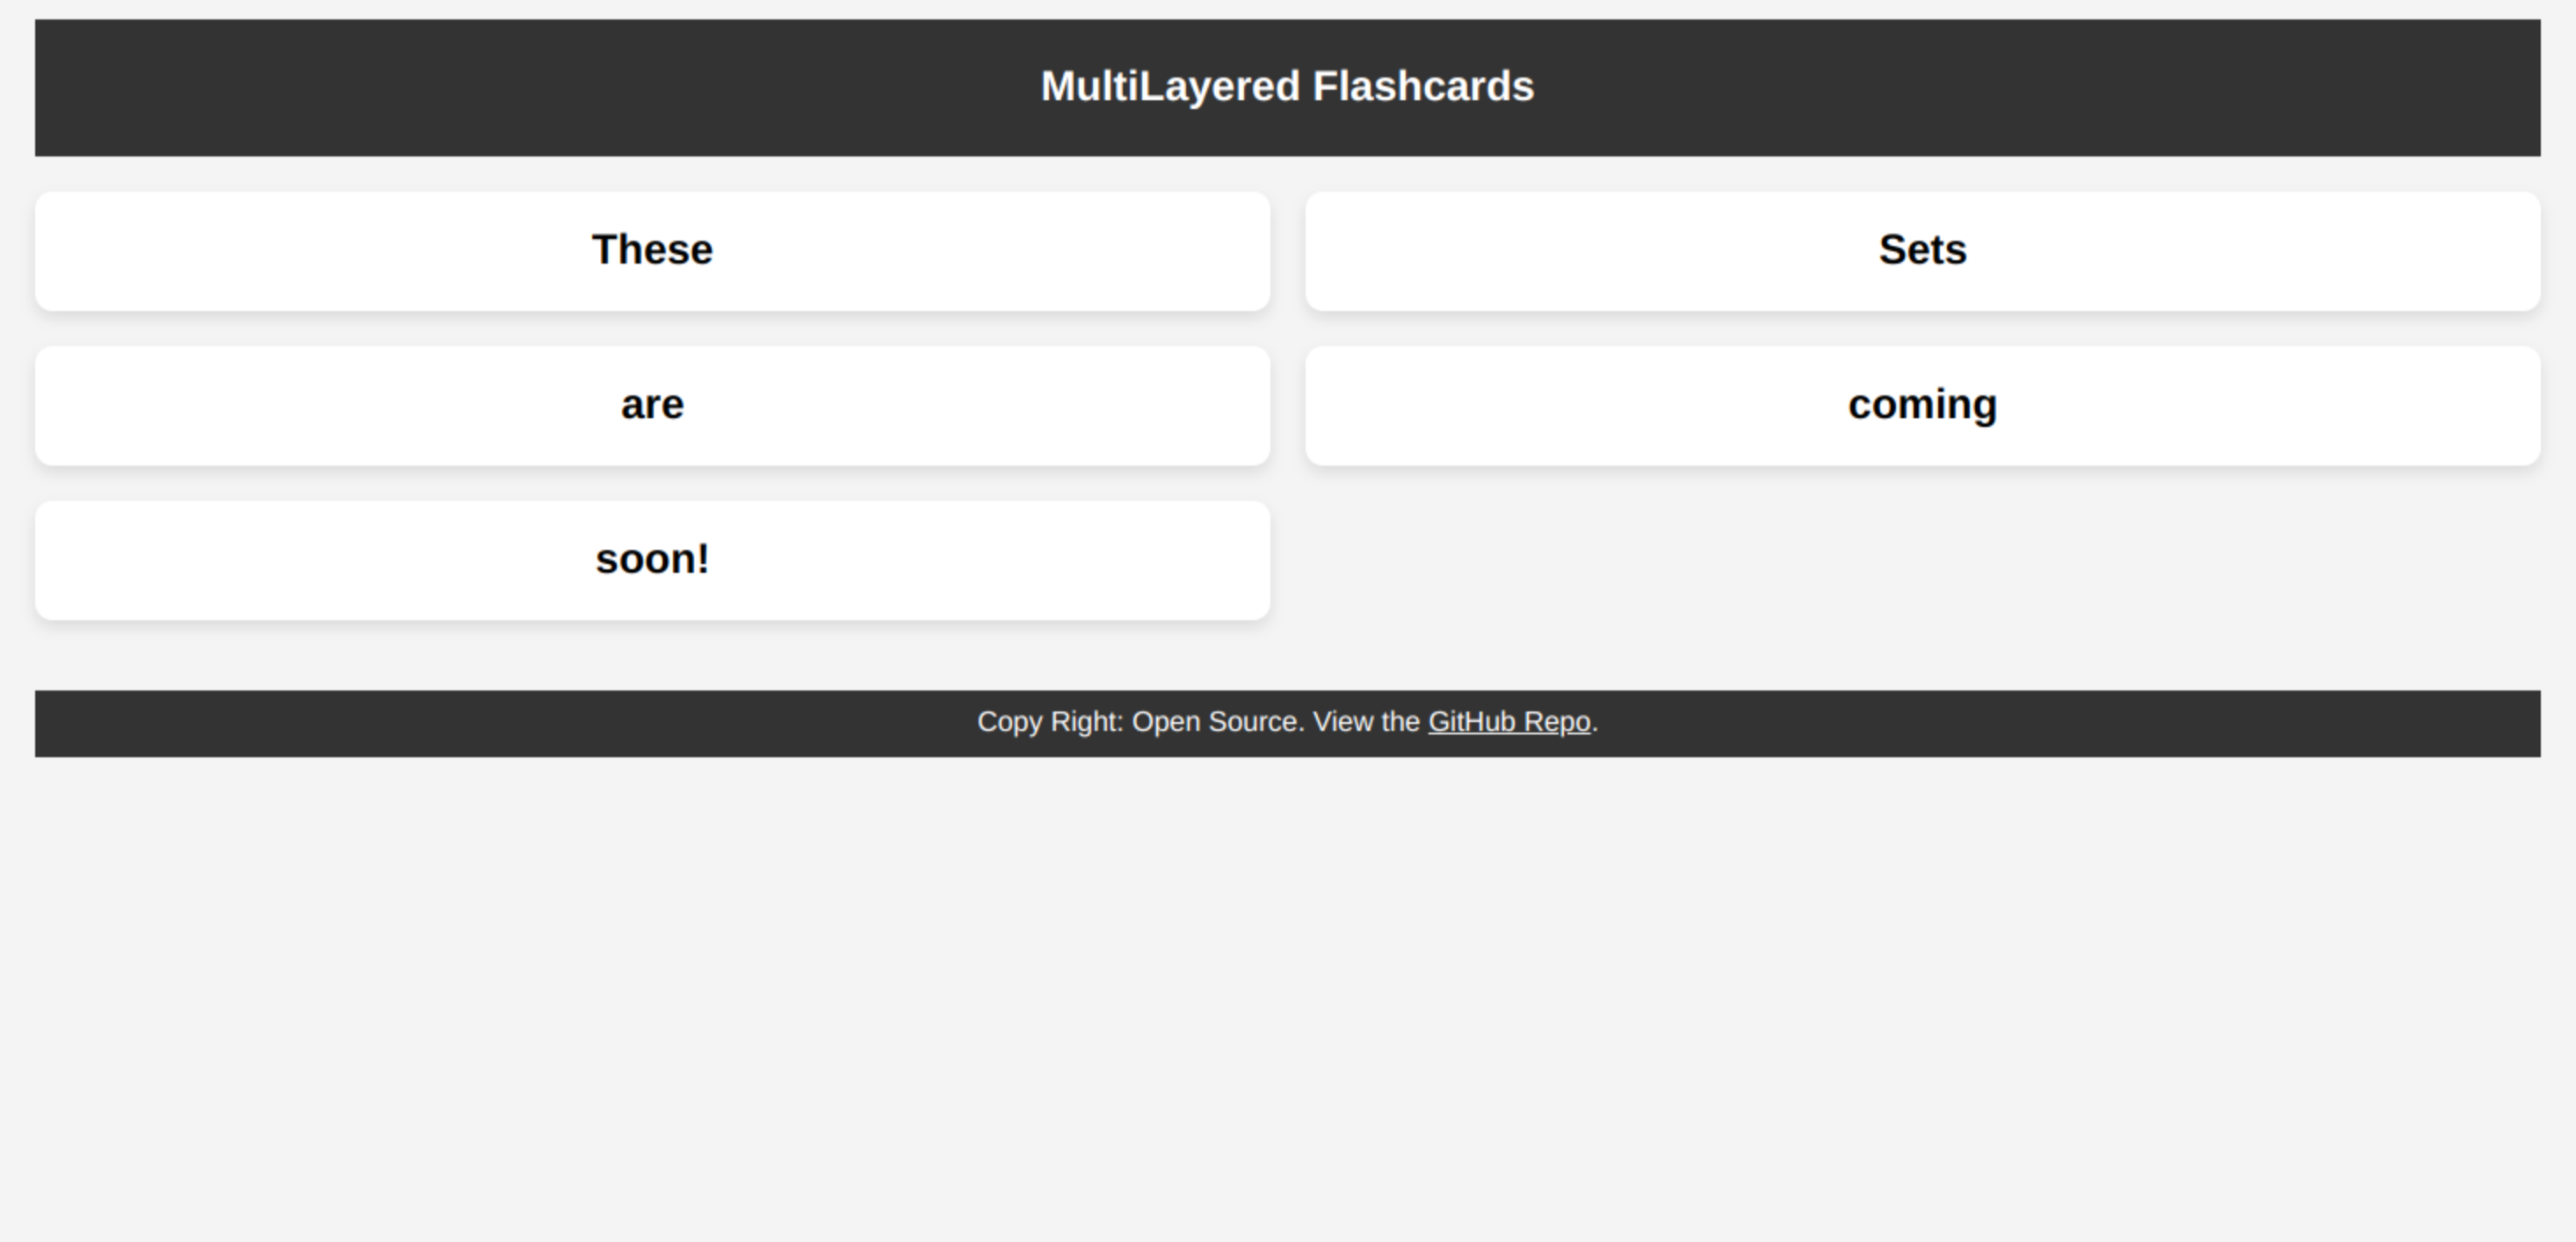
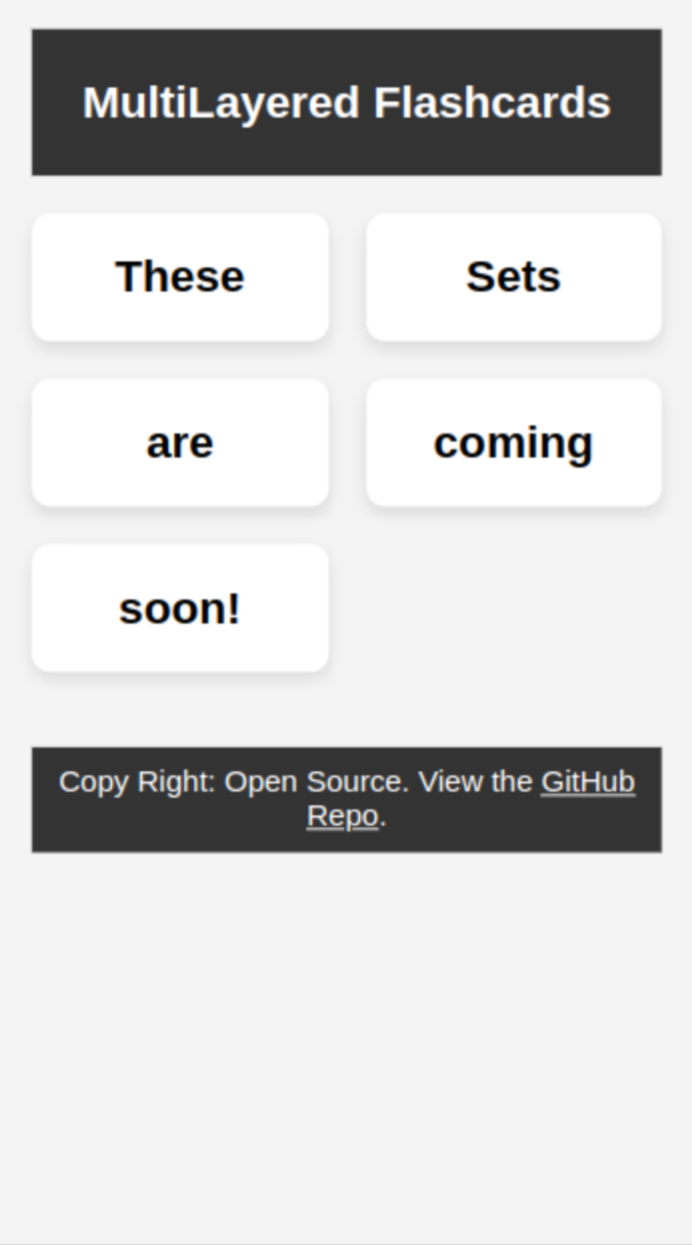
Other Developer Tools: Inspect
Inspect allows the user while working in Chrome to test and see the code for their website from inside the browser.
There are other tabs in the Inspect menu once it is pulled up. The tab relating to HTML display and CSS is under the name “Elements”. This tab also allows you to see what HTML elements connect with different elements of the website and vice versa. The developer can click the HTML to view the element on the webpage and the developer can click the mouse selector mode and then click on the website element and it shows where on the HTML that element is. This can be done on any webpage.
The Console tab is the one that is used to communicate with and test JS files. In JS you can use the command console.log("value"). The Console tab would then print “value”. This allows the developer to work with multiple. For example, the developer can use these print statements in order to confirm where in the code the program reaches, along with printing out different variables in order to confirm the variables are the correct ones and used in the correct places.
The Sources tab allows the developer to see all the code similar to the view within a VS Code or other text editors. This tab only allows the developer to view the code. They can not edit or change the code. below you can see the Sources tab view for the homepage.

Next is the Network tab which shows can track the network connectivity in addition to using different filters to track URLs and cookies and bad responses, among other functions. There is also a Performance tab which shows the Largest Contentful Paint (LCP), Cumulative Layout Shift (CLS), and Iteration to Next Paint (INP). Which will be explained below.
As relating to security, all the pages of MultiLayered Flashcards and Mandarin Study Tools are HTTPS secured. This is a greater security than just HTTP. HTTP stands for Hypertext Transfer Protocol. This has to do with different types of internet requests. The “S” in HTTPS stands for “Secure”. This means that the webpage’s calls are secured, where as in HTTP they are not. While testing and developing HTTP was used, because the local server could not be accessed outside of the computer. HTTP is a good place to start when testing locally. However, for a web page to be published and able to use by the public the webpage should be secured.
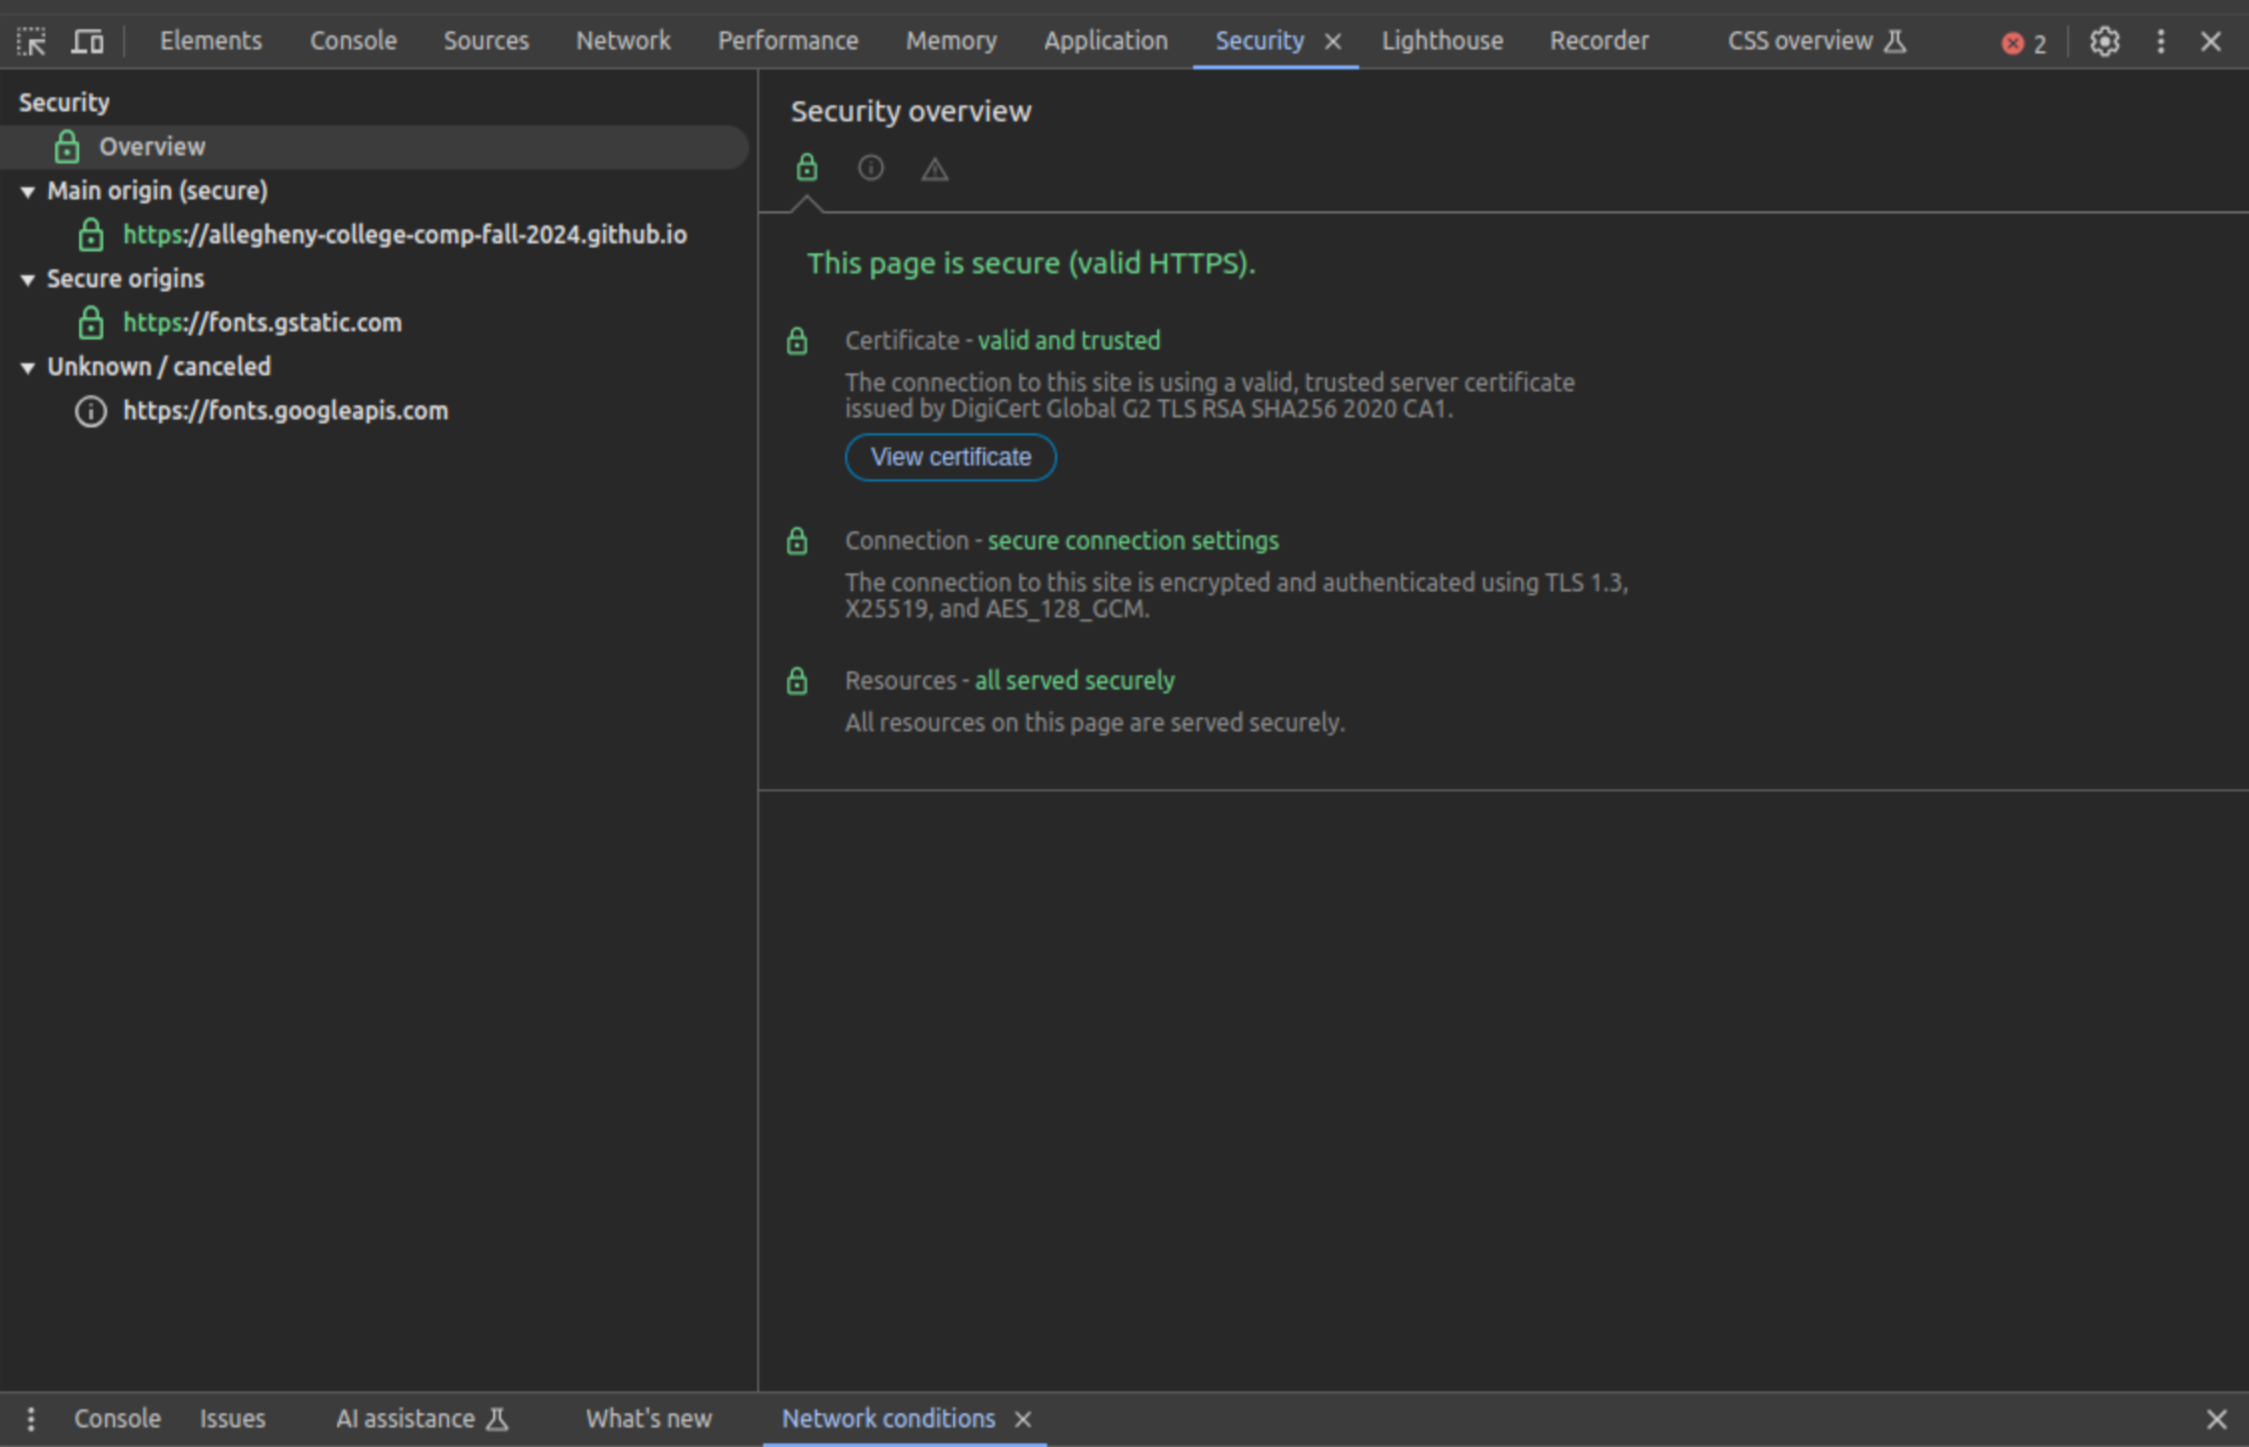
In addition, Inspect offers tools that track Memory use, an Application tab and gives a CSS Overview. However, these tools were not used for this project. Another important piece of Inspect, is a website evaluation tool which is explained in depth in the Experiment section.
Experiments
The Methods section described the different tools leveraged in this project. This section discusses the user’s interaction with the final product. It looks at the user interface and how one can go about using this tool. In addition, this section explains the experiment setup and considers the results.
Experimental Design
The experiment for this website consists of two parts. Both parts are measuring the performance of the website. The measurements are collected using Lighthouse. Lighthouse is a tool that is built into Chrome. There are four categories that Lighthouse measures. All the tools and measurements used in the experiment are explained below. Both parts are testing web pages that look exactly the same from the user side. However, the data being loaded into both sections is different. The first test loads in the data using the JSON files. This is the way that developers interact with the website and the code. The second method uses HTML files and CSS files that already have all the code prepared in it. These experiments show that not only is this tool usable and functional but also show how different methods of loading data into a website impact the performance of the website.
Experimental Tools: Lighthouse
As mentioned previously, Lighthouse, a tool built in to Chrome, is used for the evaluations. There are four different aspects being tested: performance, accessibility, best practices and SEO.
Lighthouse is a testing application used in order to testing website development. This platform does not have to be installed on Chrome it comes with it. Mentioned earlier, was the “Inspect” tool which is used in Website development and allows the developer to see the code behind the website. For each of the categories–Performance, Accessibility, Best Practices and SEO– the score is out of 100. 0-49 is considered poor. 50-89 is considered in need on improvement. While, 90-100 is considered good.
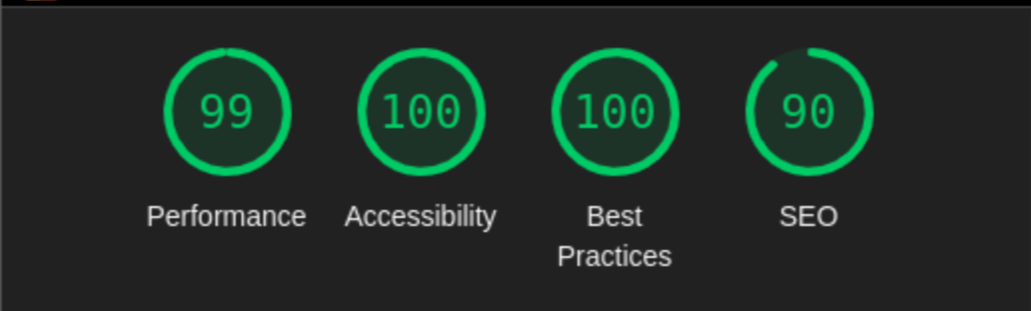
- Performance
The score for Performance is a combination of multiple different performance scores. There are five categories. These five categories are Largest Contentful Paint (LCP), Cumulative Layout Shift (CLS), First Contentful Paint (FCP), Total Blocking Time (TBT), and the Speed Index (SI). There are more categories for calculating Performance here as opposed to the Performance Tab that is under Inspect.
LCP is weighted 25%, CLS is weighted 25%, FCP is weighted 10%, TBT is weighted 30%, and SI is weighted 10% in Lighthouse 10, though these weightings are a little bit different for Lighthouse 8 where CLS is weighted at 15%. There is is a page to calculate different Performance scores which allows the developer to test different elements of the Performance score in order to determine which element of their website’s performance that they need to focus on in order to improve the performance of their website. There is a performance calculator that can be used in order to change different values and test what the final Lighthouse performance score is [34].
- A. Largest Contentful Paint (LCP)
LCP tracks how fast the webpage loads before it is visible to users. In the past there have been other metrics that have measured this but some issues with them are that they have not tracked what the user’s view is. LCP is the amount of time that it takes in order to render the largest pieces of content on a webpage. Anytime time between 0-2.5 seconds is considered ‘Good’, 2.5-4.0 is considered ‘Needs Improvement’ and 4.0+ is considered ‘Poor’ [45]. LCP generally considers tags in HTML like <img> or <video>.
- B. Cumulative Layout Shift (CLS)
CLS has to do with how information shifts while on or using a page. It considers the fact that page shifts disrupt the user experience. For example, when someone is reading a webpage it can be very disruptive to the user experience to have the text that they are reading shift and jump around on the page. Good scores for CLS are considered less than 0.1 or 0.1. Between 0.1 and 0.25 is considered needing improvement and above 0.25 is considered Poor. This scores considers how much of the page loads and generally 75th percentile of page loads. The score comes from an API called ‘Layout Instability API’ which tells the user about layout-shift. The score is calculated using two measurements called the “impact fraction” and the “distance fraction”. The impact fraction and the distance fraction multiplied together result in the final layout shift score. CLS scores are generally low on pages with lots of adds or other pops ups that shows themselves after the webpage has loaded [44].
- C. First Contentful Paint (FCP)
FCP determines how quickly the first element in your Document Object Model (DOM) loads. DOMs refer to the structure of the website and the content on the website. This includes almost all elements of the webpage. The FCP scores of loading the website is 0-0.9 seconds for green. 0.9-1.6 seconds for orange and over 1.6 seconds for red. Font loading is often one piece that slow down the FCP score [9]. One way to speed up this metric is to remove extra font parameters that are not being used. In addition, it is possible to add metrics to JS inorder to measure the FCP in the JS code in order to get a better idea when FCP tracking is actually taking place. Lighthouse also gives tips and recommendations on elements to update and how to load them in to the webpage in order to speed up performance metrics.
- D. Total Block Time (TBT)
TBT is the metric that tells the user the amount of time that the website can not be used. For example, while the website is loading the user often does not have access to it. The TBT score calculates that amount of time. All the interaction that this tracks from the user is mouse clicks, screen taps, and keyboard presses. On a mobile phone 0-200 milliseconds is good, 200-600 ms needs improvement, and over 600 is considered red and slow. On a computer desktop 0-150 ms is good, 150-350 is considered moderate, and over 350 is considered slow [8]. There are a few different ways to improve your TBT score. This again has to do with JS loading and doing is well, and the main thread of the code that is run. In addition, removing pieces of JS that are not efficient can help. The webpage will not be accessible by the user until all the elements of JS are loaded.
- E. Speed Index (SI)
SI measures how quickly visual content is loaded onto a page. 0-3.4 seconds is considered fast for loading a phone. 3.4-5.8 is considered moderately fast loading and over 5.8 is considered red and loads slowly. These numbers are for loading on a mobile platform. However, there are different values for loading a page on a desktop. Fast is considered 0-1.3, orange is 1.3-2.3 seconds and red is considered 2.3 red and poor performance. Different ways to increase the speed of loading is through minimizing the thread work, decreasing the JS runtime and a few other things as well [7].
Results and scores from the Lighthouse Performance and the general Inspect Performance tab is also considered. While the Lighthouse Performance calculations contains many more categories than the general Inspect Performance, there is one category that the general Inspect has beyond what the Lighthouse Performance calculations are considered. This is because Iteration to Next Paint (INP) has to do with user interaction, so it can not be tested by just Lighthouse alone.
- F. Index to Next Paint (INP)
INP has to do with information to show the user something is happening. It is a metric that considers a webpages responsiveness to user actions and has information alerting the user of in between stages, like a login be authenticated or a new webpage loading. If a webpage does not tell the user that the new one is loading or that the login is being authenticated the user might think there was an issue with the page or something that they did, when this may not be the case. INP detects how long between user actions and feedback of the given action. It also has to do with drop down menus and a user making selections and how fast the JS and buttons respond to the user. The INP score considers elements such as “pointerup”, “pointerdown”, and “click”. INP is considered good responsiveness when INP is less than or equal to 200 milliseconds. INP is considered needing improvement when it is between 200 and 500 ms and it is considered poor when INP is at or above 500ms. Different interactions like clicking with a mouse, tapping on a touch screen, and pressing a key on either a physical or virtual keyboard all measured by INP. Sometimes INP is not tracked. This happens when a page is loaded but never clicked on or used or it is being blocked by a bot or something else [43].
LCP and CLS are also considered under the general Inspect Performance. Both sets of Performance values are considered in the experiments.
- Accessibility
There are many different aspects considered for Accessibility. Mostly, Accessibility considers how easy it is for a user to use a page with different impairments. Most often these features have to do with visual impairments. Websites have many different functions that allow a user to easily navigate even if they may have a visual impairment. This relates to making vivid and stark color contrasts so text is easier to see and read, in addition, to making text large and bolder. There are also many tools that can read a webpage, however, this requires that the developer includes image descriptions, link descriptions and button descriptions, so the visually challenged user can still understand the webpage while it is read to them [5]. In addition, a developer can should make it so that their webpage can be circumnavigated without a mouse. These are all different features that relate to accessibility standards. These aspects and many others relate to the developer’s accessibility score.
- Best Practices
Best Practices is evaluating elements of the HTML code that should be stated and defined. When creating an HTML document a <!DOCTYPE html> should be defined [3]. If it is not defined, this is one element that the Best Practices tracker of Lighthouse is looking for [4]. Other considerations have to do with defining the language inside the doctype tag.
- Search Engine Optimization (SEO)
section is also the section that contains links to Google Fonts and the CSS styling page, as mentioned in the comment below [2].
<html lang="en">
  <head>
    <meta charset="UTF-8" />
    <meta name="viewport" content="width=device-width, initial-scale=1" />
    <meta
      name="description"
      content="Author: Rudd. Rebekah, Flashcard learning project"
    />
    <!-- <Google Fonts links, CSS page link, etc> -->
  </head>
Website Use
When a user first opens MultiLayered Flashcards, they are brought to the homepage.

From the homepage the user can click on the word “MultiLayered Flashcards” in green, or they can scroll down learn more about the website and click on the “CLICK HERE to view all available study sets!” button at the bottom of the homepage. The homepage is linked to the page where a user selects a study category from the different subjects. And the category selection page is the only page that links to the homepage. The purpose of the homepage for this project is to grab people’s attention and to get them interested in the website. It does not contain any study help or information which is why none of the other pages link to it.
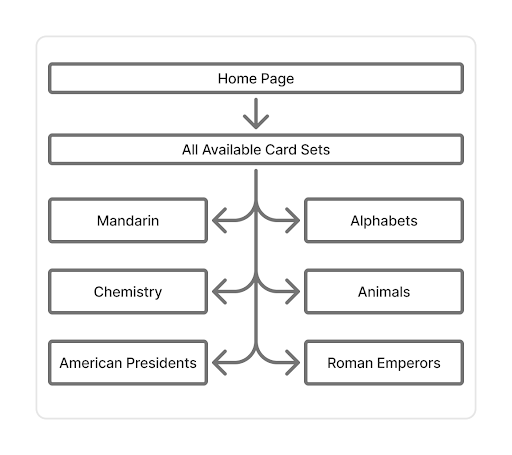
All the webpages with grids have four columns on the page when the webpage is full screen and just one column when the screen is 805 pixels or less. The changes in the display are defined in the style.css file. The top six sets are available and have data while both “Bible” and “Geography” are not yet populated.
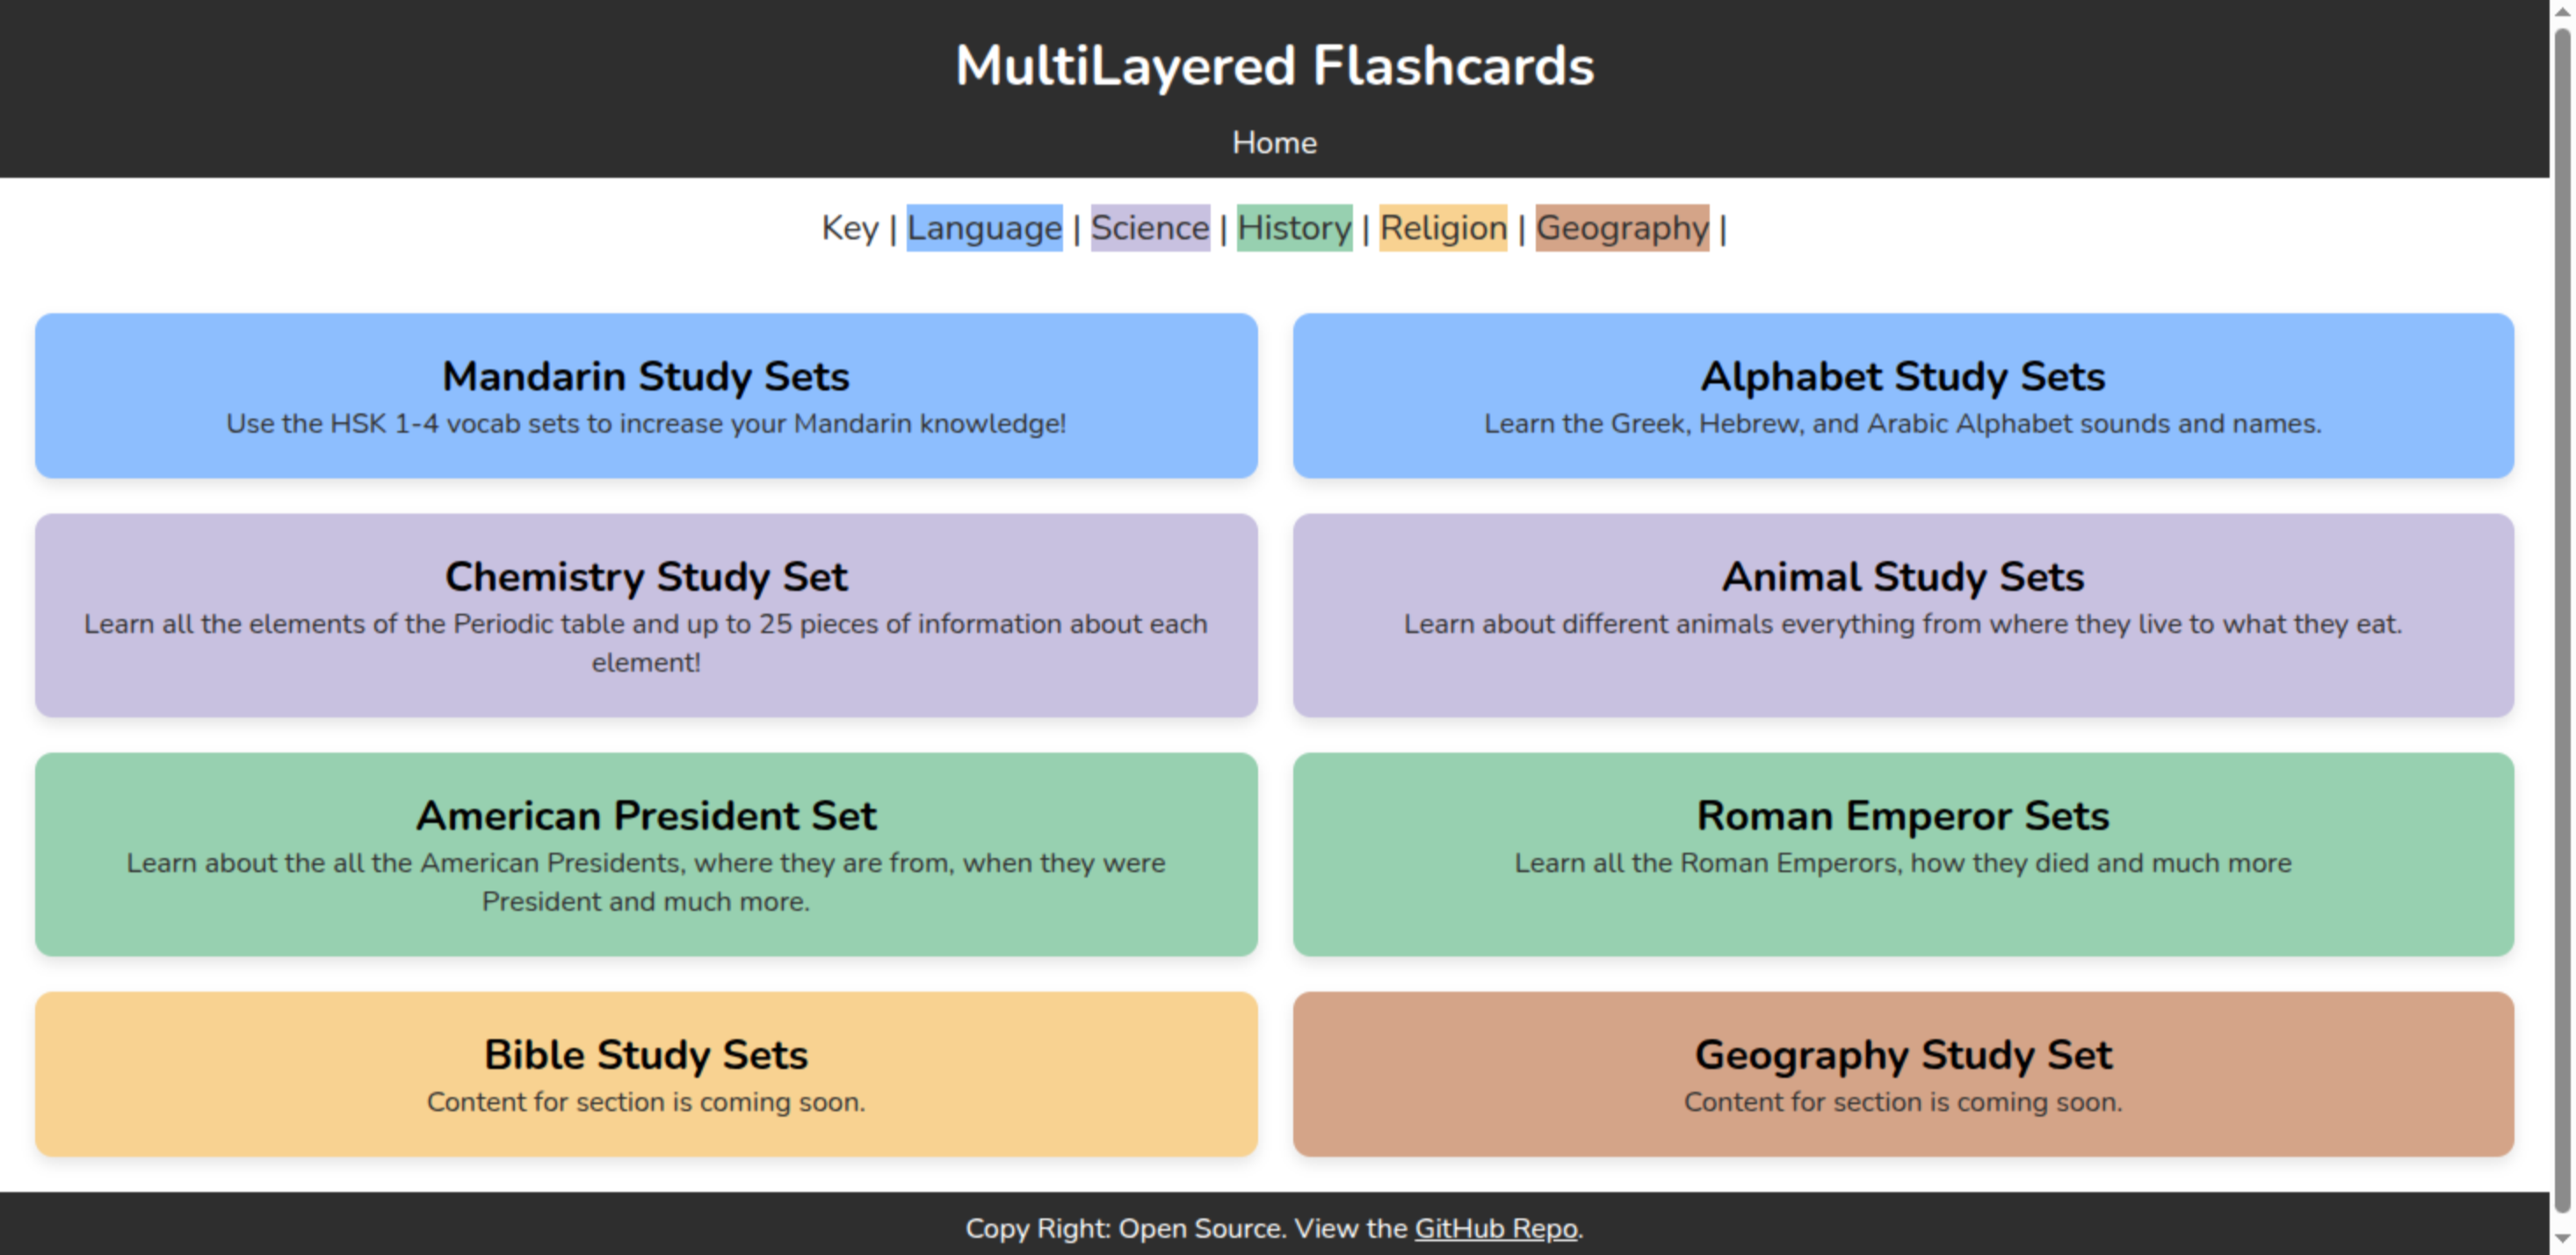
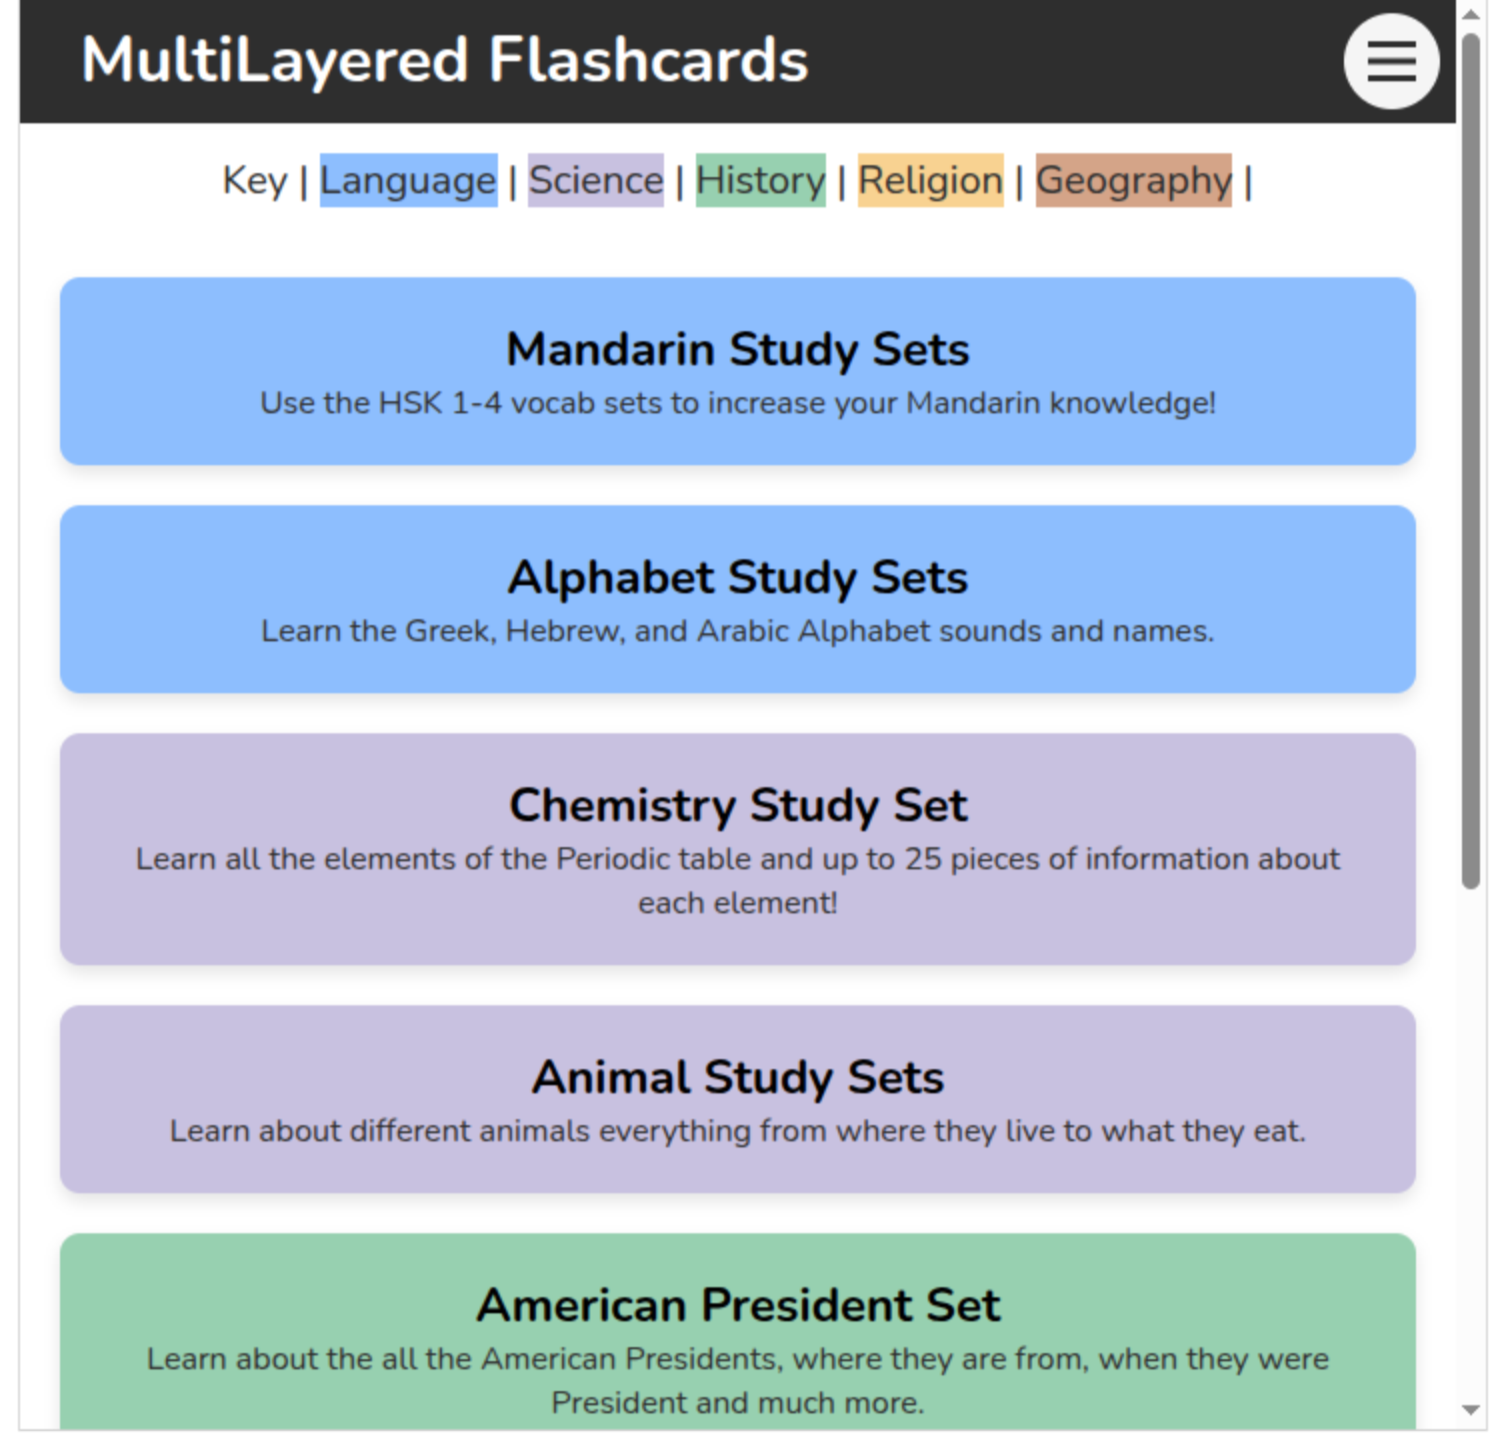
Next, the user must select which category they want to study in order to see all the different study sets available in each category. Once on the sets.html page There they are able to see all the available sets that they have. This page also gives a description of the data in the study sets. It tells the user where the data is from and what all the different layers available to them are.
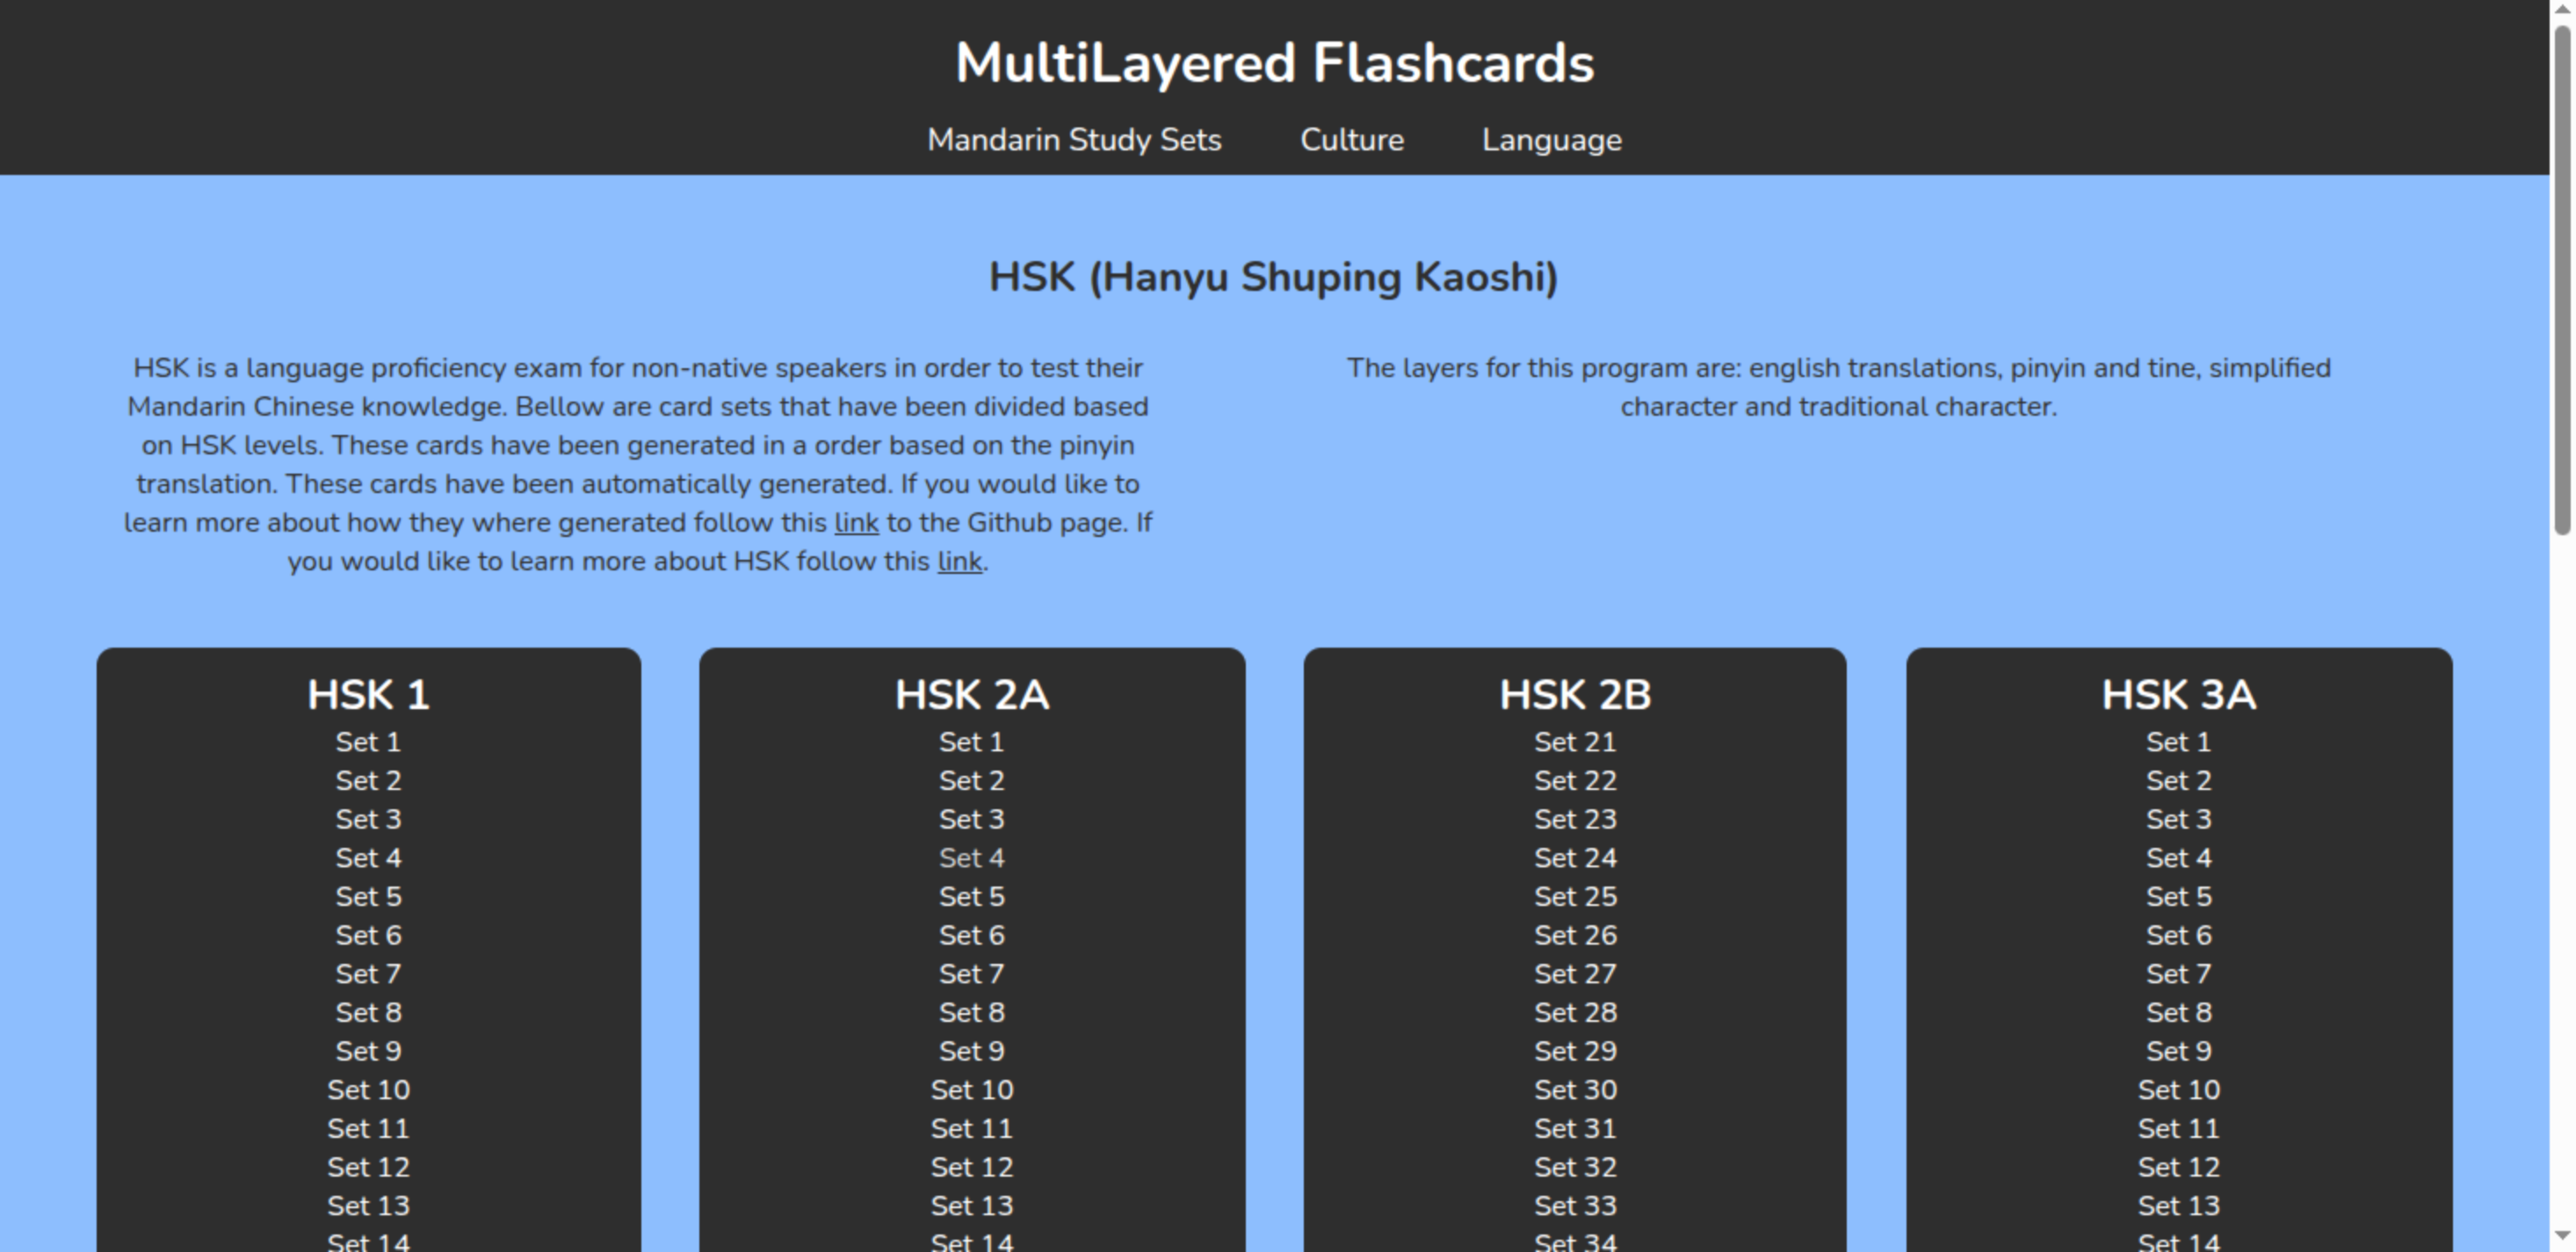
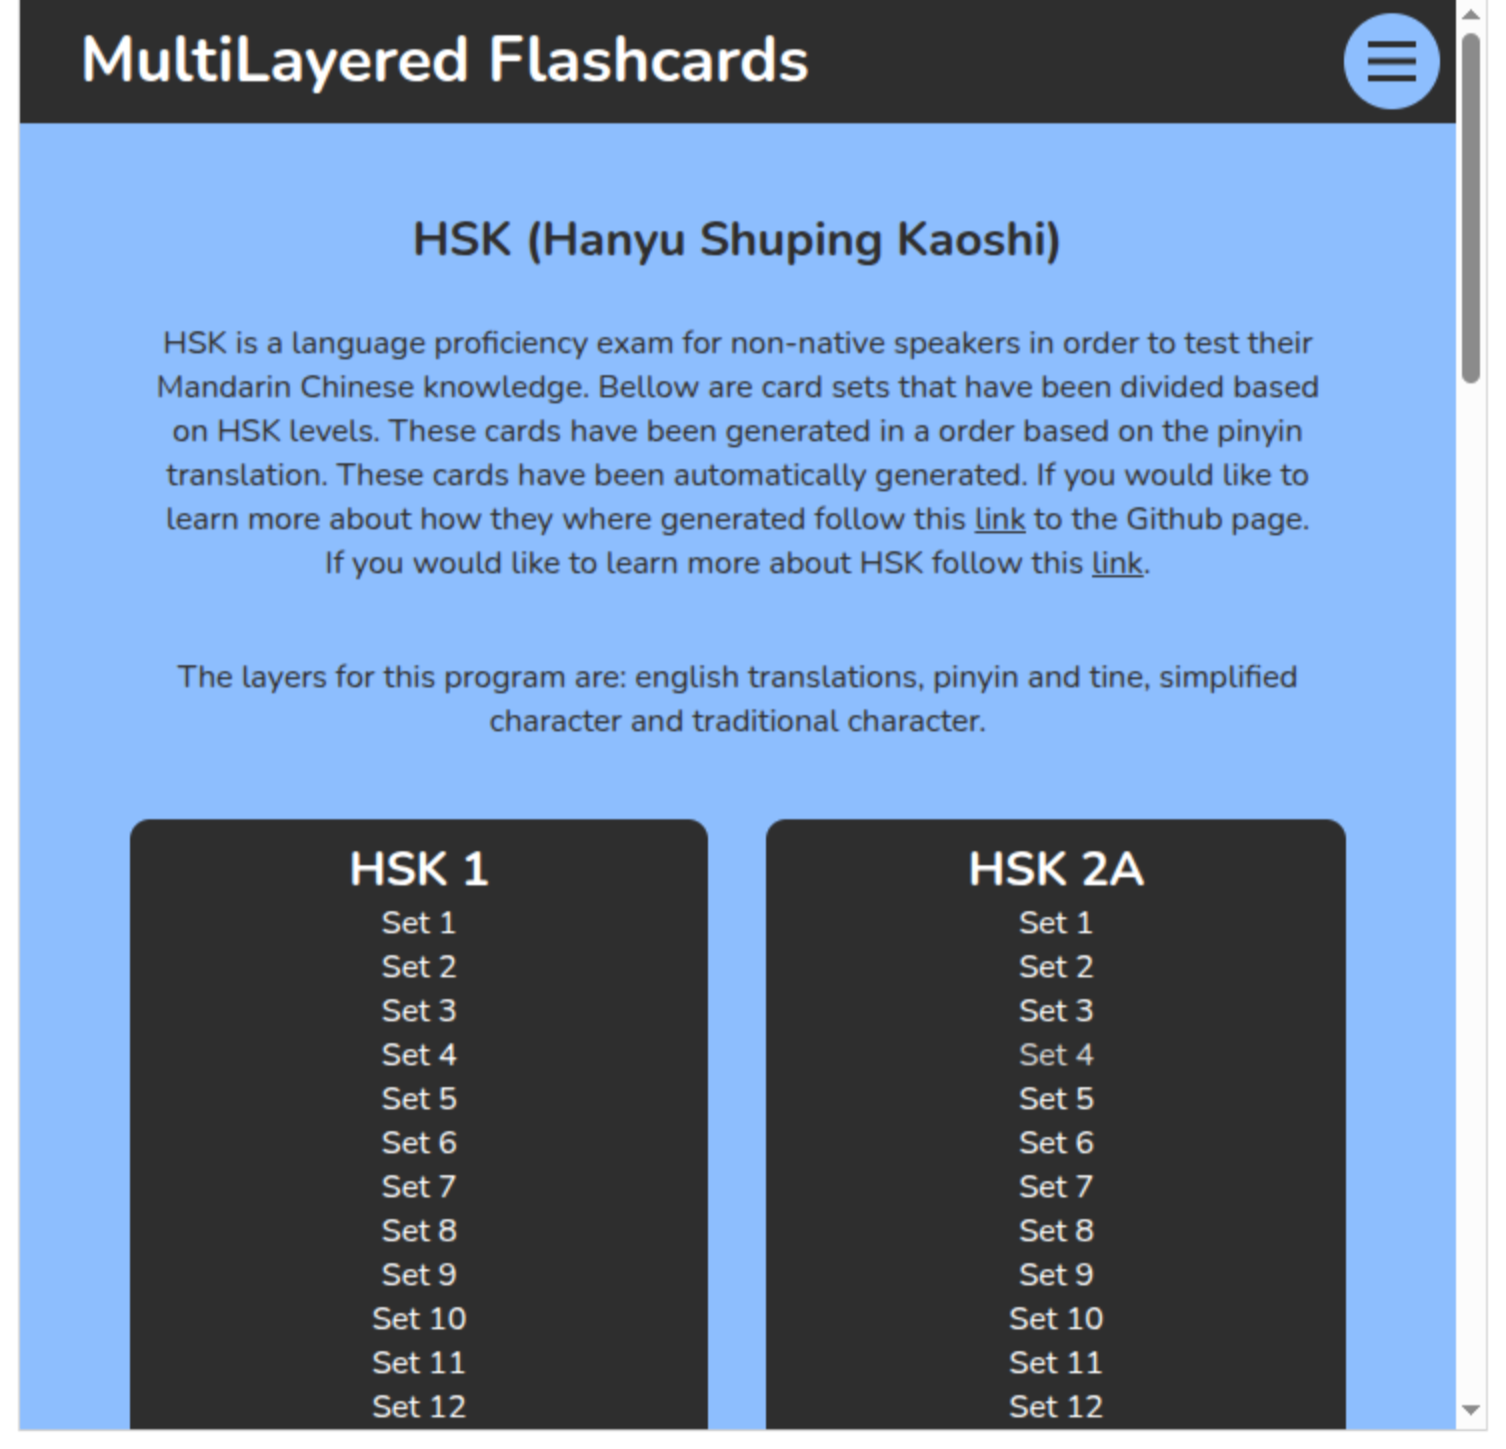
Once a user clicks on the set they want to study they are brought to a page that displays all the cards in their study set. They then click the “start” button. This is where the user is able to see all the different layers of information on any given set with populated values. The “start” button brings the user to the selection page.
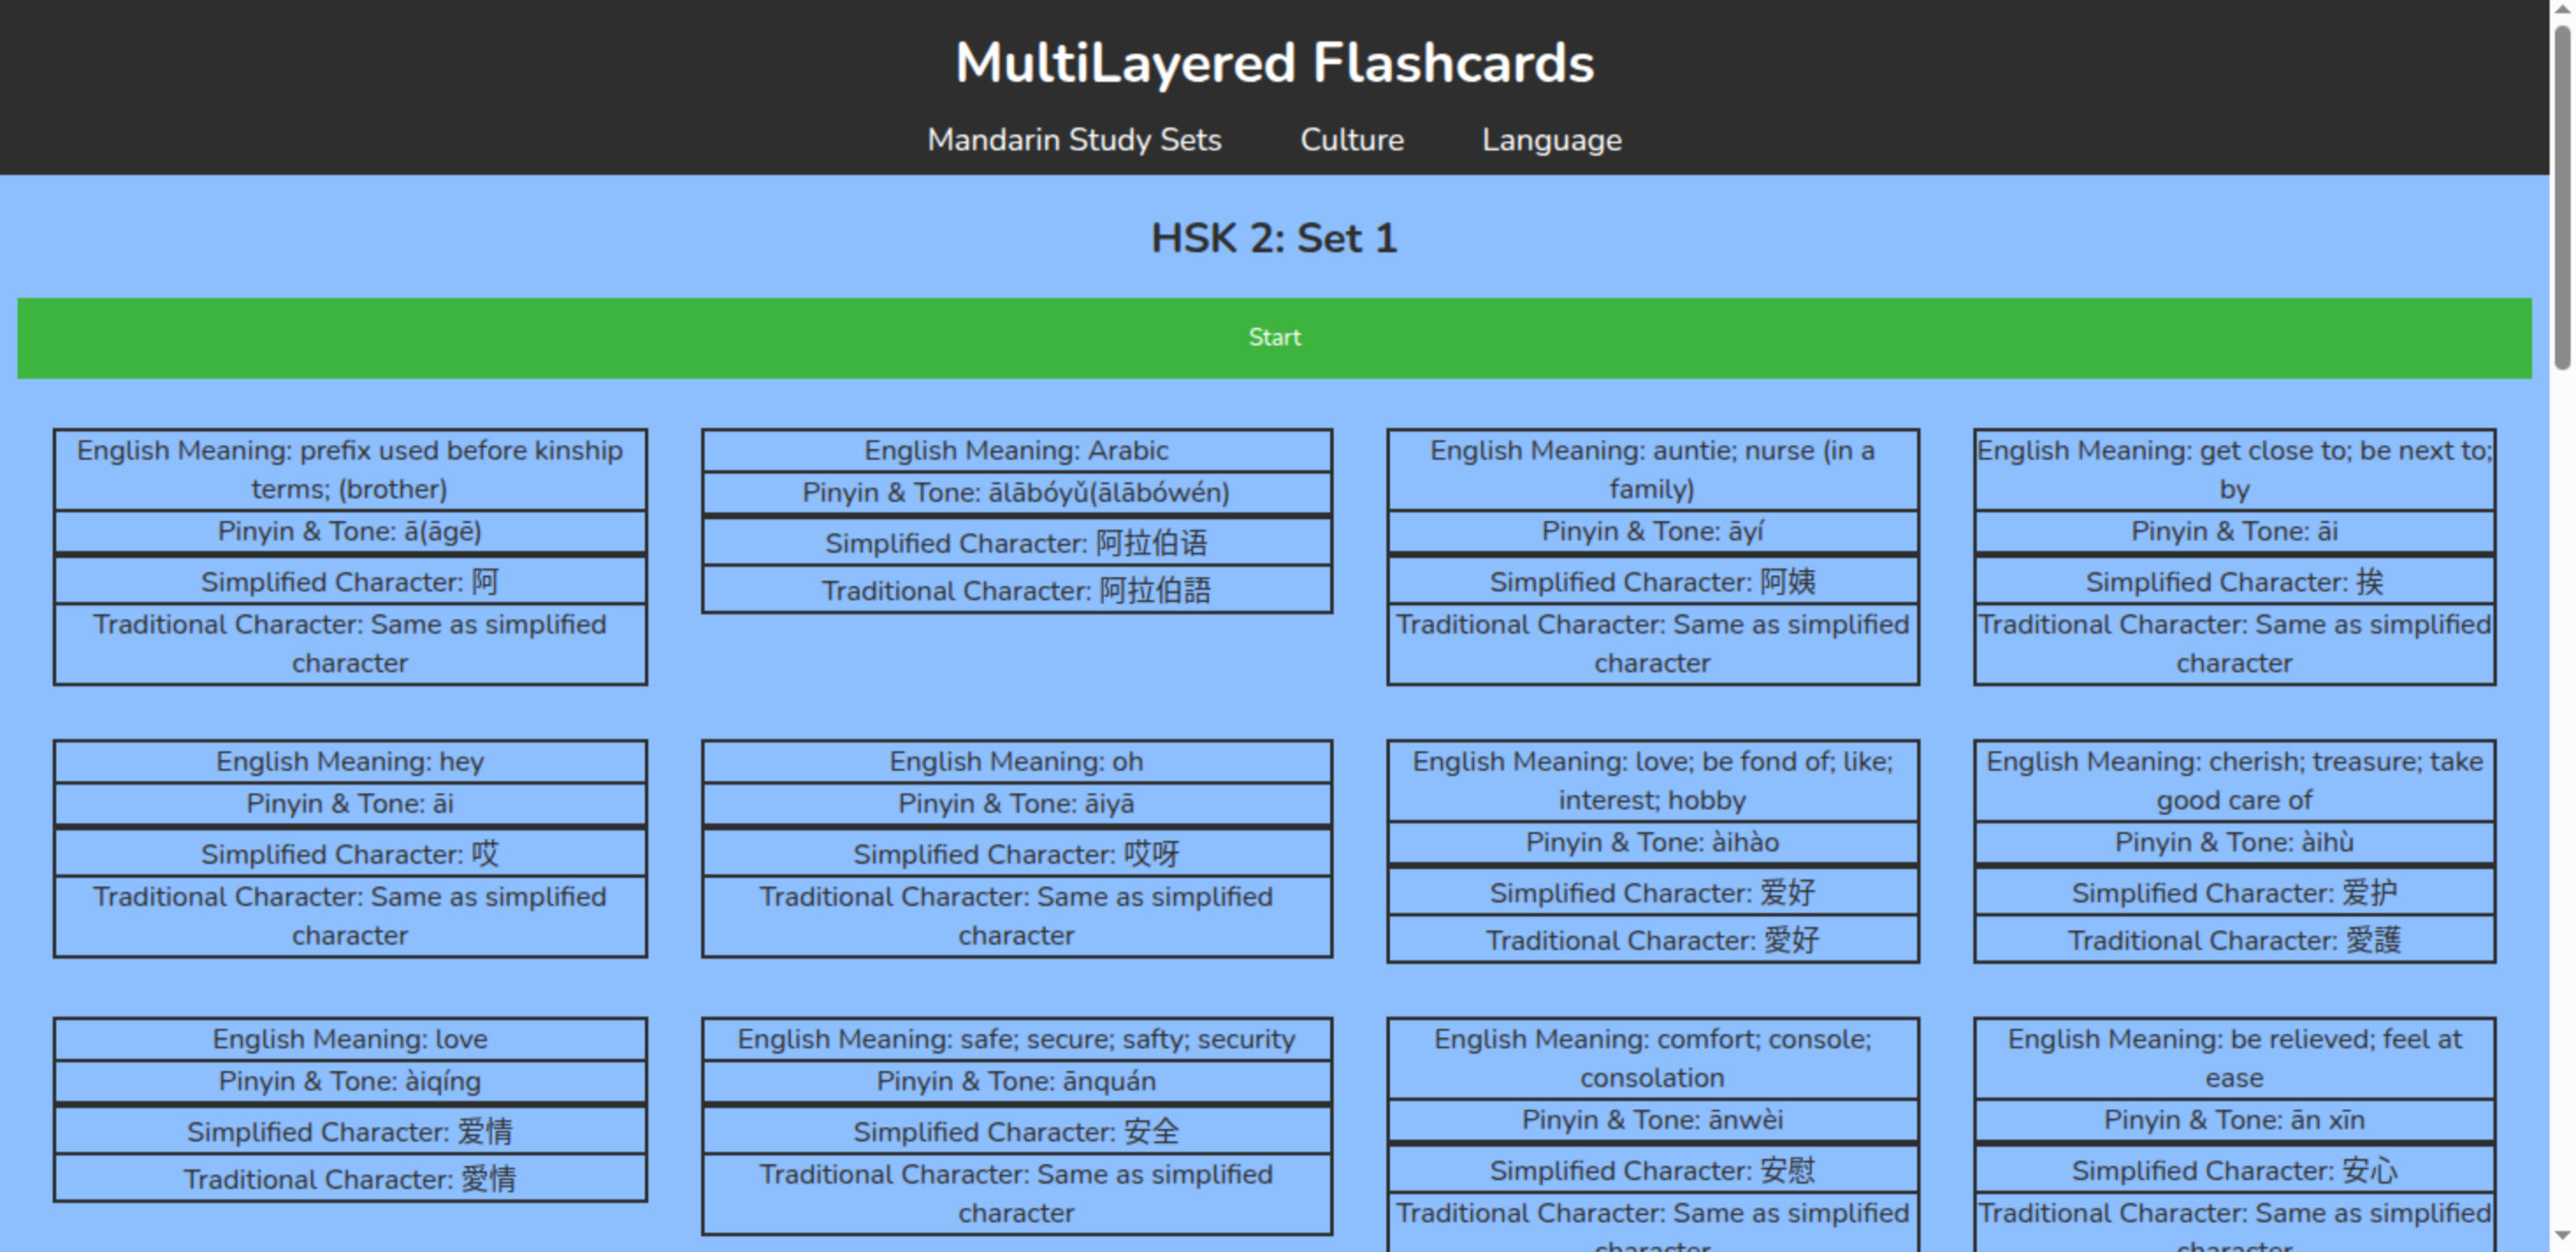
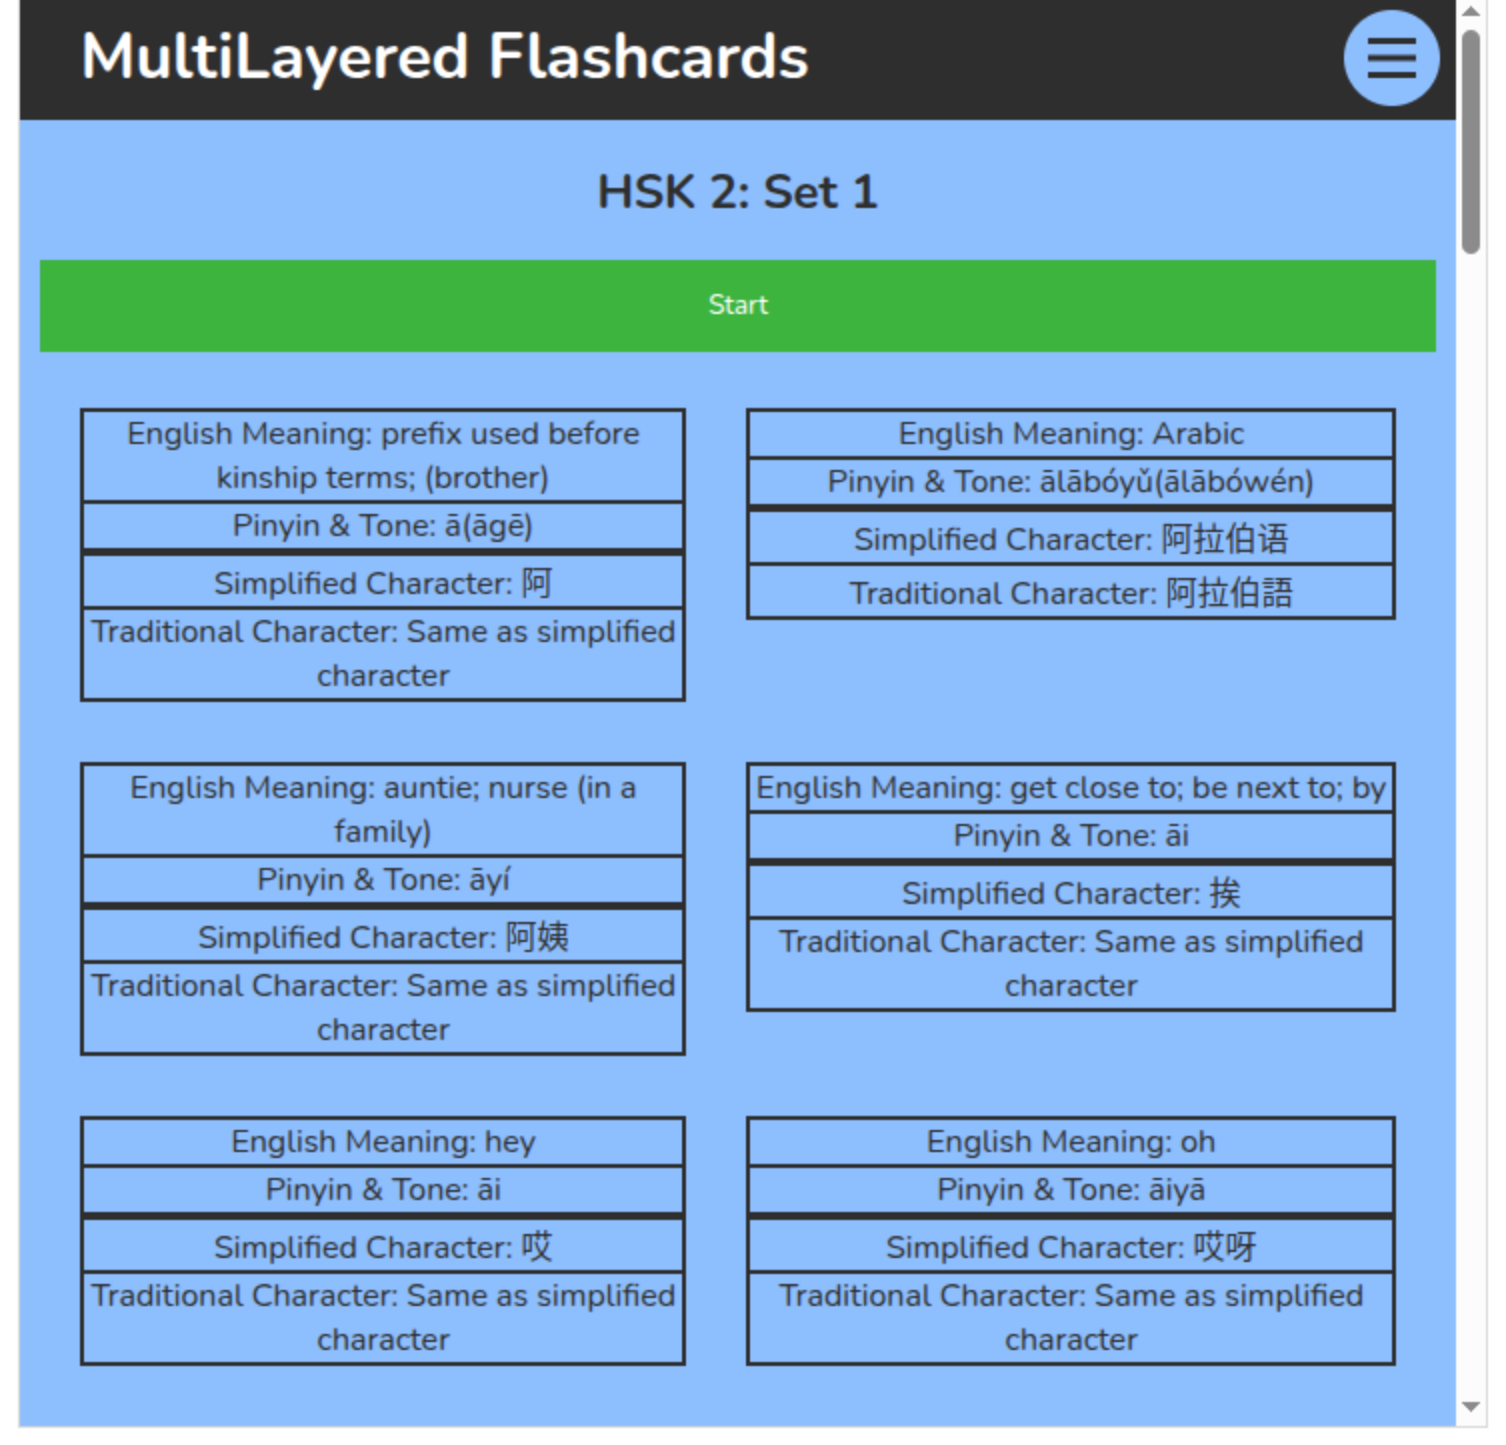
At the selection page the user selects which area of study they want on the front and back of their study cards. A user must select all the boxes available. A red error message displays on the screen if the user has not selected enough boxes. The small screen view shows the selection menu when boxes are checked. In addition, as the page says, the shuffle option does not have to be selected. The default mode is shuffled. The user must select “Created Order” if they do not want the cards to be shuffled.
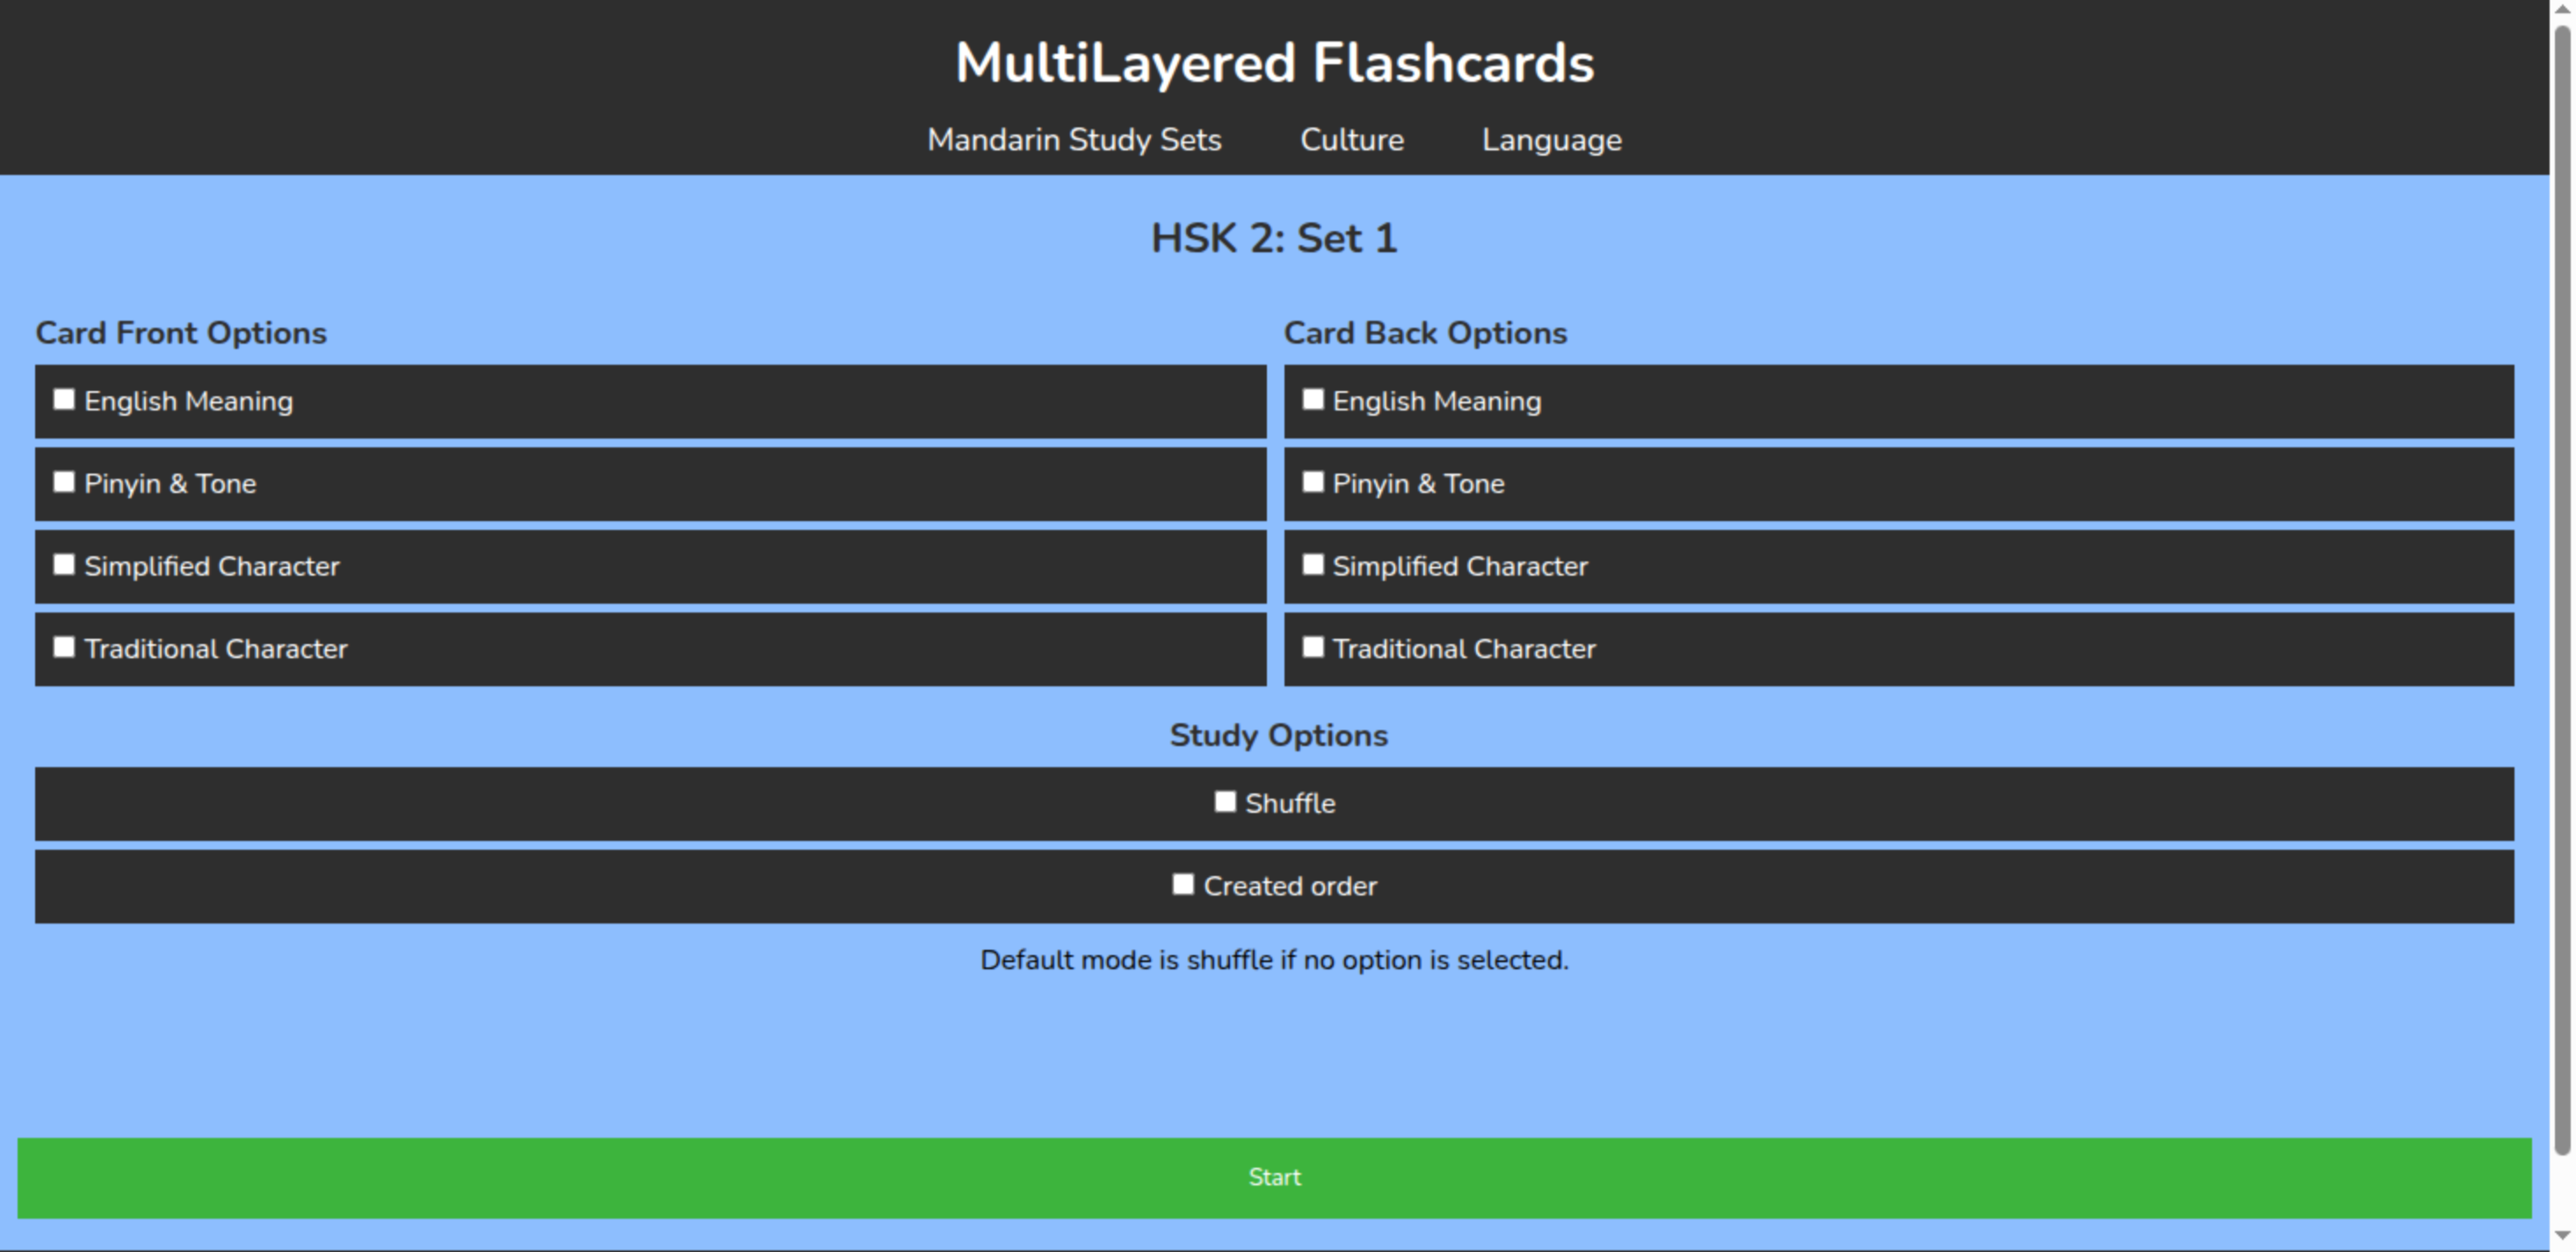
There user can not select a category for both the front and the back. When a layers is selected for the front card display the checkbox disappears from the back selection category and vice versa.
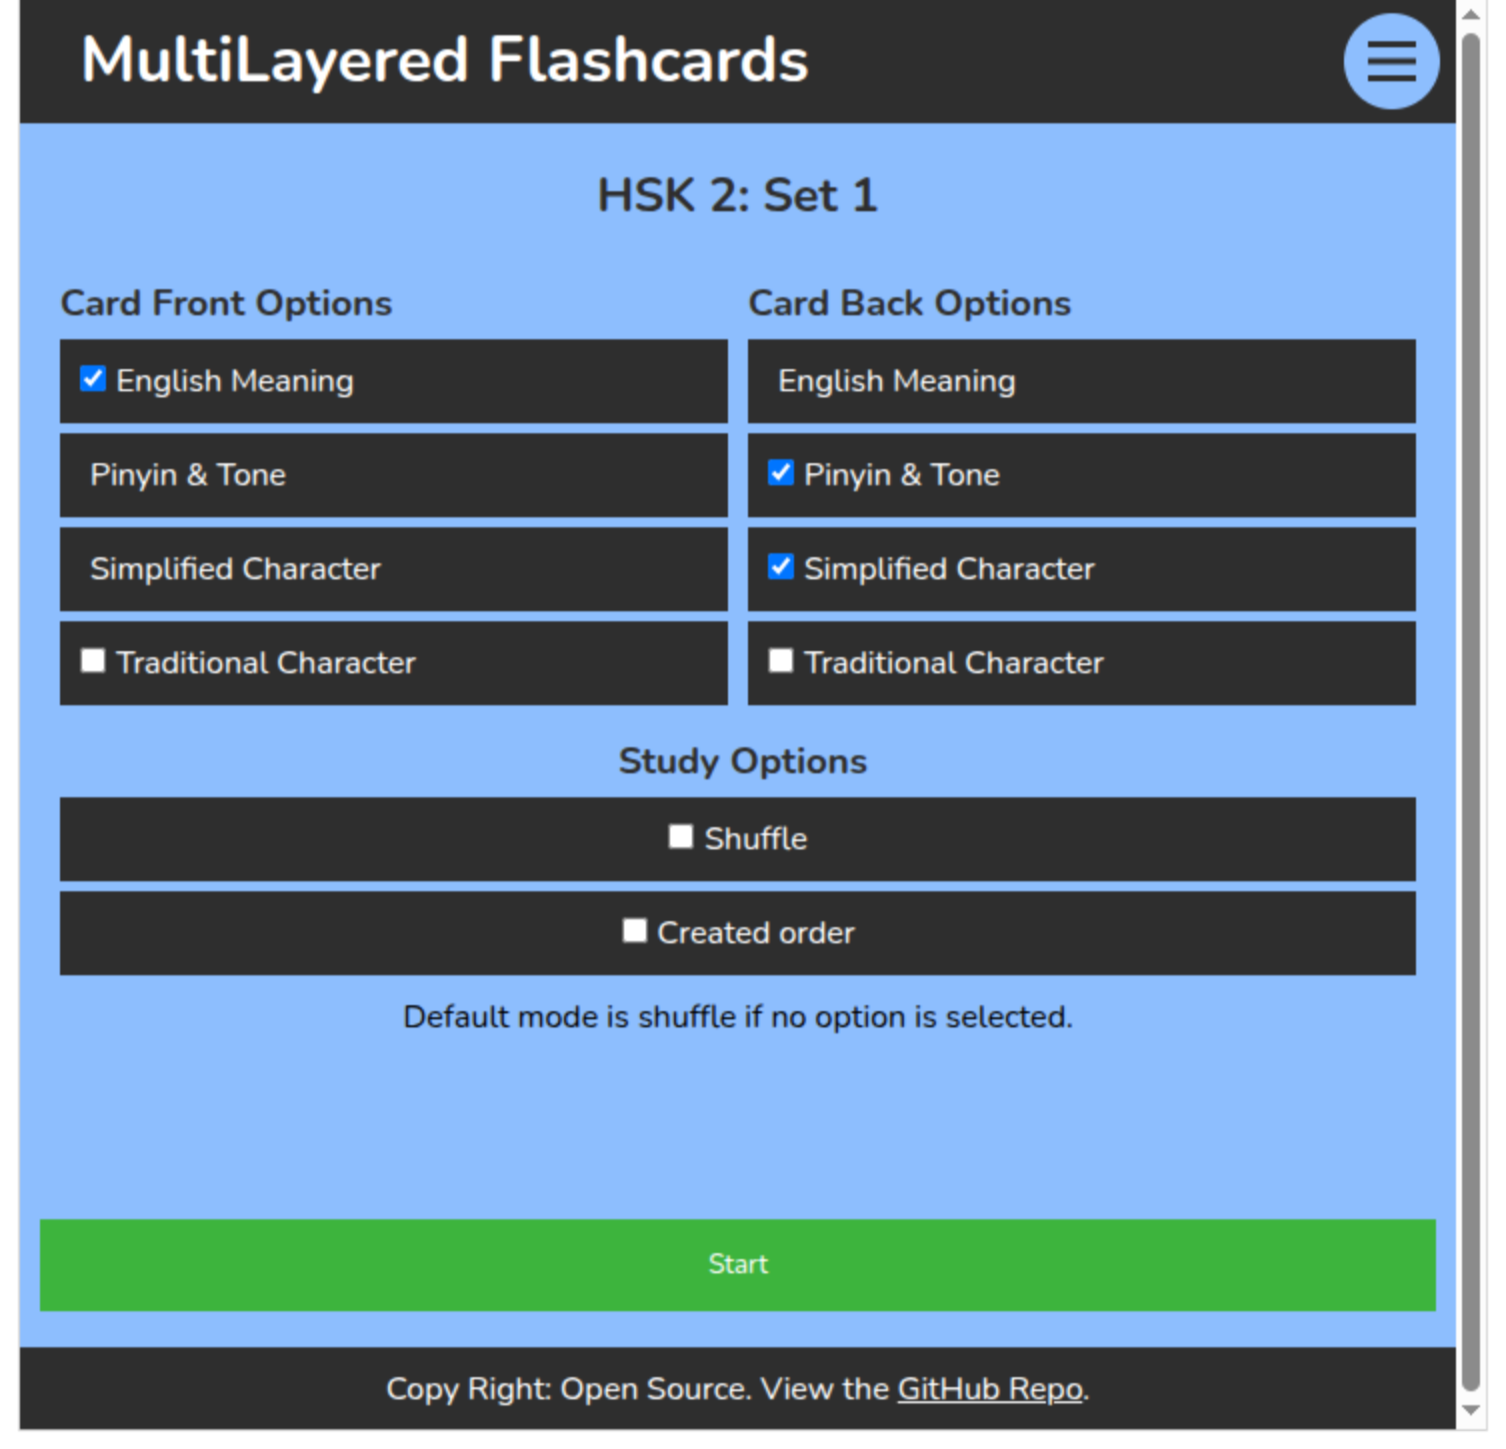
Next the user clicks the start button to start their study session. They can go through their cards by selecting the “next” button and the “flip” button shows the information on the back of the card. The card displays based on the section the user wants to display. The example below shows English as the only value selected for the front and the other three values to appear on the back of the flashcard.

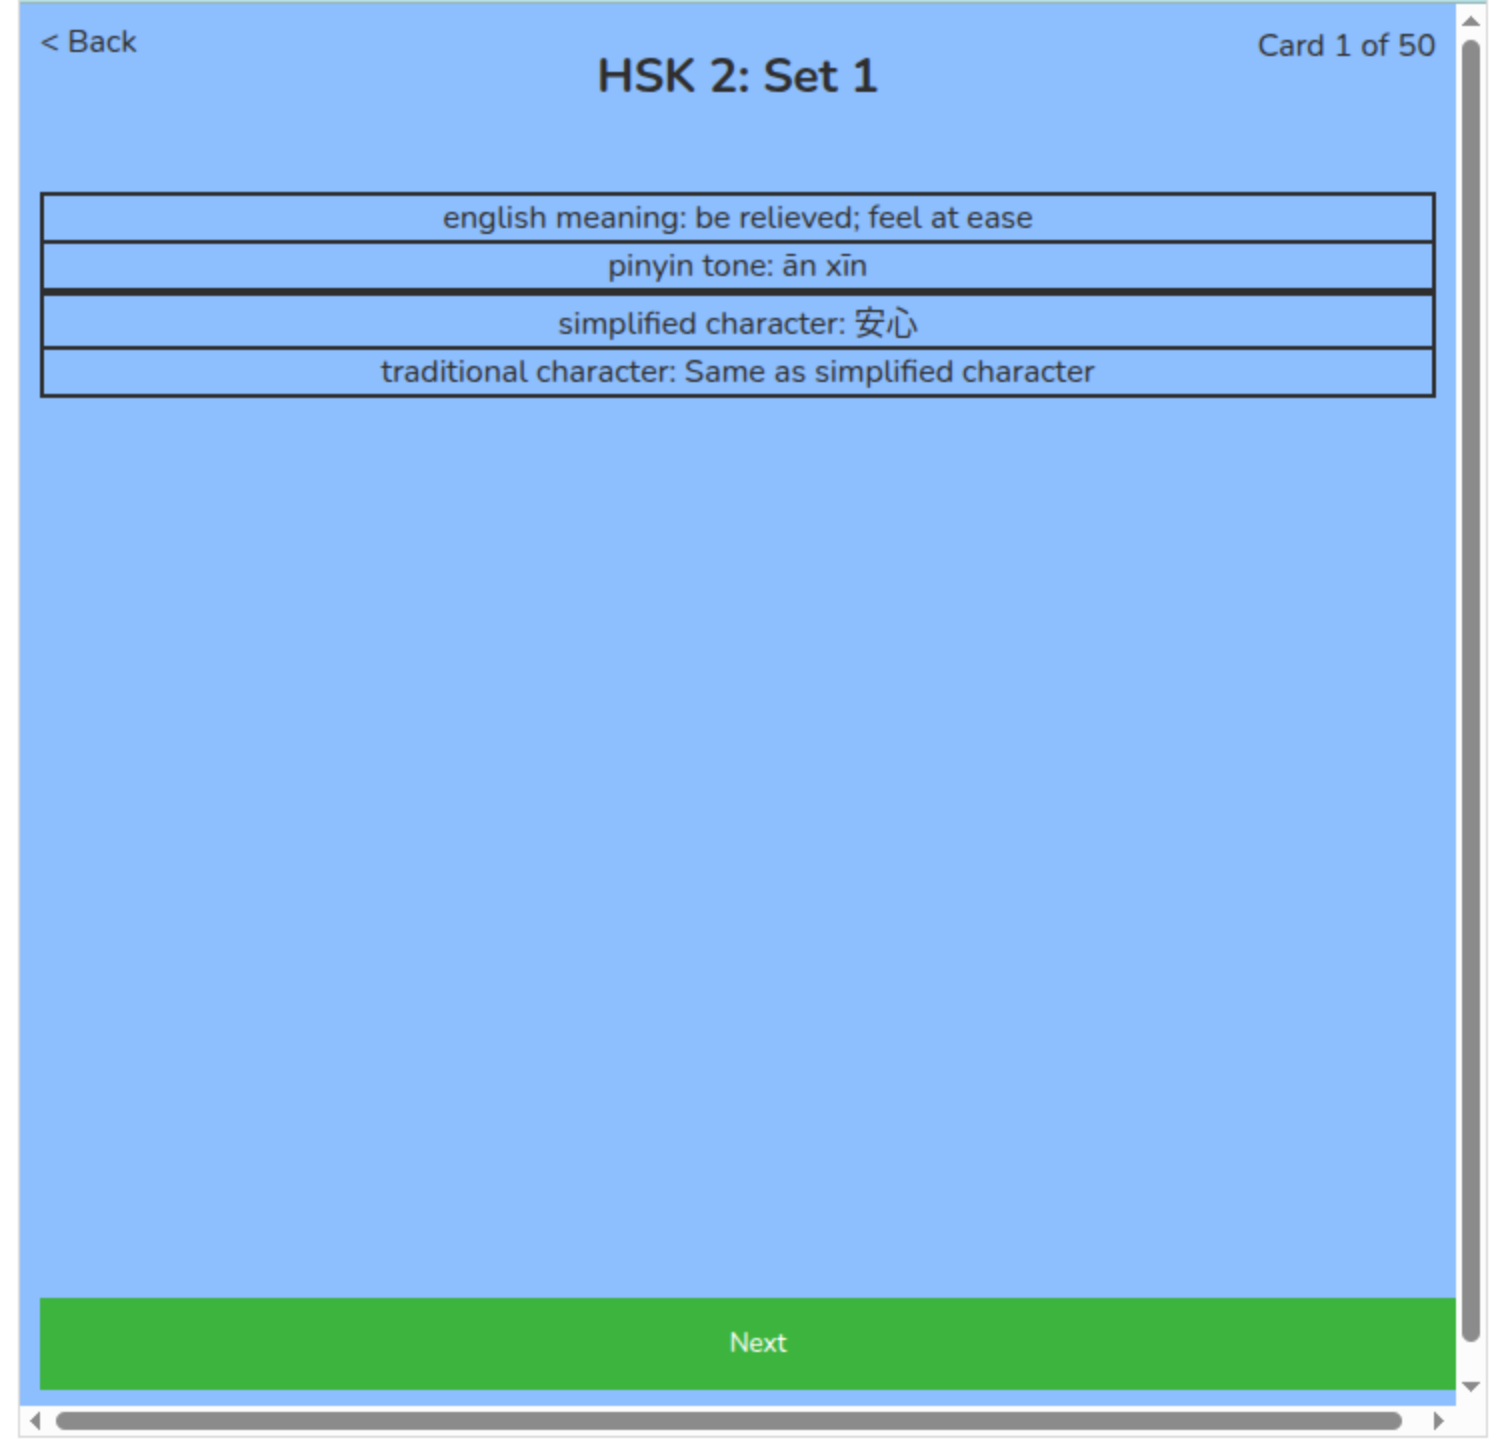
The second card also gives the user the option to go backwards. This option is not available on the first page because there is no flashcard to go back to. If a user wants to exit a study session they can select the “Back” button in the top left hand corner of the screen. Additionally, the user can see the flashcard number that they are on and how many are in the set in total in the top right hand corner of the screen.
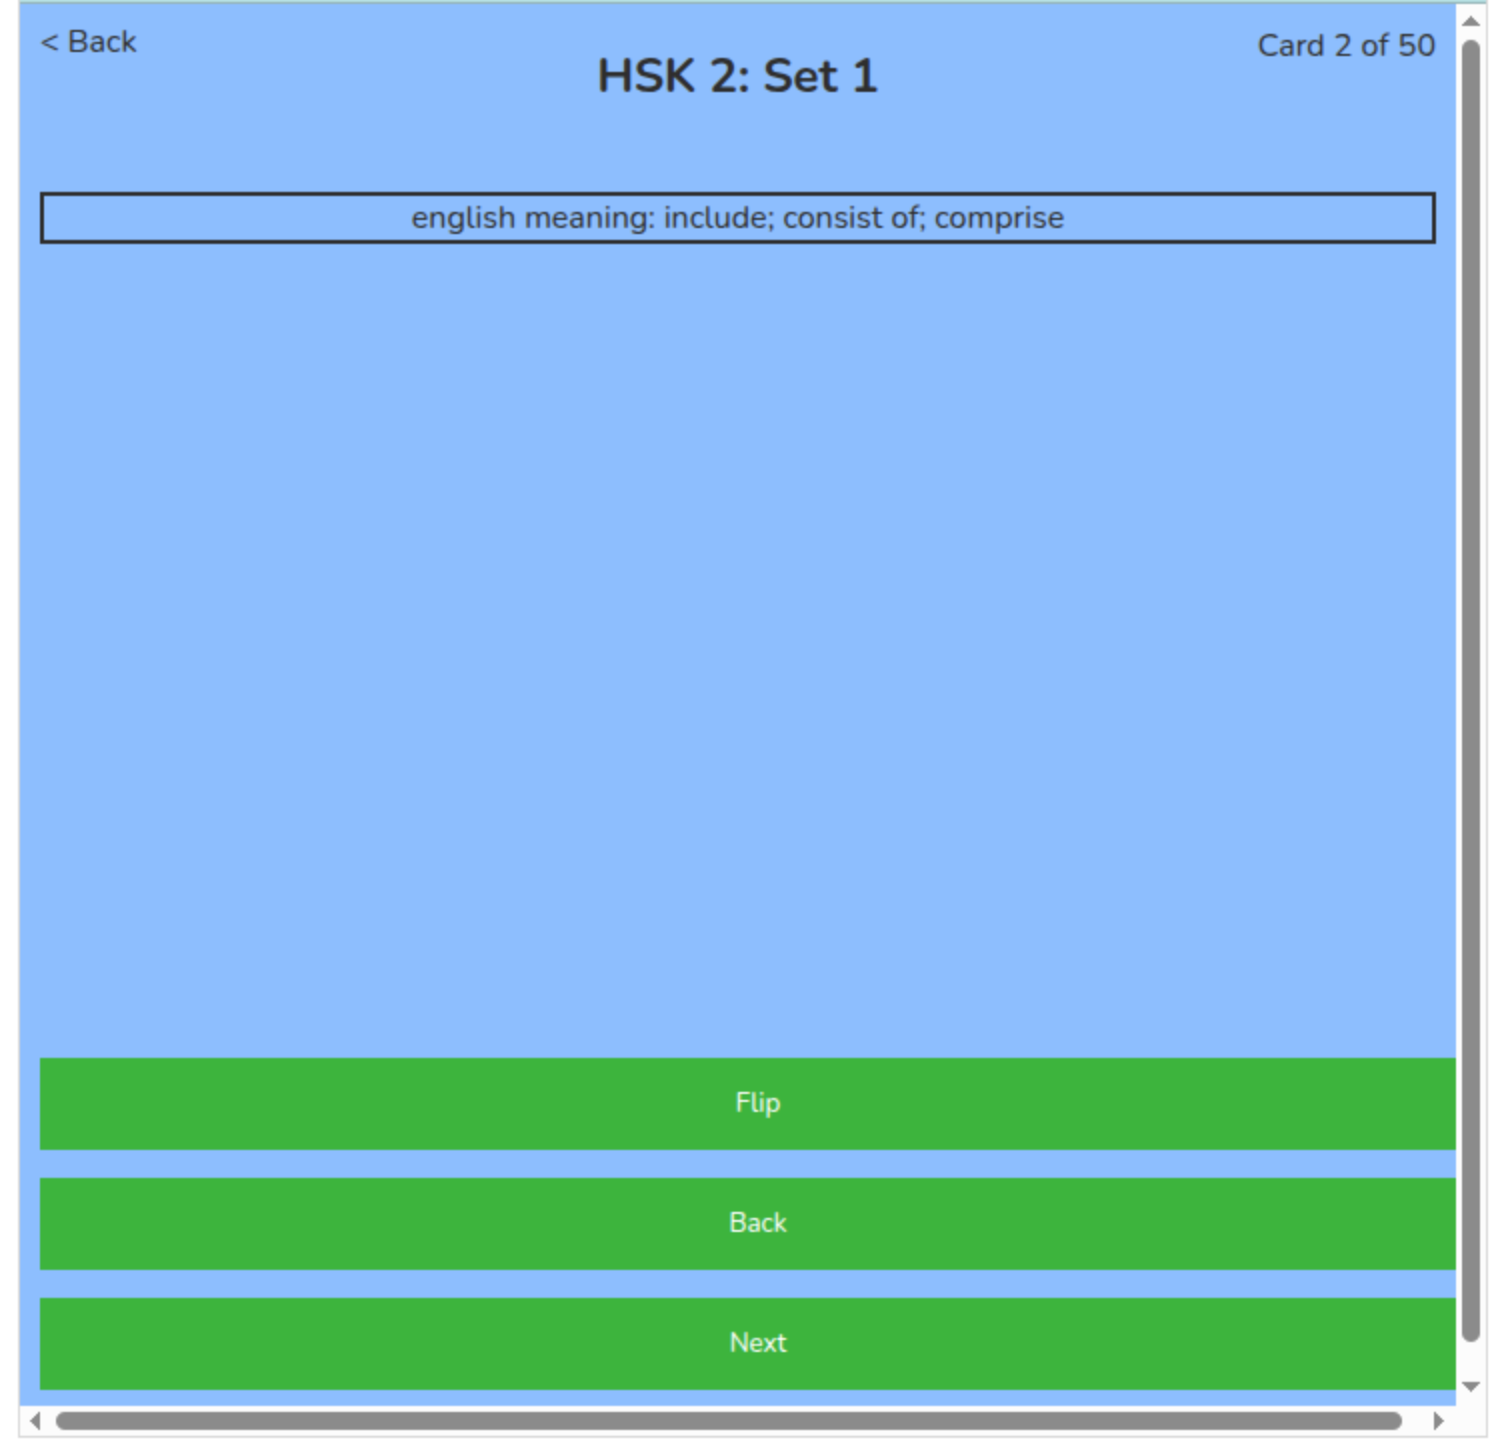
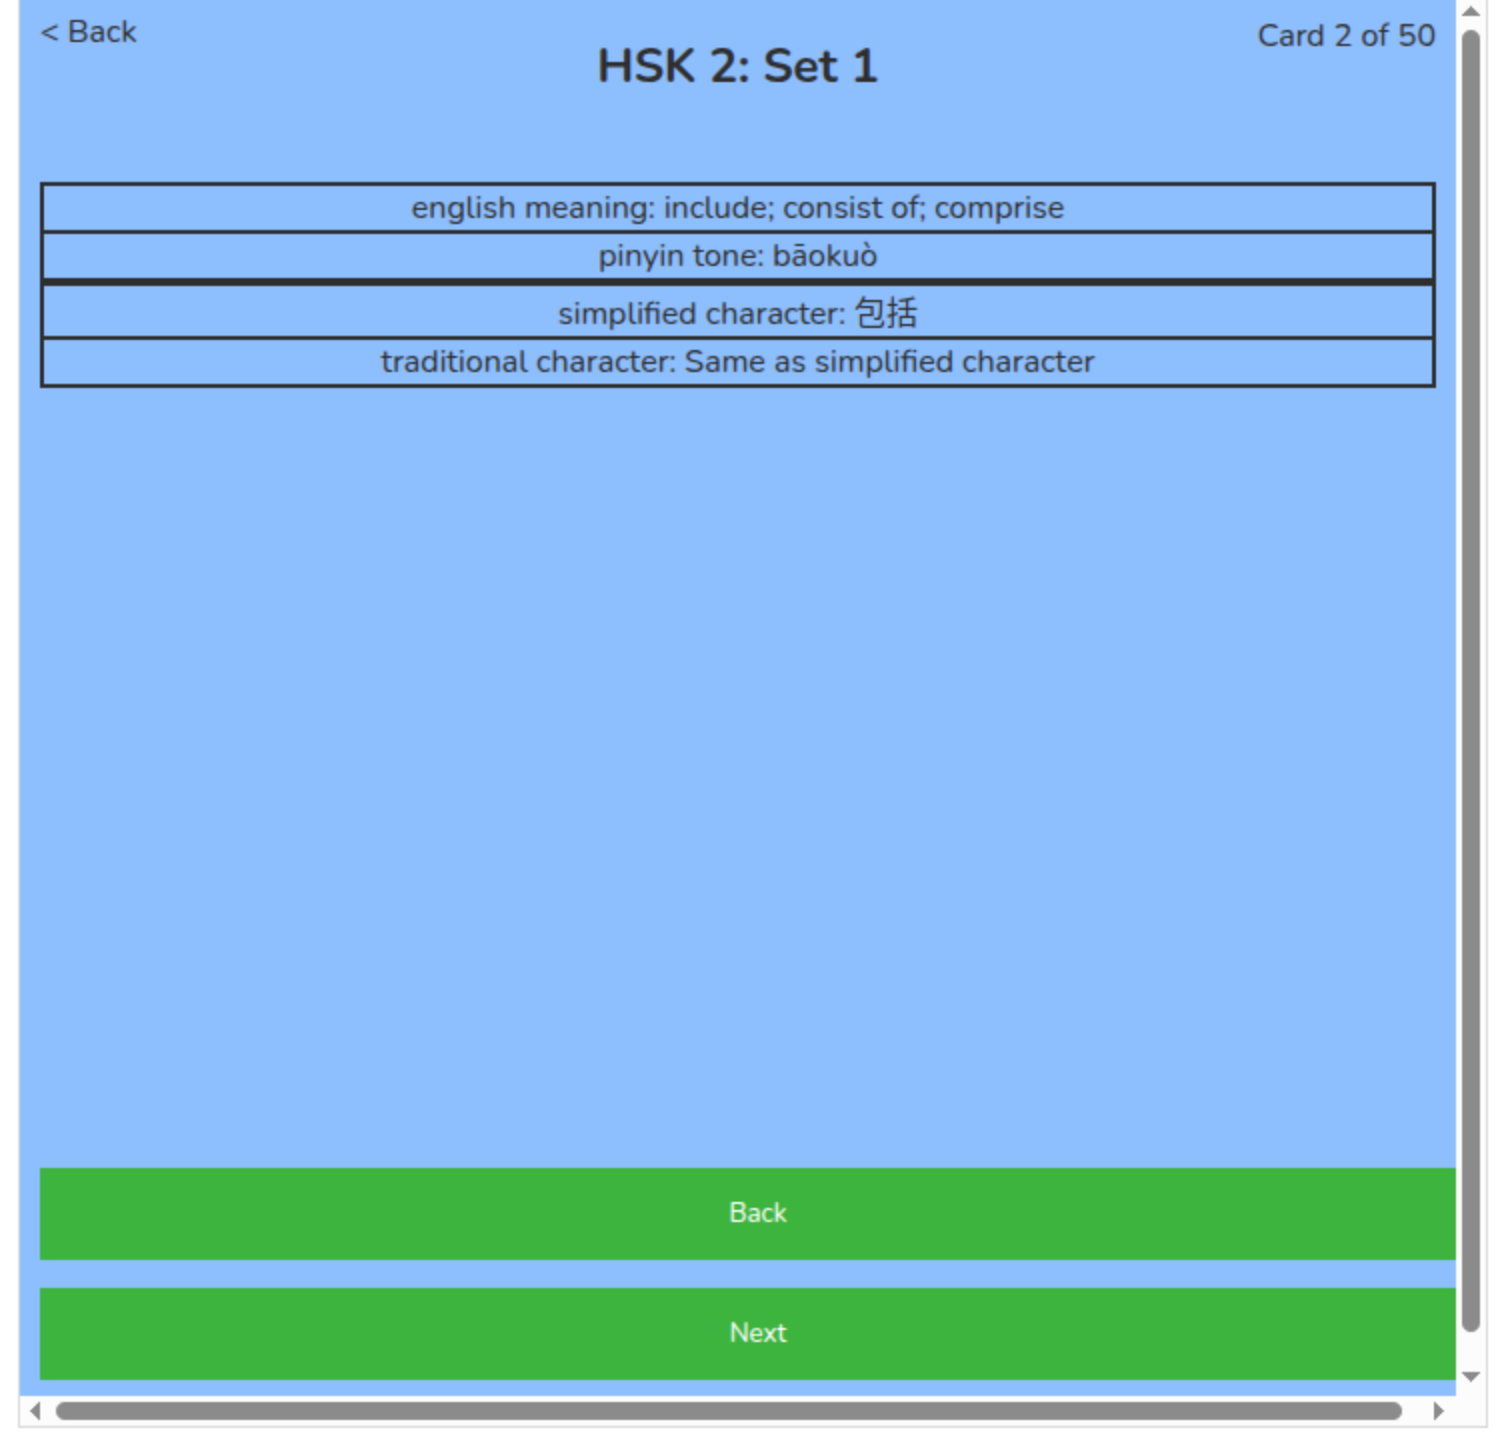
The last card does not display a next button, rather is shows a “Finish” button. When the user selects the finish button a congratulatory message is displayed on the screen.
Experiment A: Loading Data from JSON
for both experiments the scores and performance are considered from all six of the implemented data sets. Two files from the homepage and the home sets page are also considered. Then within each topic the sets.html page, card_display.html page, and study.html page is considered in the experiment. The differents sets under consideration are Mandarin, Alphabets, Chemistry, Animals, American Presidents, and Roman Emperors.
Results
Performance (Table 1):
- Performance INP (ms)
- Performance LCP1 (s)
- Performance LCP2 Lighthouse (s)
- Performance CLS1
- Performance CLS2 Lighthouse
- Performance FCP (s)
- Performance TBT (ms)
- Performance SI (s)
Lighthouse Overall Scores (Table 2):
- Performance
- Accessibility
- Best Practices
- SEO
Color Coding Key: no info = green ^= orange *= red
Homepage:
- A. index.html
- B. sets.html (template w no set)
| INP | LCP1 | LCP2 | CLS1 | CLS2 | FCP | TBT | SI | |
|---|---|---|---|---|---|---|---|---|
| A | 0 | 0.8 | 1.6 | 0 | 0.084 | 1.6 | 0 | 1.6 |
| B | 0 | 0.07 | 1.6 | 0 | 0.014 | 1.6 | 0 | 1.6 |
| 1 | 2 | 3 | 4 | |
|---|---|---|---|---|
| A | 97 | 100 | 100 | 100 |
| B | 99 | 100 | 100 | 100 |
Mandarin General:
- C. mandarin/culture.html
- D. mandarin/language.html
- E. mandarin/sets.html
Mandarin: (1hsk5)
- F. mandarin/card_display.html
- G. mandarin/study.html
Mandarin: (4hsk10)
- H. mandarin/card_display.html
- I. mandarin/study.html
| INP | LCP1 | LCP2 | CLS1 | CLS2 | FCP | TBT | SI | |
|---|---|---|---|---|---|---|---|---|
| C | 8 | 0.08 | 1.6 | 0 | 0.181^ | 1.6 | 0 | 1.6 |
| D | 0 | 0.05 | 1.6 | 0 | 0.077 | 1.6 | 0 | 1.6 |
| E | 0 | 0.08 | 1.6 | 0 | 0.179^ | 1.6 | 0 | 1.6 |
| F | 0 | 0.07 | 1.6 | 0.21^ | 0.817* | 1.6 | 0 | 1.6 |
| G | 8 | 0.08 | 1.6 | 0.19^ | 0.244^ | 1.6 | 0 | 1.6 |
| H | 0 | 0.05 | 1.6 | 0.21^ | 0.194^ | 1.6 | 0 | 1.6 |
| I | 0 | 0.06 | 1.6 | 0.19^ | 0.244^ | 1.6 | 0 | 1.6 |
| 1 | 2 | 3 | 4 | |
|---|---|---|---|---|
| C | 91 | 100 | 96 | 100 |
| D | 98 | 100 | 96 | 100 |
| E | 91 | 100 | 96 | 100 |
| F | 75^ | 92 | 96 | 91 |
| G | 87^ | 94 | 96 | 100 |
| H | 90 | 92 | 96 | 91 |
| I | 87 | 94 | 96 | 100 |
It is expected that C and D should behave similarly to A and B. This is because both these pages simply contain links and text, there is not a lot of information of either of the pages and the information that is there should not take long to load. F and G are the two web pages that are loading the data in from the JSON files. The length of time that it takes to load in the data significantly drops the score of any files where data is loaded in from JSON. This is because the for loops and creation of sections in HTML and populating them considerably slows the performance. The first chart shows that CLS 1 and 2 are both quite slow. This is because when the data loads it moves other elements on the page to the bottom. These are other elements like the start button. CLS tracks the move of elements, how far they move and how long after the first element of the webpage is visible are pieces of the webpage still moving. The movement of elements on the webpage a while after it is loaded happens because the loading takes so long and so elements shifts. Most of the other performance standards are similar across the other files to how loading happened on this first set of files.
Alphabets General:
- J. alphabets/sets.html
Alphabets Greek: * K. alphabets/card_display.html * L. alphabets/study.html
Alphabets Hebrew:
- M. alphabets/card_display.html
- N. alphabets/study.html
Alphabets Arabic:
- O. alphabets/card_display.html
- P. alphabets/study.html
| INP | LCP1 | LCP2 | CLS1 | CLS2 | FCP | TBT | SI | |
|---|---|---|---|---|---|---|---|---|
| J | 0 | 0.11 | 1.7 | 0 | 0.066 | 1.6 | 0 | 1.6 |
| K | 0 | 0.08 | 1.7 | 0.21^ | 0.817* | 1.6 | 0 | 1.6 |
| L | 0 | 0.09 | 1.7 | 0.40^ | 0.328* | 1.6 | 40 | 1.6 |
| M | 0 | 0.05 | 1.7 | 0.21 | 0.194^ | 1.6 | 60 | 1.6 |
| N | 0 | 0.06 | 1.7 | 0.37* | 0.418* | 1.6 | 70 | 1.6 |
| O | 0 | 0.06 | 1.7 | 0.21^ | 0.194^ | 1.6 | 0 | 1.6 |
| P | 8 | 0.11 | 1.7 | 0.25* | 0.302* | 1.6 | 130 | 1.6 |
| 1 | 2 | 3 | 4 | |
|---|---|---|---|---|
| J | 99 | 92 | 96 | 100 |
| K | 75 | 92 | 96 | 91 |
| L | 83 | 94 | 96 | 100 |
| M | 90 | 92 | 96 | 91 |
| N | 80 | 94 | 96 | 100 |
| O | 90 | 92 | 96 | 91 |
| P | 83 | 94 | 96 | 100 |
INP ranges from 0 ms to 16 ms. Scores are present in the number of 0, 8, and 16. There are no other numbers represented. This shows that there is very little time in between a user clicking of the webpage and the webpage responding. This data may be skewed because there are not buttons on any of these pages, besides the checkboxes of the Option menu of the study.html that can measure user’s interaction with the page beyond simply clicking anywhere on the page. The most common score is 0.
Chemistry General:
- Q. chemistry/sets.html
Chemistry Wiki:
- R. chemistry/card_display.html
- S. chemistry/study.html
Chemistry CSV:
- T. chemistry/card_display.html
- U. chemistry/study.html
Chemistry Both:
- V. chemistry/card_display.html
- W. chemistry/study.html
| INP | LCP1 | LCP2 | CLS1 | CLS2 | FCP | TBT | SI | |
|---|---|---|---|---|---|---|---|---|
| Q | 8 | 0.15 | 1.7 | 0 | 0.108^ | 1.6 | 0 | 1.6 |
| R | 16 | 0.12 | 1.7 | 0.23^ | 0.034 | 1.6 | 3250* | 1.6 |
| S | 8 | 0.12 | 2.5 | 0.62* | 0.669* | 2.5^ | 2940* | 2.5 |
| T | 8 | 0.06 | 1.7 | 0.23^ | 0.034 | 1.6 | 7090* | 1.6 |
| U | 0 | 0.11 | 1.8 | 0.62* | 0.829* | 1.6 | 6670* | 1.6 |
| V | 0 | 0.08 | 2.4 | 0.24^ | 0.016 | 2.4^ | 8140* | 3.1 |
| W | 0 | 0.77 | 1.8 | 0.62* | 0.807* | 1.6 | 9040* | 1.6 |
| 1 | 2 | 3 | 4 | |
|---|---|---|---|---|
| Q | 96 | 92 | 96 | 100 |
| R | 70 | 92 | 96 | 91 |
| S | 42* | 94 | 93 | 100 |
| T | 69^ | 92 | 96 | 91 |
| U | 45* | 94 | 93 | 100 |
| V | 64 | 92 | 96 | 91 |
| W | 45 | 94 | 96 | 100 |
LCP1 and CLS1 are also from the built in Inspect page’s data. These values are measuring the same aspects as LCP2 and CLS2. These values are significantly lower in the built in Inspect’s performance as opposed to the Lighthouse trackers. These results could be displaying this for various different reasons. Some being, the initial load versus subsequent loads of the same page. Lighthouse loads the page multiple times and takes an average of the values, while the built in of Inspect is only loading the page once.
Animal General:
- X. animals/sets.html
Animal (Set 1):
- Y. animals/card_display.html
- Z. animals/study.html
Animal (Set 3):
- AA. animals/card_display.html
- AB. animals/study.html
| INP | LCP1 | LCP2 | CLS1 | CLS2 | FCP | TBT | SI | |
|---|---|---|---|---|---|---|---|---|
| X | 8 | 0.12 | 1.6 | 0 | 0.049 | 1.6 | 0 | 1.6 |
| Y | 16 | 0.10 | 1.6 | 0.21^ | 0.194^ | 1.6 | 0 | 1.6 |
| Z | 8 | 0.08 | 1.6 | 0.62* | 0.779* | 1.6 | 0 | 1.6 |
| AA | 0 | 0.05 | 1.6 | 0.21^ | 0.194^ | 1.6 | 0 | 1.6 |
| AB | 0 | 0.07 | 1.6 | 0.62* | 0.779* | 1.6 | 0 | 1.6 |
| 1 | 2 | 3 | 4 | |
|---|---|---|---|---|
| X | 99 | 87 | 96 | 100 |
| Y | 90 | 92 | 96 | 91 |
| Z | 76 | 94 | 96 | 100 |
| AA | 90 | 92 | 96 | 91 |
| AB | 76 | 94 | 96 | 100 |
CLS is one category that is continuously marked with an ^ of * color coding. These high values largely impact the low Performance scores in Lighthouse. This means that aspects on the webpage are moving large distances from the time the web page initially loads till the time that the webpage is fully loaded. This is expected because the JSON data is being loaded into the page and the HTML pages are not hard coded with the data already. This is one reason this experiment to test the CLS values of hard coded HTML files is a worthwhile test.
American Presidents:
- AC. american_presidents/sets.html
- AD. american_presidents/card_display.html
- AE. american_presidents/study.html
| INP | LCP1 | LCP2 | CLS1 | CLS2 | FCP | TBT | SI | |
|---|---|---|---|---|---|---|---|---|
| AC | 0 | 0.11 | 1.6 | 0 | 0.04 | 1.6 | 0 | 1.6 |
| AD | 16 | 0.08 | 1.6 | 0.23^ | 0.747* | 1.6 | 0 | 1.6 |
| AE | 0 | 0.08 | 1.6 | 0.33* | 0.295* | 1.6 | 0 | 1.6 |
| 1 | 2 | 3 | 4 | |
|---|---|---|---|---|
| AC | 99 | 92 | 96 | 100 |
| AD | 76 | 92 | 96 | 91 |
| AE | 84 | 94 | 96 | 100 |
In addition to CLS the other factor that was lowering the Performance values, though only on some pages is the TBT. It is interesting the TBT was most often at 0, which the expectation of a 4 values in the Alphabet pages that were below 200, the rest of the TBT values appeared in Chemistry and were all above 2940, and ranged from 2940 to 9040. The Chemistry flashcards sets where not only the longest sets, but they were also the longest sets with the most amount of information. This compounding of information per card and an increased number of cards is one reason that there was so much time while the website was still loading and the user could not interact with it.
Roman Emperors General:
- AF. roman_emperors/sets.html
Roman Emperors (Set 1):
- AG. roman_emperors/card_display.html
- AH. roman_emperors/study.html
Roman Emperors (Set 2):
- AI. roman_emperors/card_display.html
- AJ. roman_emperors/study.html
| INP | LCP1 | LCP2 | CLS1 | CLS2 | FCP | TBT | SI | |
|---|---|---|---|---|---|---|---|---|
| AF | 8 | 0.14 | 1.6 | 0 | 0.044 | 1.6 | 0 | 1.6 |
| AG | 8 | 0.10 | 1.6 | 0.21^ | 0.747* | 1.6 | 0 | 1.6 |
| AH | 0 | 0.10 | 1.6 | 0.51* | 0.602* | 1.6 | 0 | 1.6 |
| AI | 8 | 0.07 | 1.6 | 0.21^ | 0.747* | 1.6 | 0 | 1.6 |
| AJ | 0 | 0.08 | 2.5 | 0.51* | 0.602* | 2.5^ | 0 | 2.5 |
| 1 | 2 | 3 | 4 | |
|---|---|---|---|---|
| AF | 99 | 87 | 96 | 100 |
| AG | 76 | 92 | 96 | 91 |
| AH | 77 | 94 | 96 | 100 |
| AI | 76 | 92 | 96 | 91 |
| AJ | 72 | 94 | 96 | 100 |
The values for FCP and SI remained at about 1.6 s for all trials, with some FCP and SI trials having an increased value of 2.5s. These higher scores where mostly found in the Chemistry data set, while some were also found in the Roman Emperors data set, for the final study.html page. This also shows that as the amount of data increases it can impact the amount of time it takes data to first appear on the page FCP and the speed of the load in SI. However, the correlation between data size and FCP and SI is not as large or as consistent as the correlation between TBT and data size and CLS and data size.
Experiment B: Created HTML Templates
In this experiment the same files from all the same sections as above are evaluated. However, in this experiment the data has already been loaded into the HTML files.
The created HTML templates were formed using the code below. This code used the JS program called Puppeteer in order to scrap an existing webpage. puppeteer.launch() opens a browser and puppeteer.newPage() opens a new webpage in the browser. Then page.goto("link") sends it to the required link. The setName and HSK variables iterate through all the JSON sets using the for loop. Each iteration of the for loop changes the variables passed into the URL and so on each iteration of the for loop the URL is called with different parameters and then loads different JSON data in. The code that says waitUntil: "networkidle2" makes the program wait before scraping the data. This wait time allows the webpage to be scraped only after the code has had enough time to load.
const puppeteer = require("puppeteer");
for (i = 1; i < 20; i++) {
  const setName = "1hsk";
  const HSK = "1hsk" + i;
  (async () => {
    const browser = await puppeteer.launch();
    const page = await browser.newPage();
    await page.goto(
      `https://allegheny-college-comp-fall-2024.github.io/
      rebekahrudd-multilayered-flashcards-study-tool/frontend
      _solid/mandarin/study.html?option=${HSK}`,
      { waitUntil: "networkidle2" },
  ); } ) }
Each for loop was iterated through a different amount of times in order to load all the data. The range for HSK 1 is from 1 to 21. The range for HSK 2 is from 1 to 41. The range from HSK 3 is from 1 to 45. Finally, the range from HSK 4 is from 1 to 72.
Next the html variable holds the content of the webpage. Then the information is written to the location that is specified in the fs.writeFileSync function. Then browse.close() closes the browser. This method writes all the files with the JSON code loaded into HTML format. Then the links of the different pages had to be corrected, because they linked to the folder that downloaded with them that contained the JS and CSS files. In addition, all the links were put in the HTML from a root directory, rather than from the same directory, all these links had to be adjusted. This made the set up for the experiement take longer.
const html = await page.content();
const fs = require("fs");
fs.writeFileSync(
  `frontend_solid/mandarin/study/${setName}/${HSK}.html`,
  html,
);
await browser.close();
Results
Performance (Table 1):
- Performance INP (ms)
- Performance LCP1 (s)
- Performance LCP2 Lighthouse (s)
- Performance CLS1
- Performance CLS2 Lighthouse
- Performance FCP (s)
- Performance TBT (ms)
- Performance SI (s)
Lighthouse Overall Scores (Table 2):
- Performance
- Accessibility
- Best Practices
- SEO
Color Coding Key: no info = green ^= orange *= red
Homepage:
- A. index.html
- B. sets.html (template w no set)
| INP | LCP1 | LCP2 | CLS1 | CLS2 | FCP | TBT | SI | |
|---|---|---|---|---|---|---|---|---|
| A | 8 | 0.06 | 1.6 | 0 | 0.084 | 1.6 | 0 | 1.6 |
| B | 16 | 0.08 | 1.6 | 0 | 0.014 | 1.6 | 0 | 1.6 |
| 1 | 2 | 3 | 4 | |
|---|---|---|---|---|
| A | 97 | 100 | 100 | 100 |
| B | 99 | 100 | 100 | 100 |
Mandarin General:
- C. mandarin/culture.html
- D. mandarin/language.html
- E. mandarin/sets.html
Mandarin: (1hsk5)
- F. mandarin/card_display.html
- G. mandarin/study.html
Mandarin: (4hsk10)
- H. mandarin/card_display.html
- I. mandarin/study.html
| INP | LCP1 | LCP2 | CLS1 | CLS2 | FCP | TBT | SI | |
|---|---|---|---|---|---|---|---|---|
| C | 16 | 0.12 | 1.6 | 0 | 0.181^ | 1.6 | 0 | 1.6 |
| D | 0 | 0.08 | 1.6 | 0 | 0.077 | 1.6 | 0 | 1.6 |
| E | 16 | 0.11 | 1.6 | 0 | 0.179^ | 1.6 | 0 | 1.6 |
| F | 8 | 0.13 | 1.6 | 0 | 0.093 | 1.6 | 0 | 1.6 |
| G | 0 | 0.15 | 1.6 | 0 | 0.091 | 1.6 | 0 | 1.6 |
| H | 8 | 0.12 | 1.6 | 0 | 0.078 | 1.6 | 0 | 1.6 |
| I | 0 | 0.13 | 1.6 | 0 | 0.091 | 1.6 | 0 | 1.6 |
| 1 | 2 | 3 | 4 | |
|---|---|---|---|---|
| C | 91 | 100 | 96 | 100 |
| D | 98 | 100 | 96 | 100 |
| E | 91 | 100 | 96 | 100 |
| F | 97 | 92 | 96 | 91 |
| G | 97 | 94 | 96 | 100 |
| H | 98 | 92 | 96 | 91 |
| I | 97 | 94 | 96 | 100 |
All the Mandarin sets and the general homepage layout both have great scores. The lowest Performance scores are 91 on both the culture.html page and the 1hsk5 card_display.html page. This accurately reflects the CLS on both these pages. The CLS score that Lighthouse returned were 0.181 and 0.179 respectively. These are both in the orange which is only one step above bad. However, this score is from a mostly text page and a card display page, which is quite different from Experiment A.
Alphabets General:
- J. alphabets/sets.html
Alphabets Greek:
- K. alphabets/card_display.html
- L. alphabets/study.html
Alphabets Hebrew:
- M. alphabets/card_display.html
- N. alphabets/study.html
Alphabets Arabic:
- O. alphabets/card_display.html
- P. alphabets/study.html
| INP | LCP1 | LCP2 | CLS1 | CLS2 | FCP | TBT | SI | |
|---|---|---|---|---|---|---|---|---|
| J | 8 | 0.11 | 1.7 | 0 | 0.066 | 1.6 | 0 | 1.6 |
| K | 16 | 0.12 | 0.9 | 0.02 | 0.007 | 0.8 | 0 | 0.8 |
| L | 16 | 0.16 | 0.9 | 0 | 0.007 | 0.8 | 0 | 0.8 |
| M | 0 | 0.16 | 1.1 | 0.02 | 0 | 0.9 | 0 | 0.9 |
| N | 0 | 0.11 | 0.9 | 0.02 | 0 | 0.8 | 0 | 0.8 |
| O | 8 | 0.10 | 0.9 | 0.02 | 0.007 | 0.9 | 0 | 0.9 |
| P | 0 | 0.14 | 0.9 | 0.02 | 0 | 0.9 | 0 | 0.9 |
| 1 | 2 | 3 | 4 | |
|---|---|---|---|---|
| J | 99 | 92 | 96 | 100 |
| K | 100 | 92 | 96 | 91 |
| L | 100 | 94 | 96 | 100 |
| M | 100 | 92 | 96 | 91 |
| N | 100 | 94 | 96 | 100 |
| O | 100 | 92 | 96 | 91 |
| P | 100 | 94 | 96 | 100 |
All the Alphabet results showed similar to the Mandarin sets, however, they are even better. The lowest Performance score is 99 or the set homepage. This is also because of a larger CLS value, like the Mandarin sets. Furthermore, there was only one score of 99 in Performance, while the rest were scores of 100. The category with the lowest Performance among these sets were Accessibility and Best Practices. Both these categories had scores of 92 and 94 in Accessibility and 96 in Best Practices. While, SEO had scores of either 91 or 100.
Chemistry General:
- Q. chemistry/sets.html
Chemistry Wiki:
- R. chemistry/card_display.html
- S. chemistry/study.html
Chemistry CSV:
- T. chemistry/card_display.html
- U. chemistry/study.html
Chemistry Both:
- V. chemistry/card_display.html
- W. chemistry/study.html
| INP | LCP1 | LCP2 | CLS1 | CLS2 | FCP | TBT | SI | |
|---|---|---|---|---|---|---|---|---|
| Q | 0 | 0.06 | 2.5 | 0 | 0.108^ | 2.5^ | 0 | 2.5 |
| R | 0 | 0.18 | 1.2 | 0.02 | 0 | 1.1 | 0 | 1.1 |
| S | 8 | 0.12 | 1.0 | 0.02 | 0.007 | 1.0 | 0 | 1.0 |
| T | 8 | 0.24 | 1.1 | 0 | 0 | 1.1 | 0 | 1.1 |
| U | 0 | 0.14 | 1.2 | 0.02 | 0 | 1.1 | 0 | 1.1 |
| V | 0 | 0.12 | 1.1 | 0 | 0 | 1.1 | 0 | 1.1 |
| W | 0 | 0.13 | 1.1 | 0 | 0.007 | 1.1 | 0 | 1.1 |
| 1 | 2 | 3 | 4 | |
|---|---|---|---|---|
| Q | 91 | 92 | 96 | 100 |
| R | 100 | 92 | 96 | 91 |
| S | 100 | 94 | 96 | 100 |
| T | 100 | 92 | 96 | 91 |
| U | 100 | 94 | 96 | 100 |
| V | 100 | 92 | 96 | 91 |
| W | 100 | 94 | 96 | 100 |
Similar to the Alphabet sets, the Chemistry’s set lowest score was in the general set homepage. The scores among Accessibility, Best Practices and SEO remained almost identical to the results for the Alphabet sets.
Animal General:
- X. animals/sets.html
Animal (Set 1):
- Y. animals/card_display.html
- Z. animals/study.html
Animal (Set 3):
- AA. animals/card_display.html
- AB. animals/study.html
| INP | LCP1 | LCP2 | CLS1 | CLS2 | FCP | TBT | SI | |
|---|---|---|---|---|---|---|---|---|
| X | 0 | 0.15 | 1.6 | 0 | 0.049 | 1.6 | 0 | 1.6 |
| Y | 0 | 0.13 | 0.9 | 0.02 | 0 | 0.9 | 0 | 0.9 |
| Z | 0 | 0.13 | 1.0 | 0 | 0 | 1.0 | 0 | 1.0 |
| AA | 0 | 0.08 | 0.9 | 0.02 | 0 | 0.9 | 0 | 0.9 |
| AB | 8 | 0.14 | 0.9 | 0.02 | 0.002 | 0.9 | 0 | 0.9 |
| 1 | 2 | 3 | 4 | |
|---|---|---|---|---|
| X | 99 | 87 | 96 | 100 |
| Y | 100 | 92 | 96 | 91 |
| Z | 100 | 94 | 96 | 100 |
| AA | 100 | 92 | 96 | 91 |
| AB | 100 | 94 | 96 | 100 |
The Animal sets has one of the lowest scores so far in Experiment B. This set also has the sets.html file as the lowest score. However, this is the first value across all the different Lighthouse scores that have dipped below 90 and the category is in Accessibility. The Roman Emperors set also has an Accessibility score that dips below 90 and it also occurs on the sets.html page.
American Presidents:
- AC. american_presidents/sets.html
- AD. american_presidents/card_display.html
- AE. american_presidents/study.html
| INP | LCP1 | LCP2 | CLS1 | CLS2 | FCP | TBT | SI | |
|---|---|---|---|---|---|---|---|---|
| AC | 16 | 0.13 | 1.6 | 0 | 0.04 | 1.6 | 0 | 1.6 |
| AD | 0 | 0.11 | 0.9 | 0.02 | 0 | 0.8 | 0 | 0.8 |
| AE | 0 | 0.11 | 1.1 | 0.02 | 0.072 | 0.9 | 0 | 0.9 |
| 1 | 2 | 3 | 4 | |
|---|---|---|---|---|
| AC | 99 | 92 | 96 | 100 |
| AD | 100 | 92 | 96 | 91 |
| AE | 99 | 94 | 96 | 100 |
Roman Emperors General:
- AF. roman_emperors/sets.html
Roman Emperors (Set 1):
- AG. roman_emperors/card_display.html
- AH. roman_emperors/study.html
Roman Emperors (Set 2):
- AI. roman_emperors/card_display.html
- AJ. roman_emperors/study.html
| INP | LCP1 | LCP2 | CLS1 | CLS2 | FCP | TBT | SI | |
|---|---|---|---|---|---|---|---|---|
| AF | 8 | 0.06 | 1.6 | 0 | 0.044 | 1.6 | 0 | 1.6 |
| AG | 0 | 0.14 | 0.9 | 0 | 0 | 0.9 | 0 | 0.9 |
| AH | 0 | 0.12 | 1.0 | 0.02 | 0.071 | 1.0 | 0 | 1.0 |
| AI | 0 | 0.12 | 0.9 | 0.02 | 0 | 0.8 | 0 | 0.8 |
| AJ | 0 | 0.13 | 0.9 | 0.02 | 0 | 0.9 | 0 | 0.9 |
| 1 | 2 | 3 | 4 | |
|---|---|---|---|---|
| AF | 99 | 87 | 96 | 100 |
| AG | 100 | 92 | 96 | 91 |
| AH | 99 | 94 | 96 | 100 |
| AI | 100 | 92 | 96 | 91 |
| AJ | 100 | 94 | 96 | 100 |
Overall, the scores across all the hard coded data sets performed much better and more consistently than the results from Experiment A. In Experiment B There were only two values that dipped below 90, and they were not in Performance as in Experiment A rather they were in the Accessibility categorie.
Evaluation
These results shows that the code is much more effective for a user perspective when it is already created in HTML files, rather than when it is loaded in from JSON files. This is the expected conclusion. One reason for these results is because when the data is loaded in it makes the TBT and CLS much greater, therefore lowering the Performance score. These values increase because the website is not just calling the data but rotating through all the data. As mentioned previously the for loops increase the loading time when the data inputted increases. This for loop iteration when used to create the flashcards in HTML greatly increases the TBT and CLS therefore lowering the Performance score. This means that the user has to wait longer before being able to use the webpage.
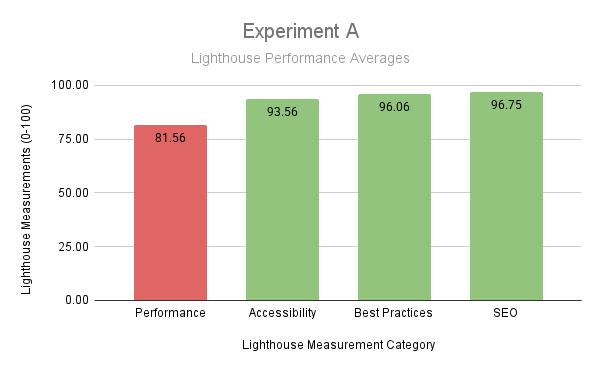
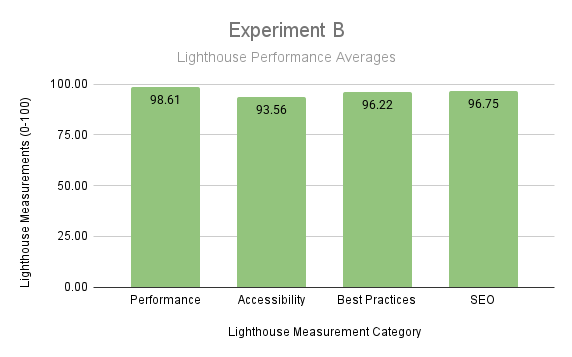
The expectation is that files with low amounts of information, and with information that is mostly textual should have good performance, white pages that have greater amounts of information should have a lower Performance score. The scores for Accessibility, Best Practices, and SEO should remain close to 100 across all pages in both experiments, which the results show clearly is true.
Threats to Validity
Threats to validity consider any tools used in the making of MulityLayered Flashcards that were relied upon outside of the application itself, specifically while testing. One tool used to test this application was Lighthouse. Lighthouse uses its own code and software to test MulityLayered Flashcards. Lighthouse has its own metrics for calculating each of the different areas where results were recorded which were Performance, Accessibility, Best Practices and Search Engine Optimization (SEO). While there were different metrics used to calculate each, different weights were given to each of the different metrics within the calculations for each of the scores. These weights might not accurately reflect the appropriate importance that measure has in any of the given areas Lighthouse is testing. Beyond Lighthouse, Inspect’s version of Performance was also considered, however, this performance tracker does not have the same concerns as Lighthouse. This is because the Inspect Performance tracker does not given and overall Performance score it simply gives numbers for the three results of INP, LCP and CLS. Though the doubt that these values were calculated correctly could be another threat to validity that is the same as Lighthouse.
Conclusion
This project shows the development of a website called MultiLayered Flashcards. This web application allows a user to have more control over their flashcard study sessions. Rather then just having one element to study on the front of back of a card or having to hard code two ideas on the back and only one on the front. MulityLayered Flashcards allows the user to change which pieces of information the user wants group on the front and which pieces of information the user wants grouped on the back of their flashcard.
MulityLayered Flashcards can be applied to virtually any area of study in which the user wants more depth and increased memory skill. This tool is for self motivated learners, it is a simple program to test one’s knowledge without gamification. The sets available on this tool right now relate to the areas of general language learning, language alphabets, science, and history. However, this tool and be applied to many areas beyond these select few implementations.
There were two versions of MulityLayered Flashcards that were tested during experiments. Experiment A loaded in the flashcard data from JSON files. While Experiment B had hard coded versions of all the HTML files. Experiment B’s performance was greatly improved compared with Experiment A. Other areas of testing like Accessibility, Best Practices and Search Engine Optimization (SEO) sustained virtually no changes between the two experiments.
Summary of Results
Both Experiment A and Experiment B’s versions of the website show a large trade off in the field of Computer Science. This tradeoff is the balance between fast user functionality and more work for the programmer versus an easier time programming and slower and clunkier systems from a user’s perspective. This of course narrows the problem greatly, however it is not that simple. The way this relationship plays out here is more simple, though the choice of which option to choose and why is often much more complicated. Experiment A gives an example where the user experience is a bit slower while loading and elements visible to the users jump large distances on the page. This is in contrast to Experiment B where the the web pages loads much more quickly but there is much more back end preparation work.
Benefits of Experiment A is that it allows the programmer to work with much larger amounts of code. For example, this project had 20 HSK Level 1 JSON files. This is in contrast to Experiment B where it was necessary to make 20 HTML files for the card_display page and the study page respectively. This is double the amount of files. In addition, after each HTML file was scraped in order for all the links on each HTML page to work, they had to be adjusted manually. This is because the links on all the HTML pages once scraped lead to the root directory of the project, so then none of the links worked once the webpage was originally scraped. In addition, as mentioned previously the JSON data is reusable because the same JSON file is used in both card_display and study files. This shows a benefit of working with JSON from the developer perspective.
card_display and study files could have been combined into one file. However the development choice was made to split these two files up so that when the user would hit the back arrow they would not go all the way back to the sets.html page, rather from a study session they would simply return to the card_display.html. One drawback of this choice is that the flashcard data has to be loaded into both HTML files. Though this decision makes the process smoother for the user, there is a draw back on both the speed on the developer side.
The benefit of having hard coded HTML files is that it increases user experience. The user’s webpage is much less jumpy and loads much more quickly. This tool is for the user’s use, so this benefit is large. However in order to make more useful and relevant websites for the user code must also be tested and simplified so that it can become better. This shows why it is important to keep both Experiment A and B’s versions of the website. However one only has been shipped to production and that is the website from Experiment A. Experiment A’s website is used for testing and furthering the ability of the code, because loading the data in is better for code testing and development. In addition, it makes the HTML pages much more reusable, which is the goal of future work when adding user accounts. The HTML code will have to be reusable and flexible when testing different functionality. While the benefit of a smooth user experience is also highly valuable.
Future Works
There are many different ways that MulityLayered Flashcards can be improved going forward. Different aspects MulityLayered Flashcards can be improved in are working on improving the different Lighthouse metrics, further code development, and code testing.
One improvement that can be made in Lighthouse scores has to do with improving render-blocking, which lowered some of the Lighthouse scores. This is one sugguestion that came up again and again as an improvement for different webpages. Render-blocking has to do with code that is loaded with the webpage but is not actually used anywhere in that specific loaded page. For example, there is a lot of code in the style.css file that falls under this category. Some of the code is pertinent and loaded on every single web page, especially the classes. However, much of the code is only applicable to one of the webpages. Dividing up this code would be a further way of hard coding the different webpages. It would also have the same trade off as above. The user experience might be faster but the reusability of the HTML pages would decrease. One update that could be made to all these webpages is moving any design element that is only used on one specific HTML page to the page where it is referenced. Another element that could be updated is how Google Fonts is used. Google Fonts also caused large render-blocking numbers. The goal is to eliminate this loading of code that is never used or accessed [6]. To see what elements are loaded and not used it must be accessed under the Sources tab of Inspect, and it can be seen under Coverage. The developer then has to reload the page before see the “Usage Visual” that indicates how much extraneous code there is. The Source tab of Inspect also allows the developer to see where exactly the code is in their files.
One idea for future works that will further code development is creating user accounts. As seen previously, all the other flashcard applications have user accounts associated with them. The goal of this future addition is that a user would be able to track progress and to create their own study sets. Information that will be saved beyond their username and password is information like the study scores, the date of the last time they studied, and other information that is similar. A few different tools that could make this a reality are MySQL as the backend and PHP in order to connect the front and the backend. However, there are many other tools as well.
In addition, when a user has an account Each flashcard and element in the flashcard will have a border color to show the user’s progress. Users will also be able to create their own sets and add different layers that they would like to focus on. If a card does not have a definition or term in one layer of the flashcard it will just display “None” for that section when the flashcards are loaded onto the screen. A user should also be able to edit and change and add layers or remove layers from existing flashcards.
Future work for Manarin specifically could be to add stroke order files to each character. In order to do this stroke order data could be taken from existing GitHub projects called animCJK [37]. The fields from this AnimCJK would need to be iterated through so that the HSK sets could match the character to the file path and then write the file path to the dictionary in JSON and then the flashcard would load the file path in from there.
The JSON code has already been set up for some future work. All the JSON files for all the different data contain information beyond the Array key and the first value in the list. There are also three other values in the list. The other information stored in each layer of the flashcard is a 0 which is a spot to add scores and the time last studied and a list of the all the times the user has studied any particular card layer. This information would be stored and updated based on the user’s scores and amount of time that they spend learning. The tool will track their progress and give them calendars to show how often they have studied. There are many other aspects of this tool that can be improved especially after user score tracking and user accounts are implemented.
Future Ethical Implications and Recommendations
Other import considerations for future work consider how this tool cool be used in wrong and malicious ways. One aspect of this tool that prevents against misuse is the amount of self motivation this tool takes to user and the general user audience this tool will attract. Users using this tool will be here to learn, seeing as there is really no other purpose to this tool.
If user accounts get added one way this tool could get misused is storing too much user information and for the wrong reasons. The user’s account and security information should be protected and not used for any purposes that that user is unaware of and has not consented for.
One large misuse of this tool could be storing and learning incorrect information. However, the onerous for this kind of misuse is the user’s responsibility. Though, of course built in web pages are the developer’s responsibility. Which is why the developer should strive to make sure all the information and study sets provided work well and are accurate.